Filename [MV5S_12RemoSys.fm]


MV5S_00.book Page 77 Wednesday, August 31, 2005 4:55 PM

Masterpage:Right+


SYSTEM CONNECTIONS EN 77

Connecting To A Dolby Digital Decoder

When you can’t switch the audio channel of a bilingual

programme

Or An Amplifier With Built-in DTS

When the unit is connected with a digital audio device using an

optional coaxial cable and “DIGITAL AUDIO OUT” is set to


“DOLBY DIGITAL/PCM”, it is not possible to switch the audio

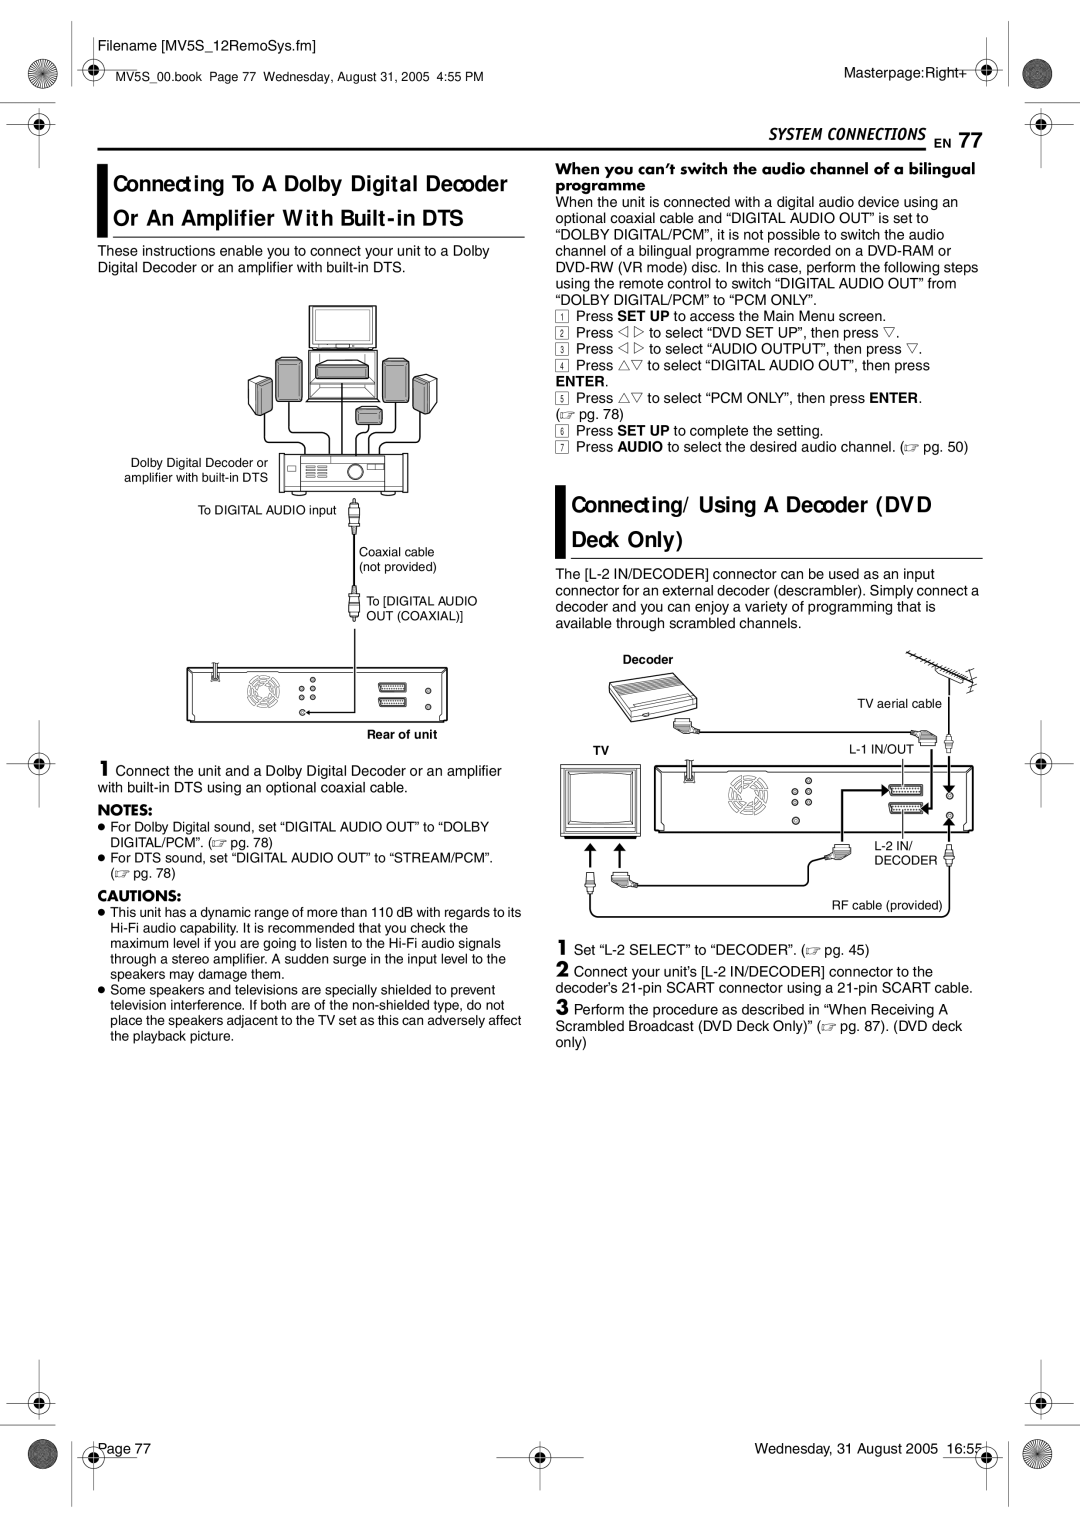
These instructions enable you to connect your unit to a Dolby

channel of a bilingual programme recorded on a DVD-RAM or

Digital Decoder or an amplifier with built-in DTS.

DVD-RW (VR mode) disc. In this case, perform the following steps


using the remote control to switch “DIGITAL AUDIO OUT” from


“DOLBY DIGITAL/PCM” to “PCM ONLY”.


A Press SET UP to access the Main Menu screen.


B Press w e to select “DVD SET UP”, then press t.


C Press w e to select “AUDIO OUTPUT”, then press t.


D Press rt to select “DIGITAL AUDIO OUT”, then press


ENTER.


E Press rt to select “PCM ONLY”, then press ENTER.


( pg. 78)


F Press SET UP to complete the setting.


G Press AUDIO to select the desired audio channel. ( pg. 50)

Dolby Digital Decoder or amplifier with built-in DTS

To DIGITAL AUDIO input

Coaxial cable (not provided)

To [DIGITAL AUDIO

OUT (COAXIAL)]

Connecting/Using A Decoder (DVD Deck Only)

The [L-2 IN/DECODER] connector can be used as an input connector for an external decoder (descrambler). Simply connect a decoder and you can enjoy a variety of programming that is available through scrambled channels.

Decoder

Rear of unit

1 Connect the unit and a Dolby Digital Decoder or an amplifier with built-in DTS using an optional coaxial cable.

NOTES:

For Dolby Digital sound, set “DIGITAL AUDIO OUT” to “DOLBY DIGITAL/PCM”. ( pg. 78)

For DTS sound, set “DIGITAL AUDIO OUT” to “STREAM/PCM”. ( pg. 78)

CAUTIONS:

This unit has a dynamic range of more than 110 dB with regards to its Hi-Fi audio capability. It is recommended that you check the maximum level if you are going to listen to the Hi-Fi audio signals through a stereo amplifier. A sudden surge in the input level to the speakers may damage them.

Some speakers and televisions are specially shielded to prevent television interference. If both are of the non-shielded type, do not place the speakers adjacent to the TV set as this can adversely affect the playback picture.


TV aerial cable

TV

L-1 IN/OUT


L-2 IN/


DECODER


RF cable (provided)

1Set “L-2 SELECT” to “DECODER”. ( pg. 45)

2Connect your unit’s [L-2 IN/DECODER] connector to the decoder’s 21-pin SCART connector using a 21-pin SCART cable.

3Perform the procedure as described in “When Receiving A Scrambled Broadcast (DVD Deck Only)” ( pg. 87). (DVD deck only)

Page 77

Wednesday, 31 August 2005 16:55

Page 77
Image 77
JVC DR-MV5BE Connecting/Using a Decoder DVD Deck Only, When you can’t switch the audio channel of a bilingual, Programme

DR-MV5BE specifications

The JVC DR-MV5BE is a versatile and feature-rich DVD recorder and VCR combo that caters to the needs of users looking to digitize their home video collection while enjoying the convenience of a dual-format device. This innovative unit combines both DVD recording and VHS playback capabilities, making it a valuable addition to any home entertainment setup.

At the core of the JVC DR-MV5BE’s functionality is its ability to record directly onto DVD discs, offering several formats including DVD-R, DVD-RW, and DVD+R. This flexibility allows users to choose the best format suited for their recording needs, whether they prioritize compatibility with other devices or rewritable options. The device also supports various recording modes, from high-quality SP mode to extended recording modes like LP and EP, granting users control over recording time and quality.

The integrated VHS player adds to the DR-MV5BE’s appeal, allowing users to play their existing VHS tapes seamlessly. This feature is perfect for those looking to preserve old home movies, as the unit can convert VHS content to DVD format through a simple dubbing process. Additionally, the DR-MV5BE features front and rear audio/video inputs, enabling users to easily connect camcorders, gaming consoles, or other external devices for recording or playback.

In terms of connectivity, the JVC DR-MV5BE is equipped with various options. The HDMI output ensures high-definition video playback, while the standard composite outputs allow compatibility with older televisions. The presence of a USB port provides further versatility, allowing users to record or transfer content to and from USB storage devices.

The unit also boasts a user-friendly interface and remote control, simplifying the recording and playback process. With built-in features such as a programmable timer, users can schedule recordings in advance, ensuring they never miss their favorite shows or events.

Overall, the JVC DR-MV5BE is a robust device that encapsulates modern recording technology while retaining the nostalgia of VHS. Its blend of functions, alongside its user-friendly design and versatility, makes it a standout option for anyone looking to bridge the gap between analog and digital media.