External Control

7About the external control

This monitor has three external control terminals.

MAKE/TRIGGER terminal (RJ-45): The following external control systems are available.

(1)MAKE (make contact) system: Controls the monitor by short-circuiting the corresponding pin terminal to the GND pin terminal, or disconnecting (opening) it.

(2)TRIGGER (trigger) system: Controls the monitor by sending the pulse signal instantaneously to the corresponding pin terminal.

“Using the MAKE/TRIGGER system” on the right

RS-485 terminals (RJ-45): Controls the monitor with the RS-485 system (“Using the serial communication” on page 22).

RS-232C terminal (D-sub 9-pin): Controls the monitor with the RS-232C system (“Using the serial communication” on page 22).

Set the following items of “REMOTE SETTING” in SET-UP MENU according to the external control terminal and control system (“SERIAL TYPE,” “PARALLEL TYPE” on page 18).


The settings of this unit

Control terminal

Control system

“SERIAL TYPE” setting

“PARALLEL TYPE”


setting


MAKE/TRIGGER

MAKE


MAKE

terminal


TRIGGER


TRIGGER


RS-485 terminal

Serial

RS-485

RS485*1

RS-232C terminal

communication

RS-232C

RS232C*1

*1 For a monitor connected to a personal computer etc, select the terminal the equipment is actually connected to. For other monitors, select “RS485.”

Control priority is as follows.

MAKE > TRIGGER = serial communication = buttons and menu on the monitor

You can use external control even when “CONTROL LOCK” is set to “VOL.LOCK” or “ALL LOCK” (page 19).

When the monitor is off (on standby), external control is not available. But certain external controls (starting/ terminating communication, turning on the monitor) are available through the serial communication (page 23).

<MAKE/TRIGGER system>

You can control the monitor by a personal computer or dedicated controller*2.

• “Using the MAKE/TRIGGER system” on the right.

*2 The controller is not commercially available. Consult your dealer if you need it.

<Serial communication>

20

7Using the MAKE/TRIGGER system

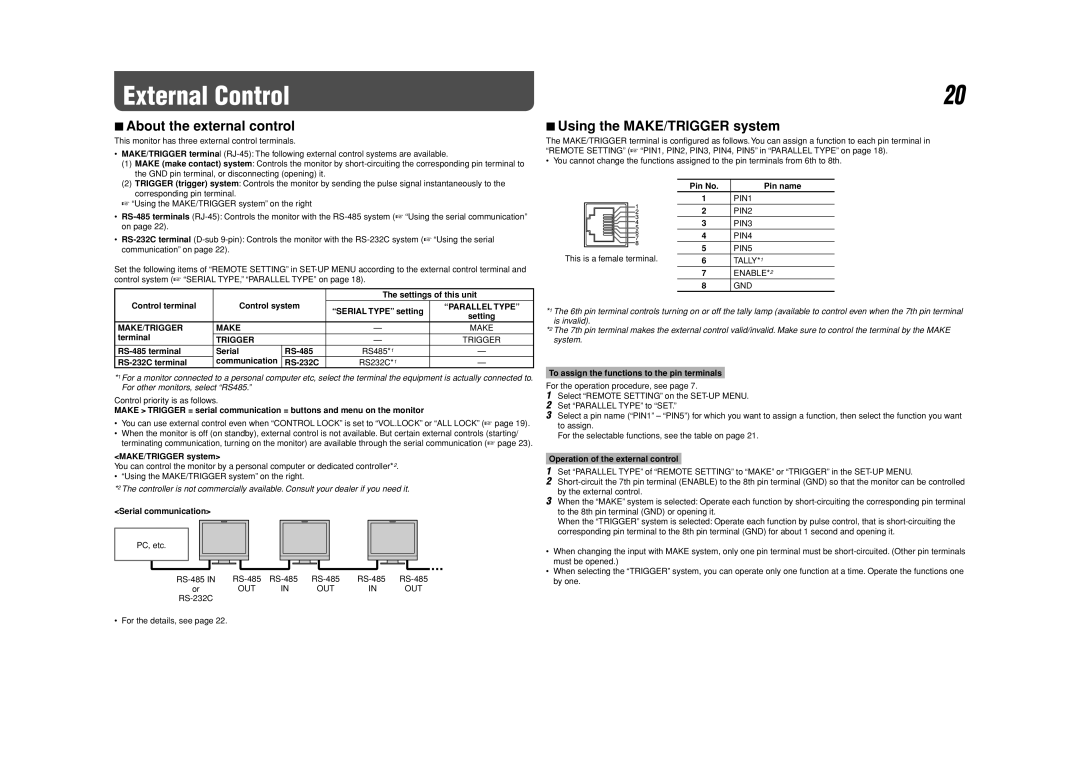
The MAKE/TRIGGER terminal is configured as follows. You can assign a function to each pin terminal in “REMOTE SETTING” (“PIN1, PIN2, PIN3, PIN4, PIN5” in “PARALLEL TYPE” on page 18).

• You cannot change the functions assigned to the pin terminals from 6th to 8th.


Pin No.

Pin name


1

PIN1


2

PIN2


3

PIN3


4

PIN4


5

PIN5

This is a female terminal.

6

TALLY*1


7

ENABLE*2


8

GND

*1 The 6th pin terminal controls turning on or off the tally lamp (available to control even when the 7th pin terminal is invalid).

*2 The 7th pin terminal makes the external control valid/invalid. Make sure to control the terminal by the MAKE system.

To assign the functions to the pin terminals

For the operation procedure, see page 7.

1Select “REMOTE SETTING” on the SET-UP MENU.

2Set “PARALLEL TYPE” to “SET.”

3Select a pin name (“PIN1” – “PIN5”) for which you want to assign a function, then select the function you want to assign.

For the selectable functions, see the table on page 21.

Operation of the external control

1Set “PARALLEL TYPE” of “REMOTE SETTING” to “MAKE” or “TRIGGER” in the SET-UP MENU.

2Short-circuit the 7th pin terminal (ENABLE) to the 8th pin terminal (GND) so that the monitor can be controlled by the external control.

3When the “MAKE” system is selected: Operate each function by short-circuiting the corresponding pin terminal to the 8th pin terminal (GND) or opening it.

When the “TRIGGER” system is selected: Operate each function by pulse control, that is short-circuiting the corresponding pin terminal to the 8th pin terminal (GND) for about 1 second and opening it.

PC, etc.

RS-485 IN

or

RS-232C

• For the details, see page 22.

RS-485 RS-485

RS-485

RS-485

RS-485

OUT

IN

OUT

IN

OUT

When changing the input with MAKE system, only one pin terminal must be short-circuited. (Other pin terminals must be opened.)

When selecting the “TRIGGER” system, you can operate only one function at a time. Operate the functions one by one.

Page 20
Image 20
JVC 0110SKH-MW-MT, DT-V24G1, DT-V20L3G External Control, About the external control, Using the MAKE/TRIGGER system

DT-V20L3G, 0110SKH-MW-MT, DT-V24G1 specifications

The JVC DT-V24G1 is a versatile 24-inch broadcast monitor designed for high-end professional applications. This monitor stands out with its full HD resolution of 1920 x 1200 pixels, ensuring that content is displayed with exceptional clarity and detail. Its advanced 10-bit IPS panel provides wide viewing angles, allowing multiple viewers to see the same high-quality image without color distortion. The DT-V24G1 supports various input formats, including SDI, HDMI, and composite, making it compatible with a wide range of video sources.

Another significant feature is the integrated waveform and vectorscope, which assist in professional monitoring and ensure accurate color grading and signal integrity. The DT-V24G1 is also equipped with built-in audio level meters, providing straightforward audio monitoring during production processes. Its flexible mount options add to its utility, allowing for easy integration into any studio setup or mobile broadcast unit.

The JVC DT-V20L3G is another noteworthy model, offering a 20-inch LCD display that delivers stunning picture quality with a native resolution of 1920 x 1080 pixels. This model is particularly suited for applications where space is at a premium, without sacrificing performance. It includes advanced color management tools, which allow for precise control over color reproduction, making it ideal for critical color work in post-production environments.

The DT-V20L3G features multiple input options, including HDMI, SDI, and DisplayPort, ensuring versatility and flexibility across various media types. It also has a compact and lightweight design, facilitating ease of transport for location shoots and smaller studio setups. The monitor’s built-in calibration tools allow users to maintain accurate color settings, ensuring reliability in every viewing condition.

Together, these monitors represent JVC's commitment to providing high-performance, reliable solutions for broadcast professionals. With advanced features, robust technologies, and a focus on user-friendly design, the JVC DT-V24G1 and DT-V20L3G are perfect for those looking to elevate their production quality. Whether in a studio, on location, or during post-production, these monitors stand out as essential tools for any broadcasting setup.