Installation

CAUTION

Do not rest your arm on the monitor or lean against the monitor.

Do not touch the LCD panel when installing the monitor.

Be sure to install the monitor securely to prevent the monitor from falling over, which may cause damage to the monitor or injury.

You can place the monitor in the following two ways when using it on the supplied stand.

4

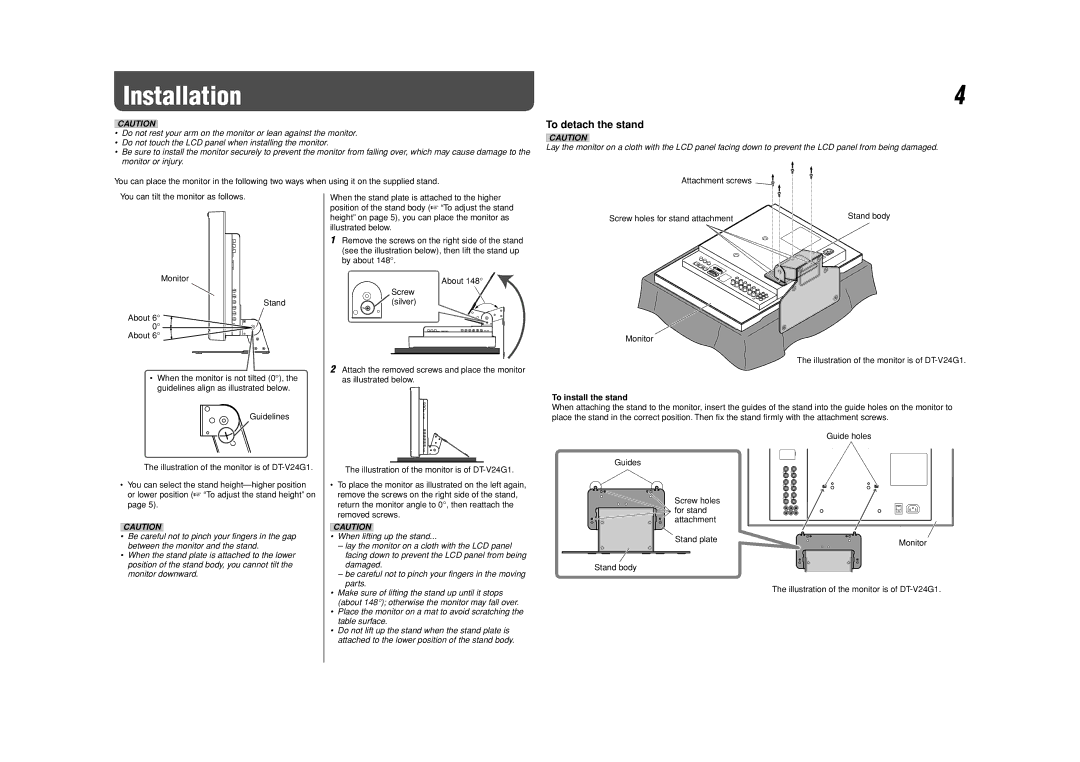
To detach the stand

CAUTION

Lay the monitor on a cloth with the LCD panel facing down to prevent the LCD panel from being damaged.

Attachment screws

You can tilt the monitor as follows.

Monitor

Stand

About 6°

About 6°

When the monitor is not tilted (0°), the guidelines align as illustrated below.

Guidelines

The illustration of the monitor is of DT-V24G1.

You can select the stand height—higher position or lower position (“To adjust the stand height” on page 5).

CAUTION

Be careful not to pinch your fingers in the gap between the monitor and the stand.

When the stand plate is attached to the lower position of the stand body, you cannot tilt the monitor downward.

When the stand plate is attached to the higher position of the stand body (“To adjust the stand height” on page 5), you can place the monitor as illustrated below.

1Remove the screws on the right side of the stand (see the illustration below), then lift the stand up by about 148°.

About 148°

Screw (silver)

2Attach the removed screws and place the monitor as illustrated below.

The illustration of the monitor is of DT-V24G1.

To place the monitor as illustrated on the left again, remove the screws on the right side of the stand, return the monitor angle to 0°, then reattach the removed screws.

CAUTION

When lifting up the stand...

lay the monitor on a cloth with the LCD panel facing down to prevent the LCD panel from being damaged.

be careful not to pinch your fingers in the moving parts.

Make sure of lifting the stand up until it stops (about 148°); otherwise the monitor may fall over.

Place the monitor on a mat to avoid scratching the table surface.

Do not lift up the stand when the stand plate is attached to the lower position of the stand body.

Screw holes for stand attachment

Stand body


Monitor

The illustration of the monitor is of DT-V24G1.

To install the stand

When attaching the stand to the monitor, insert the guides of the stand into the guide holes on the monitor to place the stand in the correct position. Then fix the stand firmly with the attachment screws.


Guide holes

Guides


Screw holes


for stand


attachment


Stand plate

Monitor


Stand body


The illustration of the monitor is of DT-V24G1.

Page 4
Image 4
JVC DT-V20L3G, DT-V24G1, 0110SKH-MW-MT specifications Installation, To detach the stand, To install the stand

DT-V20L3G, 0110SKH-MW-MT, DT-V24G1 specifications

The JVC DT-V24G1 is a versatile 24-inch broadcast monitor designed for high-end professional applications. This monitor stands out with its full HD resolution of 1920 x 1200 pixels, ensuring that content is displayed with exceptional clarity and detail. Its advanced 10-bit IPS panel provides wide viewing angles, allowing multiple viewers to see the same high-quality image without color distortion. The DT-V24G1 supports various input formats, including SDI, HDMI, and composite, making it compatible with a wide range of video sources.

Another significant feature is the integrated waveform and vectorscope, which assist in professional monitoring and ensure accurate color grading and signal integrity. The DT-V24G1 is also equipped with built-in audio level meters, providing straightforward audio monitoring during production processes. Its flexible mount options add to its utility, allowing for easy integration into any studio setup or mobile broadcast unit.

The JVC DT-V20L3G is another noteworthy model, offering a 20-inch LCD display that delivers stunning picture quality with a native resolution of 1920 x 1080 pixels. This model is particularly suited for applications where space is at a premium, without sacrificing performance. It includes advanced color management tools, which allow for precise control over color reproduction, making it ideal for critical color work in post-production environments.

The DT-V20L3G features multiple input options, including HDMI, SDI, and DisplayPort, ensuring versatility and flexibility across various media types. It also has a compact and lightweight design, facilitating ease of transport for location shoots and smaller studio setups. The monitor’s built-in calibration tools allow users to maintain accurate color settings, ensuring reliability in every viewing condition.

Together, these monitors represent JVC's commitment to providing high-performance, reliable solutions for broadcast professionals. With advanced features, robust technologies, and a focus on user-friendly design, the JVC DT-V24G1 and DT-V20L3G are perfect for those looking to elevate their production quality. Whether in a studio, on location, or during post-production, these monitors stand out as essential tools for any broadcasting setup.