For Customer Use
GC-QX3
It is recommended that you
Dear Customer
Power Lines
Power Sources
Power Cord Protection
Grounding or Polarization
Damage Requiring Service
Accessories
Cleaning
Replacement Parts
Quick Start
Connect the Camera to a Power Outlet. pg
Insert the Memory card. pg
Play back a Picture. pg
Shoot a Picture. pg
6M Pro-Still Pixel Shift Mode pg
Major Features EN
DR Pro-Still Wide Range Mode pg
Before taking important photos
Contents
Memory card 3.3V type Hand strap
Subsidiary Settings
Front View Top View
10 EN
Self timer button
Self timer lamp
Mode switch
Flash
12 EN
CONTROLS, Connectors and Indicators
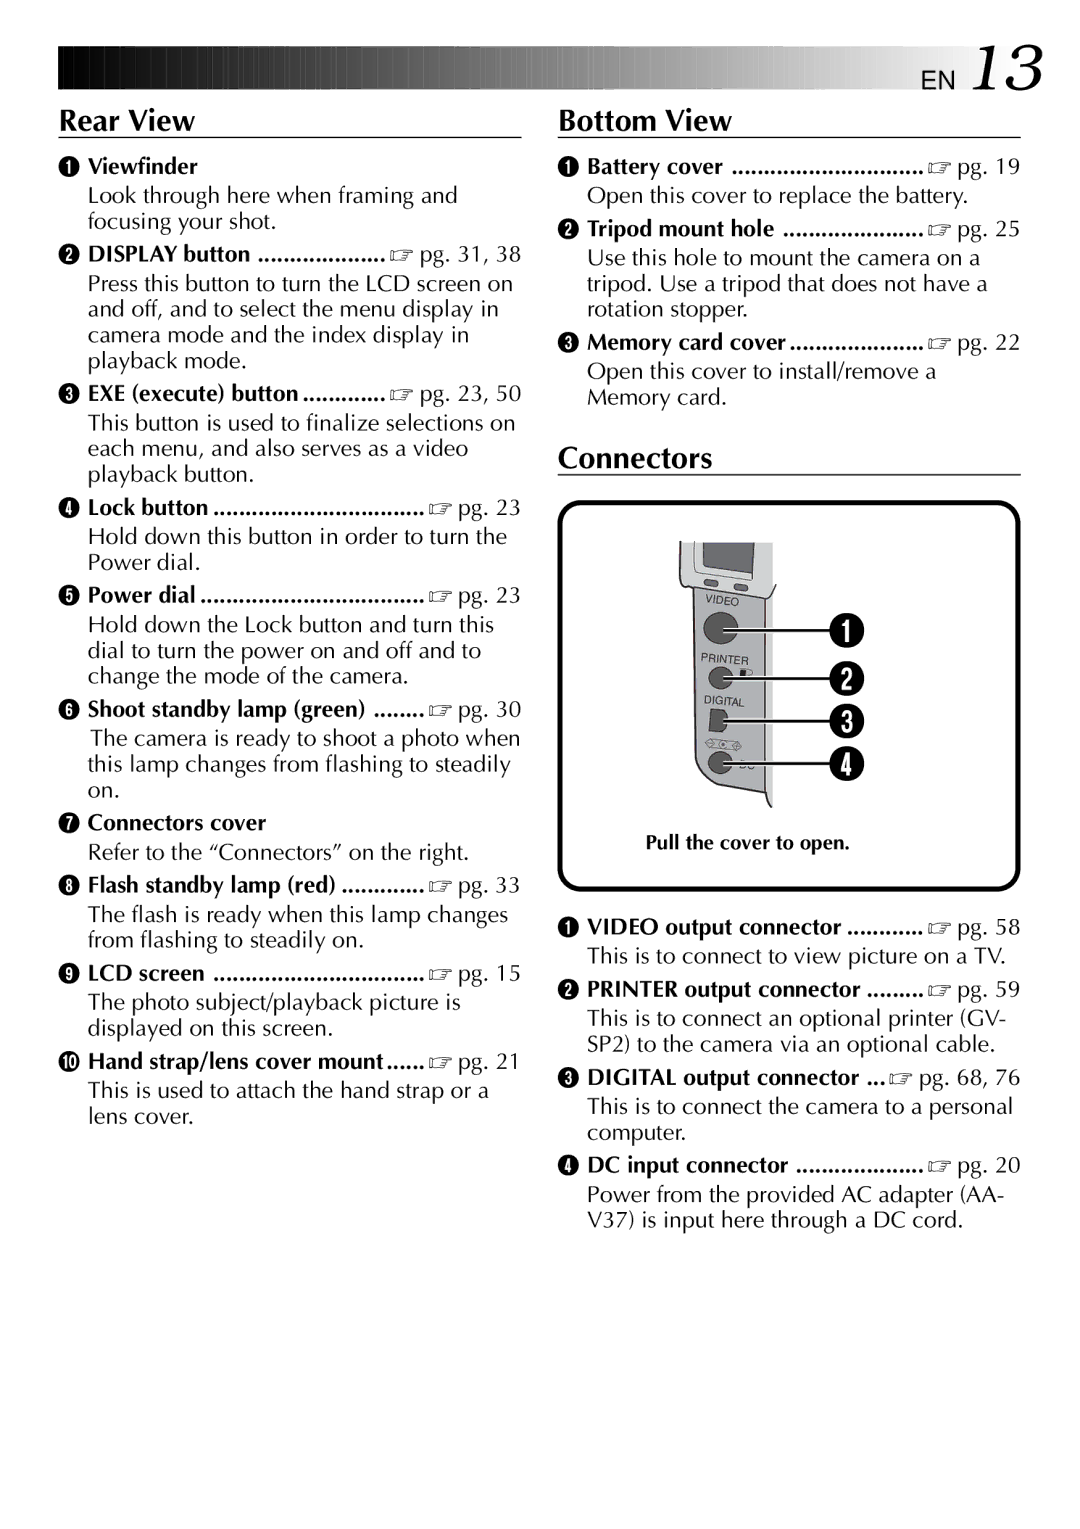
Rear View Bottom View
Connectors cover
Power dial
Battery cover
Video output connector ............ pg
Mode display
Indicator of initial settings having been changed
Remaining battery power indicator
14 EN
Macro mode indicator
Flash indicator
Timer mode indicator
Picture size indicator
16 EN
Turn the Power dial to SET to display the SET UP screen
Menu Screens
To turn off the menu screen, press the DSP button
No displays
Playback Menu Screens
Install the battery
Charging the Battery
18 EN
Pictures
Removing the Battery
Installing a Charged Battery
Connect the power cord to a power outlet
Connecting the Camera to a Power Outlet
20 EN
Getting Started
Attaching the Lens Cover
Attaching the Hand strap
Pass one end of the hand strap through the mounting hole
Inserting the Memory Card
22 EN
Removing the Memory Card
Contact surface
EXE button Lock button Button
Formatting a Memory Card
Press the r t button to select Format
Press the r t button to select YES
Viewfinder
24 EN
Normal Shooting
Macro Shooting
Good Photography Posture
Using a Tripod
Mounting the Camera on a Tripod
26 EN
Selecting the Shooting Mode
Basic Operation
Zoom lever
Zoom Shooting
You can shoot a wider angle
You can shoot a distant subject in closeup
28 EN
Turn the Power dial to SET
Selecting the Picture Size
16MB
Selecting the Picture Quality
Turn the Power dial to a or M for shooting
Press the r t button to select Quality
Operations
30 EN
Lock button Shutter button Power dial
Full Auto Shooting
Press the Shutter button all the way to take the picture
Normal Playback
Playing Back Still Pictures
Auto Playback
Press the w e button again to stop Auto Playback
Self timer button Shutter button
Self Timer
Through the following settings
32 EN
Press the Flash button and select the flash mode
Setting, since the shutter speed is slower
Flash Shooting
Flash. The flash is forced to light
Manual Focus
34 EN
→ Program
Iris Setting
Manual Shooting
36 EN
Macro Shooting
2EV
Exposure Control
+2EV
38 EN
White Balance Adjustment
Press the DSP button to turn off the menu screen
To redo the setting, simply hold down the EXE button again
Manual White Balance Adjustment
White paper should fill the screen
40 EN
Sensitivity Setting
Press the r t button to select Sens
Changing the Zoom Power While Shooting
42 EN
With this mode you can shoot 2 continuous photos
Shooting Continuous Photos
If the flash is set, it will only flash for the first photo
Changing the AE/AF Area
Turn the Power dial to M
Restoring the Default Settings
Select Manual with the Mode switch
Camera settings return to the default settings
Background Subject
Collage Mode
Frame size is automatically selected for the background
You can also use the zoom function
46 EN
6M Pro-Still Pixel Shift Mode
Hold the Lock button down while turning
6M PRO S appears on the LCD panel
DR PRO S appears on the LCD panel
DR Pro-Still Wide Range Mode
48 EN
NR Pro-Still Noise Reduction Mode
NR PRO S appears on the LCD panel
Press the Shutter button all the way to shoot the video
Video Shooting
50 EN
Select Video PB with the Mode switch
Video Playback
Brightness Adjustment of LCD Screen
Display Mode during Playback
52 EN
Turn the Power dial to A, M or V for shooting
Playback
Protecting Pictures
Deleting Pictures
Deletion indicator appears
To delete a selected picture
54 EN
Select Edit with the Mode switch
Adding Special Effects
Edit screen appears
Nega Gives a picture a negative film effect
Press the w e button to select OFF, B/W, SEPIA, or Nega
NOW Editing appears, then File screen will appear
Date screen appears
Inputting the Date
← left Select the up side of the picture
− up → right ← left ↓ down
Calendar screen appears
Inputting the Calendar
58 EN
Connecting the Camera to a TV
You can view the photographed still pictures on TV
Digital Still Camera
Digital Still Camera Power cord DC cord
Power outlet Power lamp
Print
Printer GV-SP2
60 EN
Power dial To select a picture, press the DSP button
Printing a Picture
To select a picture, and then press the DSP
File screen will appear
Print SET UP screen appears
Maximum number of copies are
Turn the Power dial to B Press the r t button to select one
Printing by Dpof Setting
Select Dpof with the Mode switch
Dpof Print screen appears
Dpof file is saved on the Memory card
Press the r t button to select an item
Changing Settings in the SET UP Menu
Contents
SET UP Menu
2032 x 1536 Qxga class
1024 x 768 XGA 640 x 480 VGA
Setting the Date and Time
Subsidiary Settings
SET UP screen returns
66 EN
Software Section
Software Section for Windows
68 EN
Operating Environment
USB Connection
Select USB Mode with the Mode switch
Installing the USB Driver
Preparation
Click the Next button Click the Finish button
70 EN
Installing the Video Player
Load the provided CD-ROM to the CD-ROM drive
Vplay folder opens
Sending a video by e-mail
Sending Image File to Computer
72 EN
Volume
Basic Playback
Play button
Easy Playback
When the playback finishes, click the Exit button
Double clicking on the icon of a video file
Playback starts automatically
74 EN
Uninstalling the Software
Click the Start button
JVC Video Decoder
Mac OS 8.5.1/Mac OS 8.6/Mac OS
Macintosh
Software Section for Macintosh
76 EN
Installing the JVC Video Decoder
Untitled icon appears on the desktop of the computer
78 EN
With Macintosh
Click the 4 button
EN Software Section for Macintosh
Playback of the video starts
System Folder opens
Double click the System Folder icon
Double click the Extensions folder icon
Extensions folder opens
Power turned off while
Power does not come on
Cannot shoot photos
Cannot see the picture on
LCD screen is splotchy
Number more than
Cannot format a Memory card
Error Messages for the camera
Trouble Shooting
Messages Contents
84 EN
Error Messages for the printer
86 EN
AC Power Adapter/Charger AA-V37
Using a Tripod Video Playback Video Shooting
Camera Setting Menu Screen
White Balance Ajustment Wide Range Mode Zoom Shooting
88 EN
Shock
When using the AC Power Adapter in areas other
To avoid malfunction
Than the USA
Avoid using the unit
For safety, do not
To prolong service life
Do not leave the unit
Serious malfunctioning
About moisture condensation
EN for Servicing Only in U.S.A
HOW to Locate Your JVC Service Center
Limited Warranty
Warranty Only in U.S.A. EN
Memo
Memo
GC-QX3