Troubleshooting

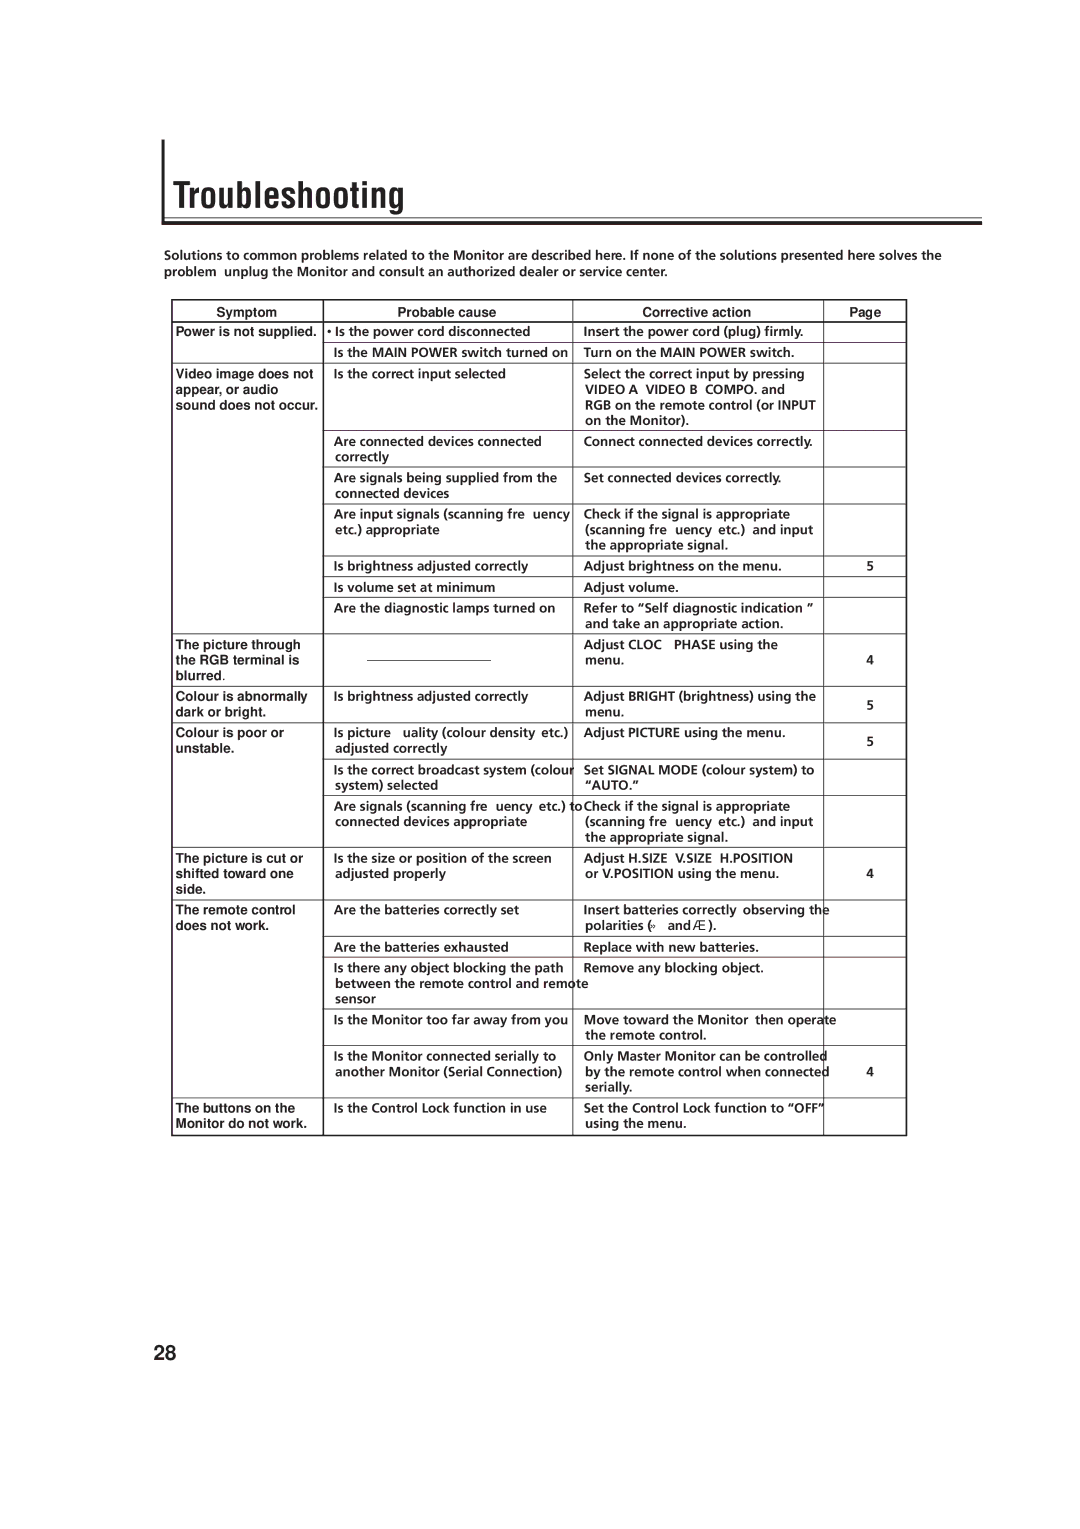
Solutions to common problems related to the Monitor are described here. If none of the solutions presented here solves the problem, unplug the Monitor and consult an authorized dealer or service center.

Symptom


Probable cause

Corrective action

Page

Power is not supplied.

Is the power cord disconnected?

•Insert the power cord (plug) firmly.

11


•Is the MAIN POWER switch turned on?

•Turn on the MAIN POWER switch.

12


Video image does not

•Is the correct input selected?

•Select the correct input by pressing


appear, or audio


VIDEO A, VIDEO B, COMPO. and

12

sound does not occur.


RGB on the remote control (or INPUT


on the Monitor).


•Are connected devices connected

•Connect connected devices correctly.

11


correctly?


•Are signals being supplied from the

•Set connected devices correctly.

11


connected devices?


•Are input signals (scanning frequency,

•Check if the signal is appropriate

10


etc.) appropriate?

(scanning frequency, etc.), and input


the appropriate signal.


•Is brightness adjusted correctly?

•Adjust brightness on the menu.

15


•Is volume set at minimum?

•Adjust volume.

12


•Are the diagnostic lamps turned on?

•Refer to “Self-diagnostic indication,”

29


and take an appropriate action.


The picture through


•Adjust CLOCK PHASE using the


the RGB terminal is


menu.

14


blurred.


Colour is abnormally

•Is brightness adjusted correctly?

•Adjust BRIGHT (brightness) using the

15

dark or bright.


menu.


Colour is poor or

•Is picture quality (colour density, etc.)

•Adjust PICTURE using the menu.

15

unstable.

adjusted correctly?


•Is the correct broadcast system (colour

•Set SIGNAL MODE (colour system) to

19


system) selected?

“AUTO.”


•Are signals (scanning frequency, etc.) to

•Check if the signal is appropriate

10


connected devices appropriate?

(scanning frequency, etc.), and input


the appropriate signal.


The picture is cut or

•Is the size or position of the screen

•Adjust H.SIZE, V.SIZE, H.POSITION


shifted toward one

adjusted properly?

or V.POSITION using the menu.

14

side.


The remote control

•Are the batteries correctly set?

•Insert batteries correctly, observing the

8

does not work.


polarities (»and Æ).


•Are the batteries exhausted?

•Replace with new batteries.

8


•Is there any object blocking the path

•Remove any blocking object.


between the remote control and remote


sensor?


•Is the Monitor too far away from you?

•Move toward the Monitor, then operate


the remote control.


•Is the Monitor connected serially to

•Only Master Monitor can be controlled

24


another Monitor (Serial Connection)?

by the remote control when connected


serially.


The buttons on the

•Is the Control Lock function in use?

•Set the Control Lock function to “OFF”

21

Monitor do not work.


using the menu.


28

Page 28
Image 28
JVC GD-V4200PZW-G, GD-V4200PCE-G, GD V4200PZW specifications Troubleshooting, Auto

GD V4200PZW, GD-V4200PCE-G, GD-V4200PZW-G, GD-V4200PCE specifications

The JVC GD-V4200PCE-G, GD-V4200PCE, GD-V4200PZW-G, and GD-V4200PZW are part of JVC's advanced series of professional video display solutions, specifically designed for a range of demanding environments such as broadcasting, production, and high-end presentations. These models excel in providing high-quality visuals and are geared towards enhancing the experience in professional media and broadcast applications.

One of the standout features of the JVC GD-V4200 series is its impressive resolution capabilities. The displays offer high-definition image quality, allowing for crisp visuals and vibrant colors. This is crucial for professionals who require precise and accurate representation of video content. The integration of advanced image processing technologies ensures that even fast-moving scenes are rendered smoothly, with minimal motion blur, making it an ideal choice for live events or sports broadcasting.

Another significant characteristic is the series' robust connectivity options. The GD-V4200 models are equipped with a variety of input interfaces, including HDMI, SDI, and DVI, allowing seamless integration with different video sources and production setups. This flexibility is essential in professional environments where multiple devices are often used interchangeably.

Color accuracy and consistency are paramount in professional video displays, and the GD-V4200 series does not disappoint. With advanced calibration capabilities, users can adjust settings to meet specific color profiles, ensuring that outputs are true to the source material. This is particularly beneficial in situations where color grading and matching are critical, such as in post-production.

Durability and reliability are also key aspects of the JVC GD-V4200 series. Built to withstand the rigors of professional use, these displays feature a robust design that ensures long-lasting performance. The series typically incorporates features such as anti-glare screens, making them suitable for both controlled indoor environments and more challenging outdoor settings.

In summary, the JVC GD-V4200PCE-G, GD-V4200PCE, GD-V4200PZW-G, and GD-V4200PZW are designed for professionals seeking high-performance video display solutions. With their high-definition resolution, extensive connectivity options, exceptional color accuracy, and durable design, these models provide a comprehensive solution for various video production and broadcasting applications, ensuring that professionals can deliver their best work consistently.