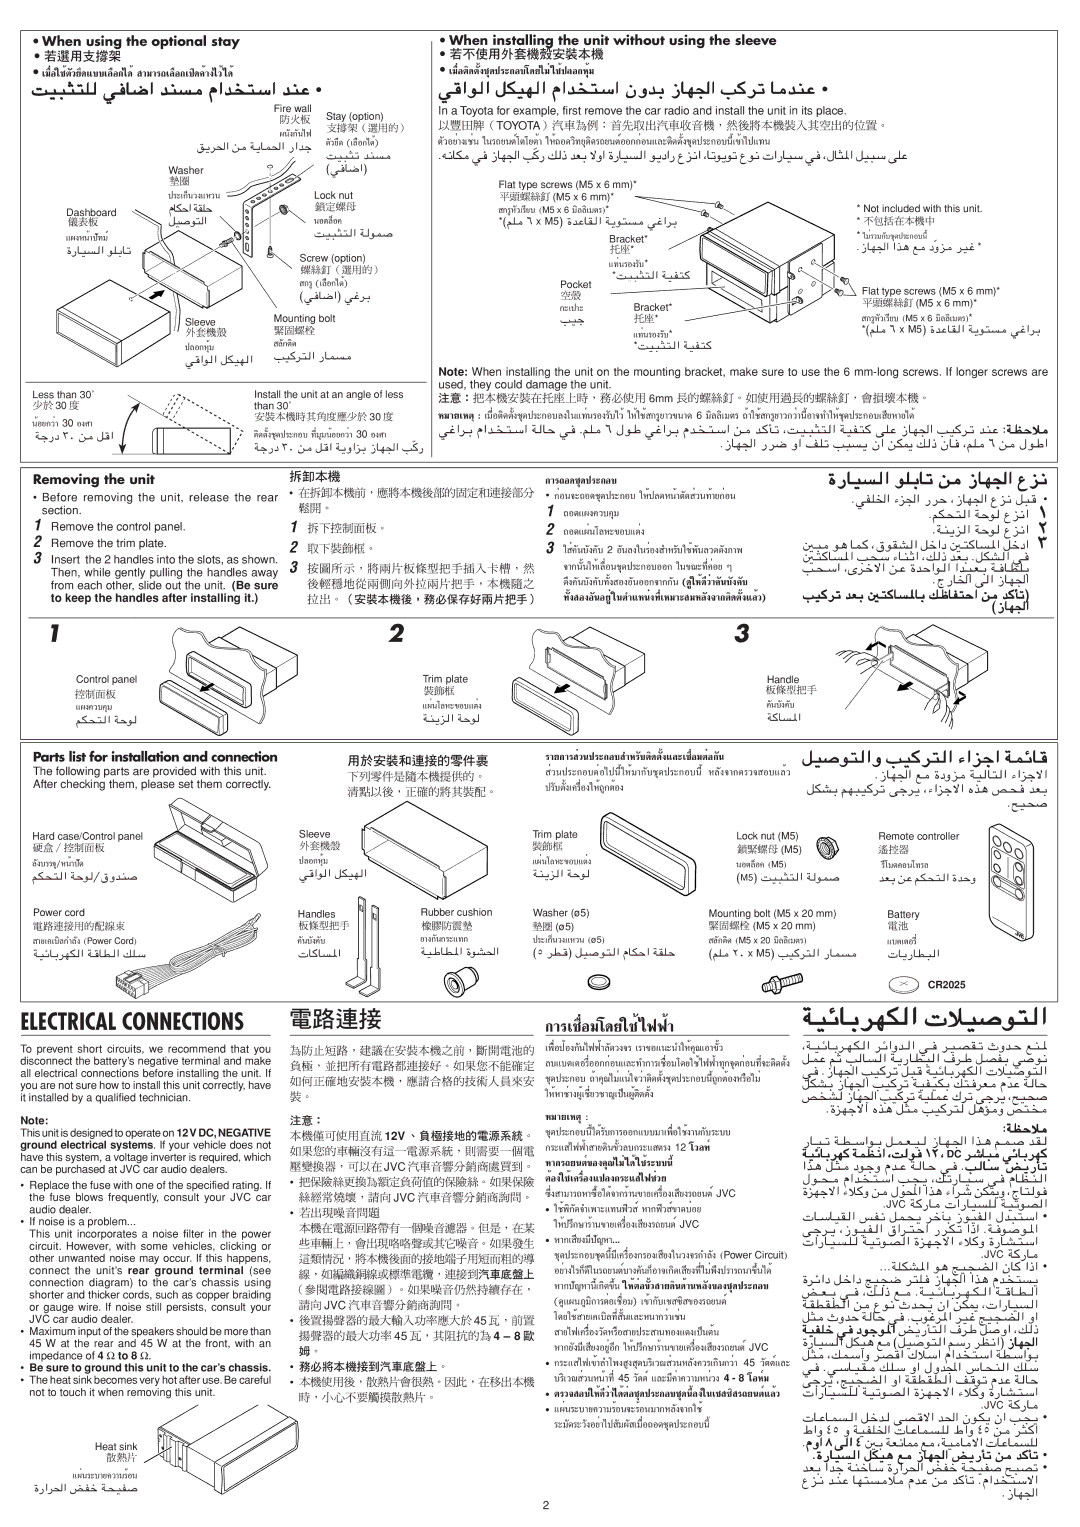
• When using the optional stay


• When installing the unit without using the sleeve


‡¡◊ËÕ„™Èµ—«¬÷¥·∫∫‡≈◊Õ°‰¥È

“¡“√∂‡≈◊Õ°‡ª‘¥§È“߉«È ‰¥È


‡¡◊ËÕµ‘¥µ—Èß™ÿ¥ª√–°Õ∫‚¥¬‰¡Ë „™Èª≈Õ°ÀÿÈ¡


ﺖﻴﺒﺜﺘﻠﻟ ﻲﻓﺎﺿا ﺪﻨﺴﻣ ماﺪﺨﺘﺳا ﺪﻨﻋ

ﻲﻗاﻮﻟا ﻞﻜﻴﻬﻟا ماﺪﺨﺘﺳا نوﺪﺑ زﺎﻬﳉا ﺐﻛﺮﺗ ﺎﻣﺪﻨﻋ


Fire wall

Stay (option)

In a Toyota for example, first remove the car radio and install the unit in its place.


￿TOYOTA￿


ºπ—ß°—π‰ø


µ—«Õ¬Ë“߇™Ëπ „π√∂¬πµÏ‚µ‚¬µÈ“ „ÀÈ∂Õ¥«‘∑¬ÿµ‘¥√∂¬πµÏÕÕ°°ËÕπ·≈–µ‘¥µ—Èß™ÿ¥ª√–°Õ∫π’ȇ¢È“‰ª·∑π


ﻖﻳﺮﳊا ﻦﻣ ﺔﻳﺎﻤﳊا راﺪﺟ

µ—«¬÷¥ (‡≈◊Õ°‰¥È)


ﺖﻴﺒﺜﺗ ﺪﻨﺴﻣ

.ﻪﻧﺎﻜﻣ ﻲﻓ زﺎﻬﳉا ﺐﻛّر ﻚﻟذ ﺪﻌﺑ ﻻوا ةرﺎﻴﺴﻟا ﻮﻳدار عﺰﻧا ،ﺎﺗﻮﻳﻮﺗ عﻮﻧ تارﺎﻴﺳ ﻲﻓ ،لﺎﺜﳌا ﻞﻴﺒﺳ ﻰﻠﻋ


Washer


(ﻲﻓﺎﺿا)


￿￿


Flat type screws (M5 x 6 mm)*


ª√–‡°Áπ«ß·À«π


Lock nut


￿ (M5 x 6 mm)*


Dashboard

مﺎﻜﺣاﺔﻘﻠﺣ


πÕµ≈ÁÕ§

*

°√ŸÀ—«‡√’¬∫(M5 x 6 ¡‘≈≈‘‡¡µ√)*


* Not included with this unit.


ﻞﻴﺻﻮﺘﻟا


(ﻢﻠﻣ ٦

x M5


*


·ºßÀπÈ“ª—∑¡Ï


ﺖﻴﺒﺜﺘﻟا ﺔﻟﻮﻤﺻ


) ةﺪﻋﺎﻘﻟا ﺔﻳﻮﺘﺴﻣ ﻲﻏاﺮﺑ

* ‰¡Ë√«¡°—∫™ÿ¥ª√–°Õ∫π’È


Bracket*


ةرﺎﻴﺴﻟا ﻮﻠﺑﺎﺗ


Screw (option)


￿￿*

.زﺎﻬﳉا اﺬﻫ ﻊﻣ دوﺰﻣّ ﺮﻴﻏ *


·∑Ëπ√Õß√—*


°√Ÿ (‡≈◊Õ°‰¥È)


*ﺖﻴﺒﺜﺘﻟا ﺔﻴﻔﺘﻛ


Pocket


Flat type screws (M5 x 6 mm)*


(ﻲﻓﺎﺿا) ﻲﻏﺮﺑ


￿￿


￿(M5 x 6 mm)*


°–‡ª“–

Bracket*


°√ŸÀ—«‡√’¬∫(M5 x 6 ¡‘≈≈‘‡¡µ√)*


Sleeve

Mounting bolt


ﺐﻴﺟ

￿￿*


≈—°µ‘¥


·∑Ëπ√Õß√—*

*(ﻢﻠﻣ ٦ x M5) ةﺪﻋﺎﻘﻟا ﺔﻳﻮﺘﺴﻣ ﻲﻏاﺮﺑ


ª≈Õ°ÀÿÈ¡


*ﺖﻴﺒﺜﺘﻟا ﺔﻴﻔﺘﻛ


ﻲﻗاﻮﻟا ﻞﻜﻴﻬﻟا

ﺐﻴﻛﺮﺘﻟا رﺎﻤﺴﻣ

Note: When installing the unit on the mounting bracket, make sure to use the 6 mm-long screws. If longer screws are


Less than 30˚


Install the unit at an angle of less

used, they could damage the unit.


6mm


￿￿ 30 ￿


than 30˚


30 ￿

À¡“¬‡Àµÿ : ‡¡◊ËÕµ‘¥µ—Èß™ÿ¥ª√–°Õ∫≈ß„π·∑Ëπ√Õß√—∫‰«È „ÀÈ„™È6 ¡‘≈≈‘‡¡µ√°√Ÿ¬“«¢π“¥∂È“„™È

°√Ÿ¬“«°«Ë“π’ÈÕ“®∑”„ÀÈ™ÿ¥ª√–°Õ∫‡ ’¬À“¬‰¥È


πÈÕ¬°«Ë“30 Õß»“


30

ﻲﻏاﺮـﺑ ماﺪـﺨـﺘـﺳا ﺔﻟﺎﺣ ﻲﻓ .ﻢﻠﻣ ٦ لﻮﻃ ﻲﻏاﺮـﺑ مﺪـﺨـﺘـﺳا ﻦـﻣ ﺪـﻛﺄـﺗ ،ﺖـﻴـﺒﺜﺘﻟا ﺔﻴﻔﺘﻛ ﻰﻠﻋ زﺎﻬﳉا ﺐﻴﻛﺮـﺗ ﺪﻨﻋ :ﺔـﻈﺣﻼﻣ

ﺔﺟرد ٣٠ ﻦﻣ ﻞﻗا


µ‘¥µ—Èß™ÿ¥ª√–°Õ∫ ∑’Ë¡ÿ¡πÈÕ¬°«Ë“Õß»“


.زﺎﻬﳉا رﺮﺿ وا ﻒﻠﺗ ﺐﺒﺴﻳ نا ﻦﻜﳝ ﻚﻟذ نﺎﻓ ،ﻢﻠﻣ ٦ ﻦﻣ لﻮﻃا


ﺔﺟرد ٣٠ ﻦﻣ ﻞﻗا ﺔﻳواﺰﺑ زﺎﻬﳉا ﺐّﻛر


Removing the unit


°“√∂Õ¥™ÿ¥ª√–°Õ∫


ةرﺎﻴﺴﻟا ﻮﻠﺑﺎﺗ ﻦﻣ زﺎﻬﳉا عﺰﻧ

• Before removing the unit, release the rear


°ËÕπ®–∂Õ¥™ÿ¥ª√–°Õ∫ „ÀȪ≈¥ÀπÈ“µ—¥ Ë«π∑È“¬°ËÕπ

.ﻲﻔﻠﳋا ءﺰﳉا رﺮﺣ ،زﺎﻬﳉا عﺰﻧ ﻞﺒﻗ

section.


1

∂Õ¥·ºß§«∫§ÿ¡


.ﻢﻜﺤﺘﻟا ﺔﺣﻮﻟ عﺰﻧا

١

1 Remove the control panel.


1


2 ∂Õ¥·ºËπ‚≈À–¢Õ∫·µËß

.ﺔﻨﻳﺰﻟا ﺔﺣﻮﻟ عﺰﻧا

٢

2 Remove the trim plate.


2


3

˧—π∫—ߧ—2Õ∫—π≈ß„π√ËÕß ”À√—∫„™Èæ—π≈«¥¥—ß¿“æ

ﲔﺒﻣ ﻮﻫ ﺎﻤﻛ ،قﻮﻘﺸﻟا ﻞﺧاد ﲔﺘﻛﺎﺴﳌا ﻞﺧدا

٣

3 Insert the 2 handles into the slots, as shown.

3


®“°π—Èπ„Àȇ≈◊ËÕπ™ÿ¥ª√–°Õ∫ÕÕ° „π¢≥–∑’˧ËÕ¬ Ê

ﲔﺘﻛﺎﺴﳌا ﺐﺤﺳ ءﺎﻨﺛا ،ﻚﻟذ ﺪﻌﺑ .ﻞﻜﺸﻟا ﻲﻓ


Then, while gently pulling the handles away


ﺐـﺤـﺳا ،ىﺮـﺧﻻا ﻦـﻋ ةﺪﺣاﻮـﻟا اﺪـﻴـﻌـﺑ ﺔـﻓﺎـﻄﻠﺑ


from each other, slide out the unit. (Be sure


¥÷ߧ—π∫—ߧ—∫∑—Èß ÕßÕ—πÕÕ°®“°°(¥Ÿ„ÀÈ—π¥’«Ë“§—π∫—ߧ—∫

.جرﺎﳋا ﻰﻟا زﺎﻬﳉا


to keep the handles after installing it.)


∑—Èß ÕßÕ—πÕ¬ŸË „πµ”·ÀπËß∑’ˇÀ¡“– ¡À≈—ß®“°µ‘¥µ—Èß·≈È«)ﺐﻴﻛﺮﺗ ﺪﻌﺑ ﲔﺘﻛﺎﺴﳌﺎﺑ ﻚﻇﺎﻔﺘﺣا ﻦﻣ ﺪﻛﺄﺗ)


(زﺎﻬﳉا


1


2


3


Control panel


Trim plate


Handle


·ºß§«∫§ÿ¡


·ºËπ‚≈À–¢Õ∫·µËß


§—π∫—ߧ—∫


ﻢﻜﺤﺘﻟا ﺔﺣﻮﻟ


ﺔﻨﻳﺰﻟا ﺔﺣﻮﻟ


ﺔﻛﺎﺴﳌا


Parts list for installation and connection

The following parts are provided with this unit.

After checking them, please set them correctly.

Hard case/Control panelSleeve

≈—ß∫√√®ÿ/ÀπÈ“ª—¥

ª≈Õ°ÀÿÈ¡


ﻢﻜﺤﺘﻟا ﺔﺣﻮﻟ/قوﺪﻨﺻ

ﻲﻗاﻮﻟا ﻞﻜﻴﻬﻟا


Power cord

Handles

Rubber cushion

(Power Cord)

§—π∫—ߧ—∫

¬“ß°—π°√–·∑°

“¬‡§‡∫‘≈°”≈—ß

ﺔﻴﻃﺎﻄﳌا ةﻮﺸﳊا

ﺔﻴﺋﺎﺑﺮﻬﻜﻟا ﺔﻗﺎﻄﻟا ﻚﻠﺳ

تﺎﻛﺎﺴﳌا

√“¬°“√ Ë«πª√–°Õ∫ ”À√—∫µ‘¥µ—Èß·≈–‡™◊ËÕ¡µËÕ°—π

ﻞﻴﺻﻮﺘﻟاو ﺐﻴﻛﺮﺘﻟا ءاﺰﺟا ﺔﻤﺋﺎﻗ

Ë«πª√–°Õ∫µËÕ‰ªπ’È„ÀÈ¡“°—∫™ÿ¥ª√–°Õ∫π’È À≈—ß®“°µ√«® Õ∫·≈È«

.زﺎﻬﳉا ﻊﻣ ةدوﺰﻣ ﺔﻴﻟﺎﺘﻟا ءاﺰﺟﻻا

ª√—∫µ—È߇§√◊ËÕß„ÀÈ∂Ÿ°µÈÕß


ﻞﻜﺸﺑ ﻢﻬﺒﻴﻛﺮﺗ ﻰﺟﺮﻳ ،ءاﺰﺟﻻا هﺬﻫ ﺺﺤﻓ ﺪﻌﺑ


.ﺢﻴﺤﺻ

Trim plate

Lock nut (M5)

Remote controller

·ºËπ‚≈À–¢Õ∫·µËß


(M5)


πÕµ≈ÁÕ§(M5)

√’‚¡µ§Õπ‚∑√≈

ﺔﻨﻳﺰﻟا ﺔﺣﻮﻟ

(M5) ﺖﻴﺒﺜﺘﻟا ﺔﻟﻮﻤﺻ

ﺪﻌﺑ ﻦﻋ ﻢﻜﺤﺘﻟا ةﺪﺣو

Washer (ø5)

Mounting bolt (M5 x 20 mm)

Battery

￿￿ (ø5)


(M5 x 20 mm)

￿￿

ª√–‡°Áπ«ß·À«π(ø5)

(M5 x 20

)

·∫µ‡µÕ√’Ë

(٥ ﺮﻄﻗ) ﻞﻴﺻﻮﺘﻟا مﺎﻜﺣا ﺔﻘﻠﺣ

≈—°µ‘¥


¡‘≈≈‘‡¡µ√

(ﻢﻠﻣ ٢٠

x M5

) ﺐﻴﻛﺮﺘﻟا رﺎﻤﺴﻣ

تﺎﻳرﺎﻄﺒﻟا


CR2025

ELECTRICAL CONNECTIONS

To prevent short circuits, we recommend that you disconnect the battery’s negative terminal and make all electrical connections before installing the unit. If you are not sure how to install this unit correctly, have it installed by a qualified technician.

Note:

This unit is designed to operate on 12V DC, NEGATIVE ground electrical systems. If your vehicle does not have this system, a voltage inverter is required, which can be purchased at JVC car audio dealers.

Replace the fuse with one of the specified rating. If the fuse blows frequently, consult your JVC car audio dealer.

If noise is a problem...

This unit incorporates a noise filter in the power circuit. However, with some vehicles, clicking or other unwanted noise may occur. If this happens, connect the unit’s rear ground terminal (see connection diagram) to the car’s chassis using shorter and thicker cords, such as copper braiding or gauge wire. If noise still persists, consult your JVC car audio dealer.

Maximum input of the speakers should be more than

45 W at the rear and 45 W at the front, with an impedance of 4 to 8 .

Be sure to ground this unit to the car’s chassis.

The heat sink becomes very hot after use. Be careful not to touch it when removing this unit.

Heat sink

·ºËπ√–∫“¬§«“¡√ÈÕπ

ةراﺮﳊا ﺾﻔﺧ ﺔﺤﻴﻔﺻ


°“√‡™◊ËÕ¡‚¥¬„™È ‰øøÈ“


ﺔﻴﺋﺎﺑﺮﻬﻜﻟا تﻼﻴﺻﻮﺘﻟا


‡æ◊ËÕªÈÕß°—π‰øøÈ“≈—¥«ß®√ ‡√“¢Õ·π–π”„Àȧÿ≥‡Õ“¢—È«


،ﺔــﻴـﺋﺎـﺑﺮــﻬـﻜـﻟا ﺮـﺋاوﺪــﻟا ﻲــﻓ ﺮـﻴـﺼـﻘـﺗ ثوﺪــﺣ ﻊـﻨـﳌ


ﻞـﻤﻋ ﻢﺛ ﺐﻟﺎﺴﻟا ﺔﻳرﺎـﻄﺒﻟا فﺮـﻃ ﻞﺼﻔﺑ ﻲﺻﻮﻧ


≈∫·∫µ‡µÕ√’ËÕÕ°°ËÕπ·≈–∑”°“√‡™◊ËÕ¡‚¥¬„™È‰øøÈ“∑ÿ°®ÿ¥°ËÕπ∑’Ë®–µ‘¥µ—Èß


ﻲﻓ .زﺎﻬﳉا ﺐﻴﻛﺮﺗ ﻞﺒﻗ ﺔﻴﺋﺎﺑﺮﻬﻜﻟا تﻼﻴﺻﻮﺘﻟا


ﻞﻜﺸﺑ زﺎﻬﳉا ﺐﻴﻛﺮﺗ ﺔﻴﻔﻴﻜﺑ ﻚﺘﻓﺮﻌﻣ مﺪﻋ ﺔﻟﺎﺣ


™ÿ¥ª√–°Õ∫ ∂È“§ÿ≥‰¡Ë·πË„®«Ë“µ‘¥µ—Èß™ÿ¥ª√–°Õ∫π’È∂Ÿ°µÈÕßÀ√◊Õ‰¡Ë


￿￿


„ÀÈÀ“™Ë“ߺŸÈ‡™’ˬ«™“≠‡ªÁπºŸÈµ‘¥µ—Èß


ﺺﺨﺸﻟ زﺎﻬﳉا ﺐﻴﻛﺮﺗ ﺔﻴﻠﻤﻋ كﺮﺗ ﻰﺟﺮﻳ ،ﺢﻴﺤﺻ


À¡“¬‡Àµÿ :


.ةﺰﻬﺟﻻا هﺬﻫ ﻞﺜﻣ ﺐﻴﻛﺮﺘﻟ ﻞﻫﺆﻣو ﺺﺘﺨﻣ


:ﺔﻈﺣﻼﻣ

12V

￿ ™ÿ¥ª√–°Õ∫π’ȉ¥È√—∫°“√ÕÕ°·∫∫¡“‡æ◊ËÕ„™Èß“π°—∫√–∫∫


°√–· ‰øøÈ“ “¬¥‘π¢—È«≈∫°√–· 12µ√ß‚«≈∑Ï


رﺎــﻴــﺗ ﺔــﻄــﺳاﻮــﺑ ﻞــﻤــﻌــﻴــﻟ زﺎــﻬــﳉا اﺬــﻫ ﻢــﻤــﺻ ﺪـﻘـﻟ


ﺔﻴﺋﺎﺑﺮﻬﻛ ﺔﻤﻈﻧا ،ﺖﻟﻮﻓ ١٢ ، DC ﺮﺷﺎﺒﻣ ﻲﺋﺎﺑﺮﻬﻛ

JVC


À“°√∂¬πµÏ¢Õߧÿ≥‰¡Ë ‰¥È „™È√–∫∫π’È


اﺬـﻫ ﻞـﺜـﻣ دﻮـﺟو مﺪــﻋ ﺔـﻟﺎـﺣ ﻲـﻓ .ﺐـﻟﺎـﺳ ﺾـﻳرﺄـﺗ


µÈÕß„™È‡§√◊ËÕß·ª≈ß°√–· ‰ø™Ë«¬


لﻮــﺤــﻣ ماﺪـﺨـﺘـﺳا ﺐـﺠـﻳ ،ﻚـﺗرﺎــﻴــﺳ ﻲـﻓ مﺎـﻈـﻨـﻟا

JVC


´÷Ëß “¡“√∂À“´◊ÈÕ‰¥È®“°√È“π¢“¬‡§√◊ËÕ߇ JVC’¬ß√∂¬πµÏ


ةﺰﻬﺟﻻا ءﻼﻛو ﻦﻣ لﻮﶈا اﺬﻫ ءاﺮﺷ ﻦﻜﳝو ،جﺎﺘﻟﻮﻓ


ë „™Èæ‘°—¥®”‡æ“–·∑πø‘« Ï À“°ø‘« Ï¢“¥∫ËÕ¬


.JVC ﺔﻛرﺎﻣ تارﺎﻴﺴﻠﻟ ﺔﻴﺗﻮﺼﻟا


تﺎـﺳﺎﻴﻘﻟا ﺲﻔﻧ ﻞﻤﺤﻳ ﺮﺧﺂﺑ زﻮﻴﻔﻟا لﺪﺒﺘﺳا


„ÀȪ√÷°…“√È“π¢“¬‡§√◊ËÕ߇ ’¬ß√∂¬πµÏJVC


ﻰـﺟﺮــﻳ ،زﻮـﻴـﻔـﻟا قاﺮــﺘـﺣا رﺮـﻜـﺗ اذا .ﺔـﻓﻮـﺻﻮـﳌا


ë À“°‡ ’¬ß¡’ª—≠À“...


تارﺎـﻴـﺴـﻠـﻟ ﺔﻴﺗﻮـﺼﻟا ةﺰـﻬـﺟﻻا ءﻼﻛو ةرﺎـﺸـﺘﺳا


™ÿ¥ª√–°Õ∫™ÿ¥π’È¡’‡§√◊ËÕß°√Õ߇ ’¬ß„π«ß®√°”≈(PowerCircuitß

)


.JVC ﺔﻛرﺎﻣ


լ˓߉√°Á¥’„π√∂¬πµÏ∫“ߧ—π°ÁÕ“®‡°‘¥‡ ’¬ß∑’ˉ¡Ëæ÷ߪ√“√∂π“¢÷Èπ‰¥È

...ﺔﻠﻜﺸﳌا ﻮﻫ ﺞﻴﺠﻀﻟا نﺎﻛ اذا


ةﺮـﺋاد ﻞـﺧاد ﺞﻴﺠﺿ ﺮﺘﻠﻓ زﺎﻬﳉا اﺬﻫ مﺪﺨﺘﺴﻳ


À“°ª—≠À“π’ȇ°‘¥„ÀȵËÕ¢÷Èπ ¢—È« “¬¥‘π¥È“πÀ≈—ߢÕß™ÿ¥ª√–°Õ∫


(¥Ÿ·ºπ¿Ÿ¡‘°“√µËÕ‡™◊ËÕ¡) ‡¢È“°—∫‡™ ´‘ ¢Õß√∂¬πµÏ


ﺾـــﻌـــﺑ ﻲـــﻓ ،ﻚـــﻟذ ﻊـــﻣ .ﺔـــﻴـــﺋﺎــﺑﺮـــﻬـــﻜـــﻟا ﺔـــﻗﺎـــﻄــﻟا

￿￿JVC


ﺔـﻘﻄﻘﻄﻟا ﻦﻣ عﻮﻧ ثﺪﺤﻳ نا ﻦﻜﳝ ،تارﺎﻴﺴﻟا

45


‚¥¬„™È “¬‡§‡∫‘≈∑’Ë —Èπ·≈–Àπ“°«Ë“‡™Ëπ


ﻞﺜﻣ ثوﺪﺣ ﺔﻟﺎﺣ ﻲﻓ .بﻮﻏﺮﳌا ﺮﻴﻏ ﺞﻴﺠﻀﻟا وا

45

4 – 8 ￿

“¬‰ø‡§√◊ËÕß«—¥À√◊Õ “¬ª√– “π∑Õß·¥ß‡ªÁπµÈπ


ﺔﻴﻔﻠﺧ ﻲﻓ دﻮﺟﻮﳌا ﺾﻳرﺄﺘﻟا فﺮﻃ ﻞﺻوا ،ﻚﻟذ

￿￿


ةرﺎﻴﺴﻟا ﻞﻜﻴﻫ ﻊﻣ (ﻞﻴﺻﻮﺘﻟا ﻢﺳر ﺮﻈﻧا) زﺎﻬﳉا


À“°¬—ß¡’‡ ’¬ßÕ¬ŸËÕ’° „ÀȪ√÷°…“√È“π¢“¬‡§√◊ËÕ߇JVC’¬ß√∂¬πµÏ


ﻞﺜﻣ ،ﻚﻤﺳاو ﺮﺼﻗا كﻼﺳا ماﺪﺨﺘﺳا ﺔﻄﺳاﻮﺑ

￿

ë °√–· ‰ø‡¢È“≈”‚æß Ÿß ÿ¥∫√‘‡«≥ Ë«πÀ≈—ߧ«√‡°‘π°«Ë“45—µµÏ·≈– ﻲـﻓ .ﻲـﺳﺎـﻴـﻘـﻣ ﻚـﻠﺳ وا لوﺪﻟﻤﺠا سﺎﺤﻨﻟا ﻚﻠﺳ


∫√‘‡«≥ Ë«πÀπÈ“∑’Ë45 —µµÏ ·≈–¡’§Ë“§«“¡ÀπË«ß4 - 8 ‚ÕÀÏ¡


ﻰﺟﺮﻳ ،ﺞﻴﺠﻀﻟا وا ﺔﻘﻄﻘﻄﻟا ﻒﻗﻮﺗ مﺪﻋ ﺔﻟﺎﺣ


ë µ√«® Õ∫„ÀÈ¥’«Ë“‰¥ÈµËÕ™ÿ¥ª√–°Õ∫™ÿ¥π’È≈ß„π‡™ ´‘ √∂¬πµÏ·≈È«تارﺎـﻴـﺴـﻠـﻟ ﺔﻴﺗﻮـﺼﻟا ةﺰـﻬـﺟﻻا ءﻼﻛو ةرﺎـﺸـﺘﺳا


ë ·ºËπ√–∫“¬§«“¡√ÈÕπ®–√ÈÕπ¡“°À≈—ß®“°„™È


.JVC ﺔﻛرﺎﻣ


تﺎـﻋﺎـﻤﺴـﻟا ﻞـﺧﺪـﻟ ﻰﺼـﻗﻻا ﺪـﳊا نﻮـﻜﻳ نا ﺐـﺠـﻳ

√–¡—¥√–«—ßլ˓‰ª —¡º— ‡¡◊ËÕ∂Õ¥™ÿ¥ª√–°Õ∫π’È

طاو ٤٥ و ﺔﻴـﻔﻠـﳋا تﺎـﻋﺎﻤـﺴـﻠﻟ طاو ٤٥ ﻦـﻣ ﺮﺜـﻛا


.موا ٨ ﻰﻟا ٤ ﲔﺑ ﺔﻌﻧﺎﳑ ﻊﻣ ،ﺔﻴﻣﺎﻣﻻا تﺎﻋﺎﻤﺴﻠﻟ


.ةرﺎﻴﺴﻟا ﻞﻜﻴﻫ ﻊﻣ زﺎﻬﳉا ﺾﻳرﺄﺗ ﻦﻣ ﺪﻛﺄﺗ


ﺪﻌﺑ اﺪﺟ ﺔﻨﺧﺎﺳ ةراﺮﳊا ﺾﻔﺧ ﺔﺤﻴﻔﺻ ﺢﺒﺼﺗ


عﺰـﻧ ﺪـﻨﻋ ﺎﻬﺘﺴﻣﻼﻣ مﺪﻋ ﻦﻣ ﺪﻛﺄﺗ .ماﺪﺨﺘﺳﻻا


.زﺎﻬﳉا

2

Page 30
Image 30
JVC GET0113-001A To keep the handles after installing it, 12V, CR2025, Be sure to ground this unit to the car’s chassis

KS-FX621, CH-X100, CH-X series, GET0113-001A, CDA-5755 specifications

The JVC CDA-5755 is a high-performance car audio receiver that embodies several cutting-edge technologies and features designed to enhance the in-car listening experience. This model combines modern aesthetics with advanced functionality, making it a popular choice among audio enthusiasts. One standout feature of the CDA-5755 is its compatibility with various audio formats, including MP3, WMA, and WAV files. This versatility enables users to enjoy their favorite music in different formats, providing flexibility when it comes to playing media.

Another remarkable characteristic of the CDA-5755 is its user-friendly interface. The device features a bright, easy-to-read LCD display that allows for effortless navigation through playlists and radio stations. Alongside this, it boasts a powerful built-in amplifier that enhances audio output, delivering clear and dynamic sound even at higher volume levels.

In conjunction with the CDA-5755, the GET0113-001A is JVC's innovative remote control designed to provide convenient access to the receiver's functions. This remote control allows users to adjust volume, change tracks, and switch between different input sources without needing to take their hands off the wheel, ensuring safer driving.

Turning to the CH-X series, particularly the CH-X100, this line of CD changers is engineered to offer seamless integration with JVC head units like the CDA-5755. The CH-X100 accommodates multiple CDs, providing a wider range of music at your fingertips. Its fast CD access and advanced loading mechanism make it easy to switch between discs, enhancing the overall listening experience during long drives.

The KS-FX621 is another significant component of JVC's car audio lineup. This cassette player and FM/AM receiver boast a built-in equalizer to fine-tune sound preferences, allowing listeners to customize their audio experience. Its robust build and reliable performance ensure that it remains a relevant choice for both classic car restoration enthusiasts and those seeking nostalgia combined with modern technology.

Together, the JVC CDA-5755, GET0113-001A, CH-X100, and KS-FX621 create a cohesive audio system that prioritizes sound quality, functionality, and user convenience. With their standout features, these products reflect JVC's commitment to delivering an exceptional entertainment experience tailored to the needs of contemporary drivers. Whether for daily commutes or road trips, this combination provides an engaging and enjoyable soundtrack for any journey.