38EN

EDITING(cont.)

REW/FF STOP

PLAY/PAUSE

IN/OUT

CANCEL


R.A. EDIT


PREPARE CAMCORDER

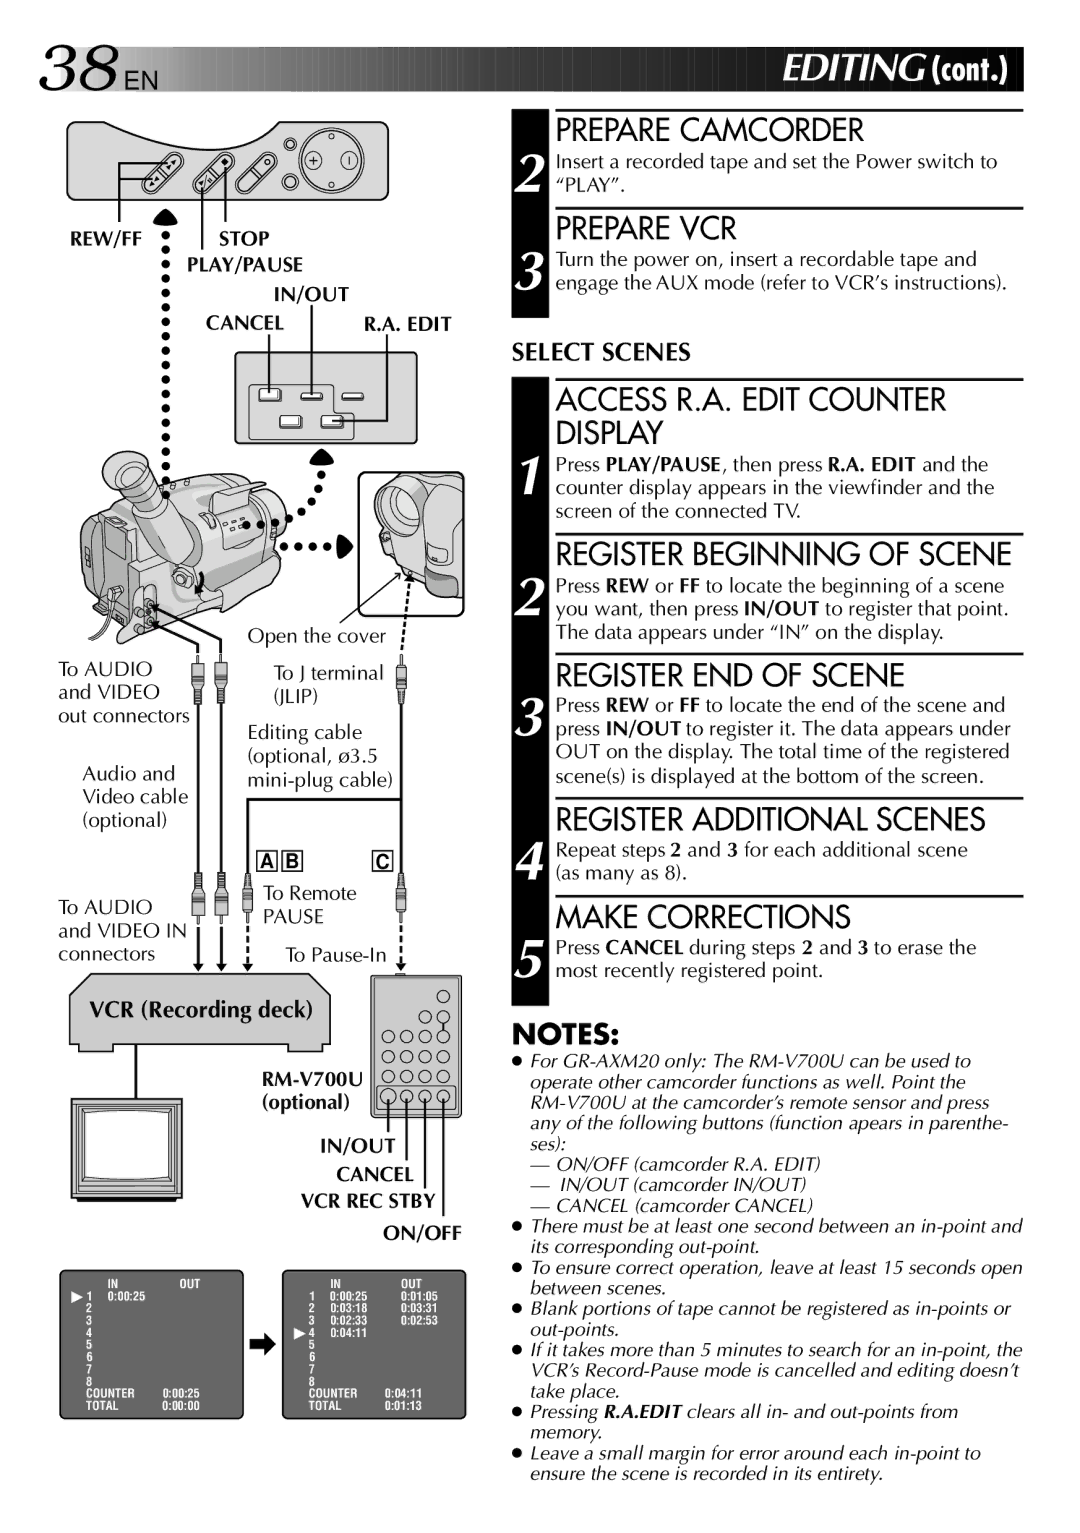
2 Insert a recorded tape and set the Power switch to “PLAY”.

PREPARE VCR

3 Turn the power on, insert a recordable tape and engage the AUX mode (refer to VCR’s instructions).

SELECT SCENES

ACCESS R.A. EDIT COUNTER DISPLAY

1 Press PLAY/PAUSE, then press R.A. EDIT and the counter display appears in the viewfinder and the screen of the connected TV.

REGISTER BEGINNING OF SCENE

To AUDIO and VIDEO out connectors

Audio and Video cable (optional)

To AUDIO and VIDEO IN connectors

Open the cover

To J terminal (JLIP)

Editing cable (optional, ø3.5 mini-plug cable)

A B

C

To Remote

PAUSE

To Pause-In

2 Press REW or FF to locate the beginning of a scene you want, then press IN/OUT to register that point. The data appears under “IN” on the display.

REGISTER END OF SCENE

3 Press REW or FF to locate the end of the scene and press IN/OUT to register it. The data appears under OUT on the display. The total time of the registered scene(s) is displayed at the bottom of the screen.

REGISTER ADDITIONAL SCENES

4 Repeat steps 2 and 3 for each additional scene (as many as 8).

MAKE CORRECTIONS

5 Press CANCEL during steps 2 and 3 to erase the most recently registered point.

VCR (Recording deck)

RM-V700U (optional)

IN/OUT

CANCEL

VCR REC STBY

ON/OFF

IN

OUT


IN

OUT

ç♣ 1 0:00:25


ç 1

0:00:25

0:01:05

2


2

0:03:18

0:03:31

3


3

0:02:33

0:02:53

4


4

0:04:11


5


5


6


6


7


7


8


8


COUNTER

0:00:25

COUNTER

0:04:11

TOTAL

0:00:00

TOTAL

0:01:13

NOTES:

For GR-AXM20 only: The RM-V700U can be used to operate other camcorder functions as well. Point the RM-V700U at the camcorder’s remote sensor and press any of the following buttons (function apears in parenthe- ses):

ON/OFF (camcorder R.A. EDIT)

IN/OUT (camcorder IN/OUT)

CANCEL (camcorder CANCEL)

There must be at least one second between an in-point and its corresponding out-point.

To ensure correct operation, leave at least 15 seconds open between scenes.

Blank portions of tape cannot be registered as in-points or out-points.

If it takes more than 5 minutes to search for an in-point, the VCR’s Record-Pause mode is cancelled and editing doesn’t take place.

Pressing R.A.EDIT clears all in- and out-points from memory.

Leave a small margin for error around each in-point to ensure the scene is recorded in its entirety.

Page 38
Image 38
JVC GR-AXM20, GR-AXM10 manual Ditin G

GR-AXM10, GR-AXM20 specifications

The JVC GR-AXM20 and GR-AXM10 are compact camcorders that made waves in the late 1990s and early 2000s thanks to their innovative features and user-friendly design. Targeting both amateur and semi-professional videographers, these models are known for their reliability and versatility. The JVC GR-AXM20, the more advanced of the two, boasts several high-tech features that appeal to a range of users, from families capturing moments to video enthusiasts.

One of the standout characteristics of the GR-AXM20 is its 20x optical zoom lens, which allows users to capture distant subjects with clarity. This feature is complemented by a digital zoom capability, extending up to 700x, enabling even greater reach when necessary. The GR-AXM10, while slightly less powerful with a 10x optical zoom, still delivers impressive performance for everyday video recording needs.

Both models incorporate JVC's Super Sensing technology, which enhances low-light performance, making them well-suited for indoor or dimly lit environments. The built-in image stabilizer is another hallmark feature, reducing shakiness and delivering smoother video playback, particularly beneficial for handheld shooting.

In terms of audio quality, the GR-AXM20 and GR-AXM10 feature built-in stereo microphones, ensuring clear sound capture to complement the visual element. This combination of video and audio quality positioned these camcorders as practical options for family events, travel videos, and more.

The user interface is designed with simplicity in mind, featuring an LCD screen that rotates for easy viewing from various angles. This flexibility facilitates creative shooting angles and adds to the overall user experience. Additionally, both camcorders support a variety of recording modes, including standard and long-play, maximizing recording time and offering users options depending on their needs.

In summary, the JVC GR-AXM20 and GR-AXM10 stand out for their optical zoom capabilities, low-light performance, and user-friendly design. Their combination of features makes these camcorders ideal choices for those looking to capture life's moments without compromising on quality. Whether for home videos or more artistic endeavors, both models have left a lasting impression in the realm of consumer camcorders.