GUIA PARA OPERACION RAPIDA EN 55

Si la unidad comienza a funcionar mal, deje de usarla inmediatamente y consulte a su concesionario local de JVC.

ALIMENTACION

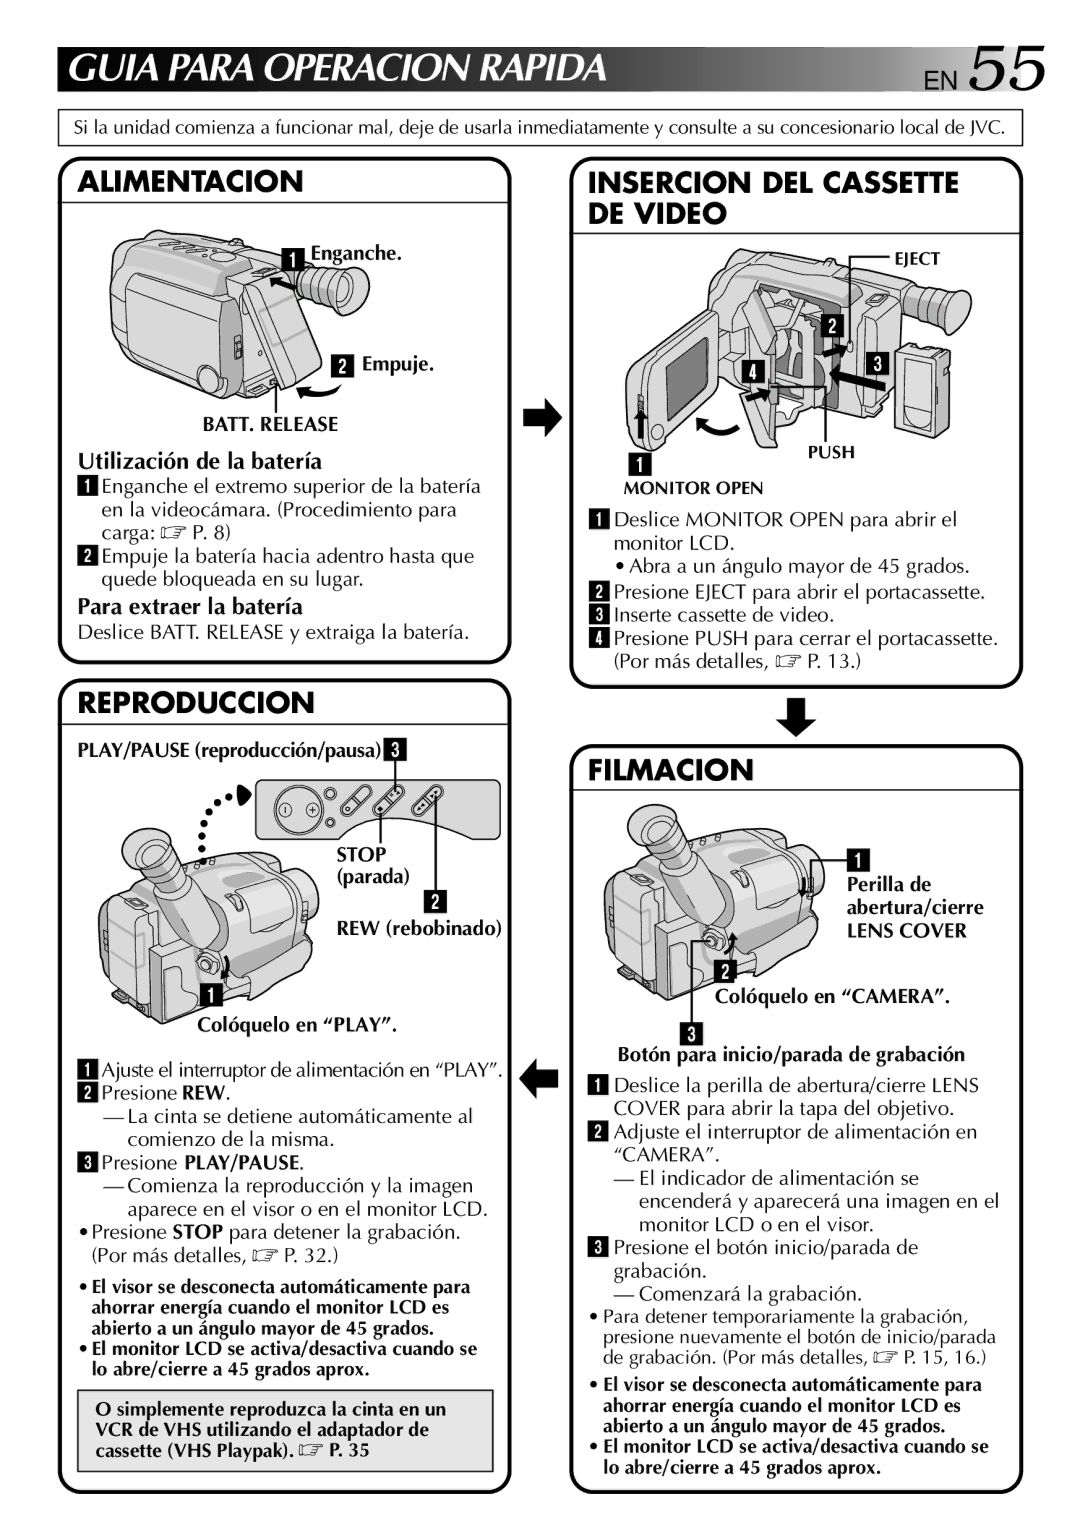
1 Enganche.

2 Empuje.

BATT. RELEASE

Utilización de la batería

1Enganche el extremo superior de la batería

en la videocámara. (Procedimiento para carga: P. 8)

2Empuje la batería hacia adentro hasta que quede bloqueada en su lugar.

Para extraer la batería

Deslice BATT. RELEASE y extraiga la batería.

INSERCION DEL CASSETTE DE VIDEO

EJECT

2

4 3

1PUSH

MONITOR OPEN

1Deslice MONITOR OPEN para abrir el monitor LCD.

Abra a un ángulo mayor de 45 grados. 2Presione EJECT para abrir el portacassette. 3Inserte cassette de video.

4Presione PUSH para cerrar el portacassette. (Por más detalles, P. 13.)

REPRODUCCION

PLAY/PAUSE (reproducción/pausa)3

STOP (parada)

2

REW (rebobinado)

1

Colóquelo en “PLAY”.

1Ajuste el interruptor de alimentación en “PLAY”.

2Presione REW.

La cinta se detiene automáticamente al comienzo de la misma.

3Presione PLAY/PAUSE.

Comienza la reproducción y la imagen aparece en el visor o en el monitor LCD.

•Presione STOP para detener la grabación. (Por más detalles, P. 32.)

•El visor se desconecta automáticamente para ahorrar energía cuando el monitor LCD es abierto a un ángulo mayor de 45 grados.

•El monitor LCD se activa/desactiva cuando se lo abre/cierre a 45 grados aprox.

O simplemente reproduzca la cinta en un VCR de VHS utilizando el adaptador de cassette (VHS Playpak). P. 35

FILMACION

1

Perilla de abertura/cierre

LENS COVER

2

Colóquelo en “CAMERA”.

3

Botón para inicio/parada de grabación

1 Deslice la perilla de abertura/cierre LENS COVER para abrir la tapa del objetivo.

2 Adjuste el interruptor de alimentación en “CAMERA”.

El indicador de alimentación se encenderá y aparecerá una imagen en el monitor LCD o en el visor.

3 Presione el botón inicio/parada de grabación.

Comenzará la grabación.

Para detener temporariamente la grabación,

presione nuevamente el botón de inicio/parada de grabación. (Por más detalles, P. 15, 16.)

El visor se desconecta automáticamente para ahorrar energía cuando el monitor LCD es abierto a un ángulo mayor de 45 grados.

El monitor LCD se activa/desactiva cuando se lo abre/cierre a 45 grados aprox.

Page 55
Image 55
JVC GR-AXM10, GR-AXM20 manual PLAY/PAUSE reproducción/pausa3, REW rebobinado Colóquelo en Play

GR-AXM10, GR-AXM20 specifications

The JVC GR-AXM20 and GR-AXM10 are compact camcorders that made waves in the late 1990s and early 2000s thanks to their innovative features and user-friendly design. Targeting both amateur and semi-professional videographers, these models are known for their reliability and versatility. The JVC GR-AXM20, the more advanced of the two, boasts several high-tech features that appeal to a range of users, from families capturing moments to video enthusiasts.

One of the standout characteristics of the GR-AXM20 is its 20x optical zoom lens, which allows users to capture distant subjects with clarity. This feature is complemented by a digital zoom capability, extending up to 700x, enabling even greater reach when necessary. The GR-AXM10, while slightly less powerful with a 10x optical zoom, still delivers impressive performance for everyday video recording needs.

Both models incorporate JVC's Super Sensing technology, which enhances low-light performance, making them well-suited for indoor or dimly lit environments. The built-in image stabilizer is another hallmark feature, reducing shakiness and delivering smoother video playback, particularly beneficial for handheld shooting.

In terms of audio quality, the GR-AXM20 and GR-AXM10 feature built-in stereo microphones, ensuring clear sound capture to complement the visual element. This combination of video and audio quality positioned these camcorders as practical options for family events, travel videos, and more.

The user interface is designed with simplicity in mind, featuring an LCD screen that rotates for easy viewing from various angles. This flexibility facilitates creative shooting angles and adds to the overall user experience. Additionally, both camcorders support a variety of recording modes, including standard and long-play, maximizing recording time and offering users options depending on their needs.

In summary, the JVC GR-AXM20 and GR-AXM10 stand out for their optical zoom capabilities, low-light performance, and user-friendly design. Their combination of features makes these camcorders ideal choices for those looking to capture life's moments without compromising on quality. Whether for home videos or more artistic endeavors, both models have left a lasting impression in the realm of consumer camcorders.