Connector cover**
Connector cover**
|
| To JLIP*** |
|
|
|
|
|
|
|
|
|
|
|
|
|
|
|
|
|
|
|
|
| To |
|
| |||||
|
| Core filter |
|
|
|
|
|
|
|
|
|
|
|
|
|
|
|
|
|
|
|
|
|
| |||||||
|
|
|
|
|
|
|
|
|
|
|
|
|
|
|
|
|
|
|
|
|
|
|
|
|
|
|
| Output |
|
|
|
|
|
| Yellow to |
|
|
|
| Red to |
| ||||||||||||||||||||||
|
|
|
|
|
|
|
| ||||||||||||||||||||||||
|
|
| Video |
|
|
|
|
|
| Audio |
| ||||||||||||||||||||
|
|
|
|
|
| ||||||||||||||||||||||||||
|
|
| Output* |
|
|
|
|
|
| Output R |
| ||||||||||||||||||||
|
|
|
|
| |||||||||||||||||||||||||||
|
|
|
|
|
|
|
|
|
|
|
|
|
|
|
|
|
|
|
|
|
|
|
|
|
| ||||||
|
|
| White to | A/V cable (provided) |
| ||||||||||||||||||||||||||
|
|
| Audio Output L | [RCA plug to RCA plug] |
| ||||||||||||||||||||||||||
|
| Editing cable |
|
|
|
|
|
|
|
|
|
|
|
|
|
|
|
|
|
|
|
|
| ||||||||
|
|
|
|
|
|
|
|
|
|
|
|
|
|
|
|
|
|
|
|
|
|
| |||||||||
|
|
|
|
|
|
|
|
|
|
|
|
|
|
|
|
|
|
|
|
|
| cable |
| ||||||||
|
| (provided) |
|
|
|
|
|
|
|
|
|
|
|
|
|
|
|
|
|
|
|
|
| ||||||||
|
|
|
|
|
|
|
|
|
|
|
|
|
|
|
|
|
|
|
|
|
| (provided) |
| ||||||||
|
|
|
|
|
|
|
|
|
|
|
|
|
|
|
|
|
|
|
|
|
|
|
|
|
|
|
| ||||
|
|
| To AUDIO, |
|
|
|
|
|
|
|
|
|
|
|
|
|
|
|
|
|
|
|
| ||||||||
|
|
|
|
|
|
|
|
|
|
|
|
|
|
|
|
|
|
|
|
|
| ||||||||||
|
|
|
|
|
|
|
|
|
|
|
|
|
|
|
| ||||||||||||||||
|
|
| VIDEO* |
|
|
|
|
|
|
|
|
|
|
| |||||||||||||||||
|
|
|
|
|
|
|
|
|
|
|
|
|
|
|
|
| |||||||||||||||
|
|
| and |
|
|
| |||||||||||||||||||||||||
|
|
| |||||||||||||||||||||||||||||
connectors |
|
To Remote |
|
PAUSE or R.A.EDIT | VCR |
|
To PAUSE IN |
|
| TV |
T | W |
DISPLAY |
|
FADE/WIPE | PLAY |
| |
R.A.EDIT | |
(provided) | ON/OFF |
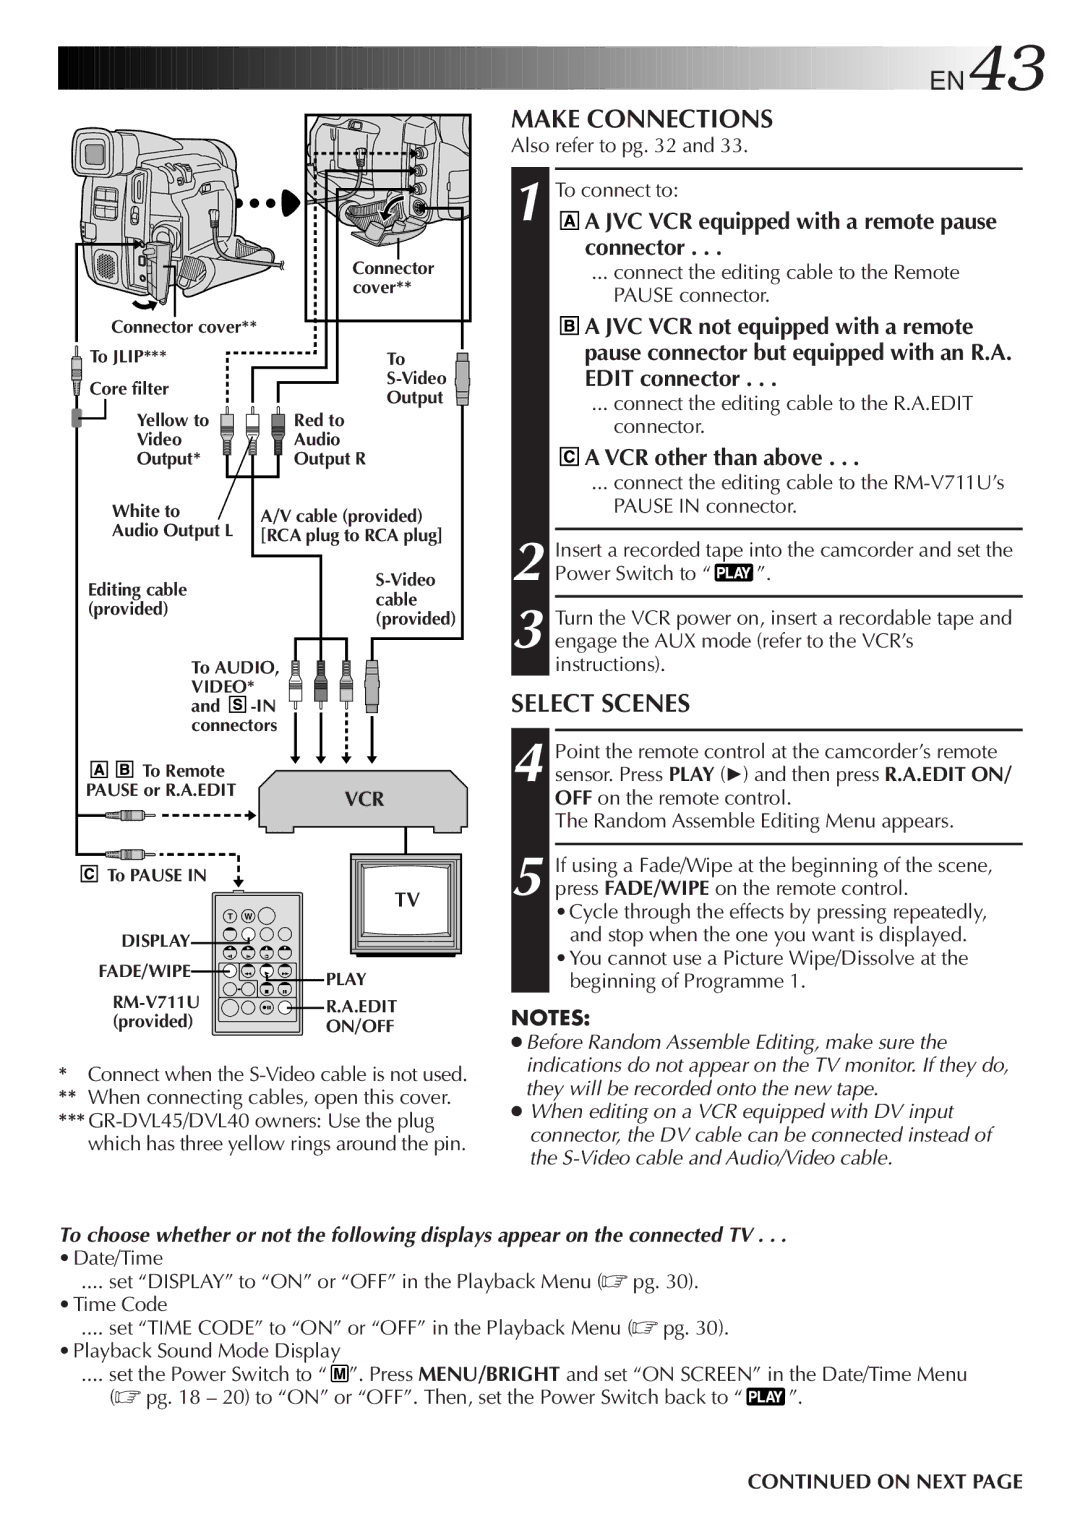
*Connect when the
**When connecting cables, open this cover.
***


 EN43
EN43
MAKE CONNECTIONS
Also refer to pg. 32 and 33.
1
4
5 If using a Fade/Wipe at the beginning of the scene, press FADE/WIPE on the remote control.
•Cycle through the effects by pressing repeatedly, and stop when the one you want is displayed.
•You cannot use a Picture Wipe/Dissolve at the beginning of Programme 1.
NOTES:
●Before Random Assemble Editing, make sure the indications do not appear on the TV monitor. If they do, they will be recorded onto the new tape.
●When editing on a VCR equipped with DV input connector, the DV cable can be connected instead of the
To choose whether or not the following displays appear on the connected TV . . .
•Date/Time
.... set “DISPLAY” to “ON” or “OFF” in the Playback Menu (☞ pg. 30).
•Time Code
.... set “TIME CODE” to “ON” or “OFF” in the Playback Menu (☞ pg. 30).
•Playback Sound Mode Display
.... set the Power Switch to “ ![]() ”. Press MENU/BRIGHT and set “ON SCREEN” in the Date/Time Menu
”. Press MENU/BRIGHT and set “ON SCREEN” in the Date/Time Menu
(☞ pg. 18 – 20) to “ON” or “OFF”. Then, set the Power Switch back to “ | ”. |
CONTINUED ON NEXT PAGE