Main
EN
COMPACT VHS CAMCORDER
INSTRUCTIONS
GR-SXM320 GR-SX851 GR-AX750
ENGLISH
CONTENTS
SAFETY PRECAUTIONS
CAUTION
The rating information and safety caution of the AC Power Adapter/Charger are on its bottom.
Warning on lithium battery (for clock operation and remote control unit)
WARNING: TO PREVENT FIRE OR SHOCK HAZARD, DO NOT EXPOSE THIS UNIT TO RAIN OR MOISTURE.
Page
5. Ventilation
6. Wall or Ceiling Mounting
ANTENNA INSTALLATION INSTRUCTIONS
1. Outdoor Antenna Grounding
IMPORTANT PRODUCT SAFETY INSTRUCTIONS
INSTALLATION
1. Grounding or Polarization
2. Power Sources
3. Overloading
USE
1. Accessories
2. Product and Cart Combination
3. Water and Moisture
4. Object and Liquid Entry
QUICK OPERATION GUIDE
1 2
Z
3
For GR-SXM320 Owners:
MAJOR FEATURES
Integrated Auto Light (GR-SXM320/SX851 only) (Z pg. 20) Program AE with Special Effects (Z pg. 22)
Picture Stabilizer (Z pg. 18)
Super VHS-ET (GR-SXM320/ SX851 only) (Z pg. 13)
TBC (Time Base Corrector) (Z pg. 32)
Power
CHARGING THE BATTERY PACK
Charge Marker
USING THE BATTERY PACK
USING AC POWER
USING A CAR BATTERY
2 3
Clock (Lithium) Battery Insertion/Removal
(cont.)
Loading/Unloading A Cassette
12-hour indication with AM or PM
Menu Screen 1
Date/Time Settings
Set the Power Switch to PRO.. The power lamp comes on.
pg. 26).
Press MENU. The Menu Screen appears.
Press the Select Wheel to close the Menu Screen.
Recording Mode Setting
Set depending on your preference.
Menu Screen
The tape remaining time (
(cont.)
2
If an S-VHS cassette is loaded . . .
In the S-VHS ET Setting Menu,
In the S-VHS Setting Menu,
If a cassette is not loaded, S-VHS will be displayed in the Menu Screen.
NOTES about S-VHS and S-VHS ET (GR-SXM320/SX851 only)
Compatibility Between S-VHS And VHS (GR-SXM320/SX851 only)
2 3
1
4
Grip Adjustment
Viewfinder Adjustment
Shoulder Strap Attachment
CAUTION:
Tripod Mounting
Shooting While Watching The Viewfinder
To Stop Recording . . .
Shooting While Watching The LCD Monitor (GR-SXM320 only)
To Adjust The Brightness Of The LCD Monitor
Basic Recording
JOURNALISTIC SHOOTING (GR-SXM320 only)
INTERFACE SHOOTING (GR-SXM320 only)
LCD MONITOR*/VIEWFINDER INDICA- TIONS
Basic Features
Zooming
Picture Stabilizer
Quick Review
Distortion may occur at the start of playback. This is normal.
Fade/Wipe (
Retake
Noise bars appear and pictures may become monochrome or darken during Retake. This is normal.
Basic Features (cont.)
DANGER
Video Light (GR-SXM320/SX851 only)
Fade/Wipe Effects
Advanced Features
FADER
MOSAIC (Fader)
SHUTTER (Wipe)
Program AE With Special Effects
Advanced Features (cont.)
Only one mode can be engaged at a time.
The screen becomes slightly reddish when the Fade/ Wipe (
pg. 21) is used in the Sepia mode.
Using Menus For Detailed Adjustment
Normal Screen
(ex. Menu Screen available using the MENU Button)
Set the Power Switch to PRO..
Menu access depends on the function you select.
Menu Screen Available Using The Select Wheel
Menu Screen Available Using The MENU Button
MENU SCREEN EXPLANATIONS
Page
Advanced Features (cont.)
DISPLAY
The selected display can be recorded.
If you do not want to record the display, select the OFF mode before shooting. AUTO DATE
After changing the date.
Animation
Time-Lapse
Animation and Time-Lapse are canceled when the power is shut off or when the cassette is ejected.
Before performing the following steps, make sure that:
The Power Switch is set to PRO..
Exposure Control
Advanced Features (cont.)
When shooting using reverse lighting or when the background is too bright.
When shooting on a reflective natural background such as at the beach or when skiing.
When the background is overly dark or the subject light.
AUTO FOCUS
MANUAL FOCUS
White Balance Adjustment
To Return To Automatic White Balance . . .
pg. 22) is activated.
White balance cannot be used when Sepia
Manual White Balance Operation
Basic Playback
LCD Monitor Brightness Adjustment (GR-SXM320 only):
Speaker Volume Control (GR-SXM320 only):
Still Playback:
Shuttle Search:
Features
Tracking:
TBC (Time Base Corrector):
Counter Memory Function:
Using The Cassette Adapter
Cassette Adapter (VHS Playpak)
Connections
B.Connection to a TV or VCR equipped only with A/V input connectors
Basic Connections
Tape Dubbing
1 4 6 8
AB
2 ! # % &
USING THE REMOTE CONTROL UNIT (GR-SXM320/SX851 only)
Buttons
1 2
3 4
5
Animation and Time-Lapse
Animation
Also refer to page 27.
Time-Lapse
USING THE REMOTE CONTROL UNIT (GR-SXM320/SX851 ony)
(cont.)
After step 5, Retake (
Insert Editing
Use the RM-V700U remote control unit to perform this procedure.
Audio Dubbing
TROUBLESHOOTING
SYMPTOM POSSIBLE CAUSE(S)
TAPE TRANSPORT
POWER
RECORDING
OTHER
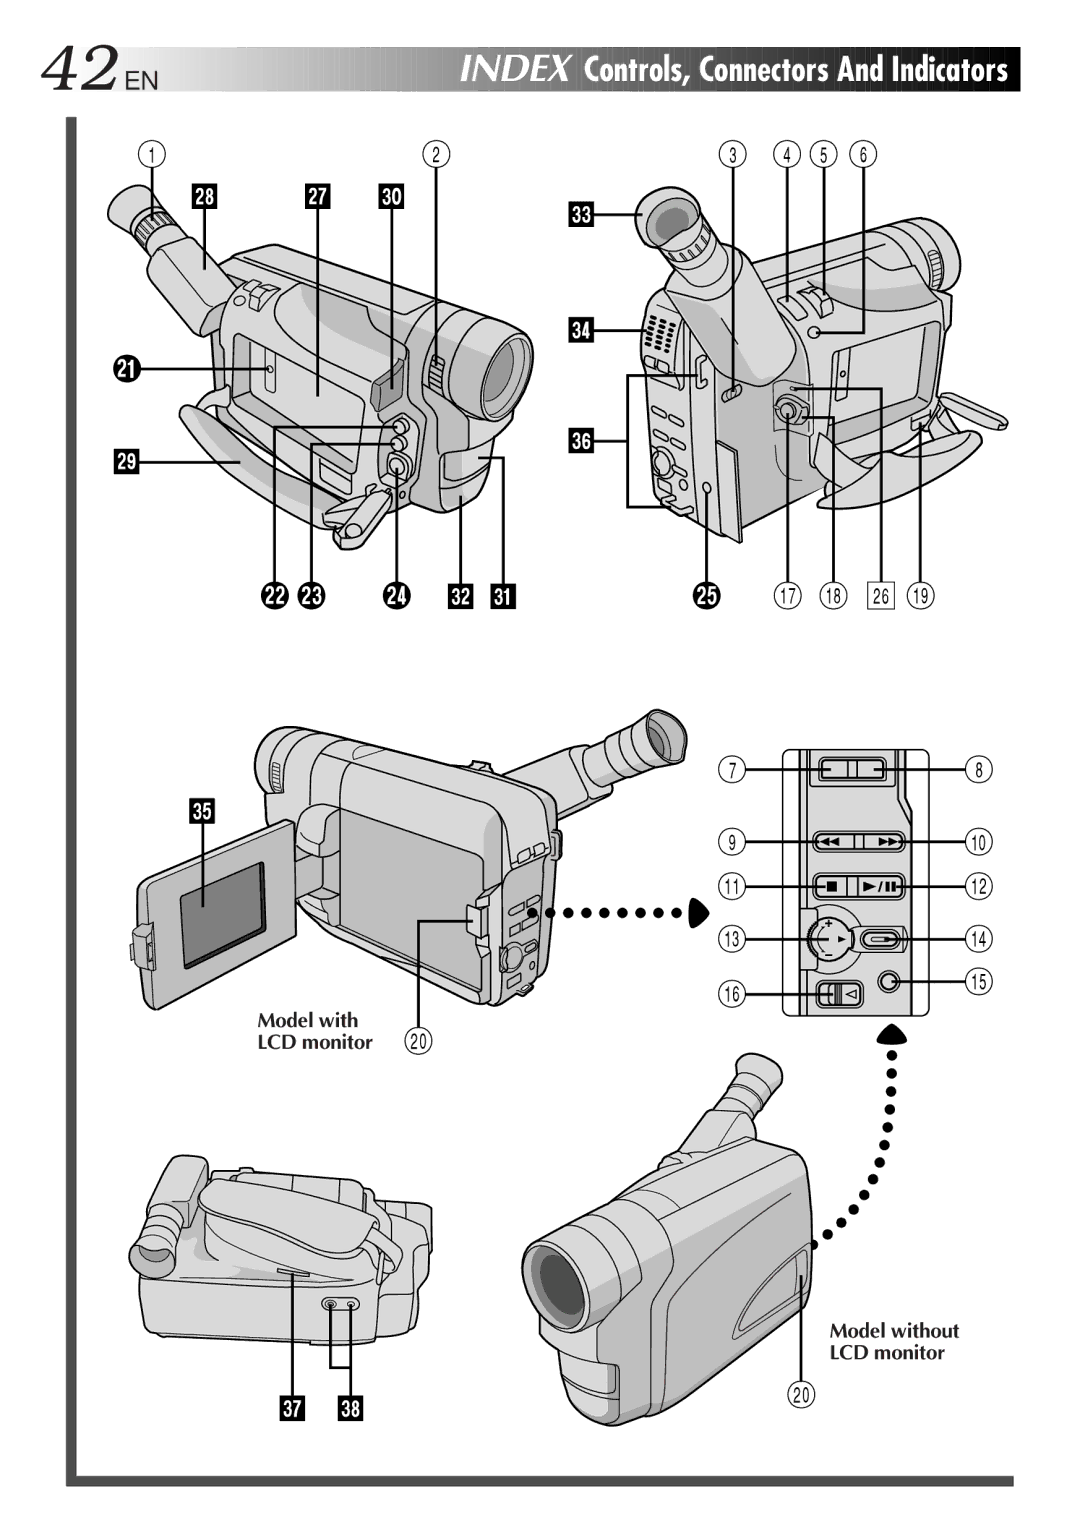
INDEX
Controls, Connectors And Indicators
Controls
Connectors
Indicators
Other Parts
INDEX
Indications
Indications During Recording
(
53 42
Warning Indications
Indications During Playback
9 8
+
2 7 4 1 3 5 6
CAUTIONS
Video Light
DANGER:
General Battery Precautions
INFORMATION
Battery Packs
Recharging time is based on room temperature of 20C (68F.)
The lower the temperature, the longer recharging takes.
Cassettes
CAUTIONS
Main Unit
LCD Monitor
TERMS
Page
Connectors
AC Power Adapter/Charger AA-V16U
Cassette Adapter C-P7U
Optional Accessories
SPECIFICATIONS
Camcorder
General
ESPAOL
A
Alimentacin
no
CARGA DE LA BATERIA
GUIA PARA OPERACION RAPIDA
1 2
1
2
3
FOR SERVICING (Only in U.S.A.)
HOW TO LOCATE YOUR JVC SERVICE CENTER
Dear customer:
Dont service it yourself.
JVC
WARRANTY (Only in U.S.A.)
LIMITED WARRANTY
CONSUMER VIDEO 1-90
EN