24ENTIMERRECORDING(cont.)

Regular Timer Programming

If you don’t know the SowView number for the programme you wish to record, use the following procedure to set your recorder to timer-record the programme.

Or you can use the Illumi-Guide feature, where the remote control tells you which button to press next by lighting it up. To use the Illumi-Guide feature, press ILLUMI GUIDE before performing step 1. (PROG, REW, PLAY, FF light up at this time.)

If you aren't going to use the Illumi-Guide feature, go directly to step 1.

Remember, the clock must be set before you can progamme the timer (pg. 7).

Before performing the following steps:

1

Insert a cassette with the safety tab in place. The recorder

will come on automatically.

Turn on the TV and select the VIDEO channel (or AV mode).

+

000

0

000

0000

0

000

ACCESS TIMER PROGRAM- MING SCREEN

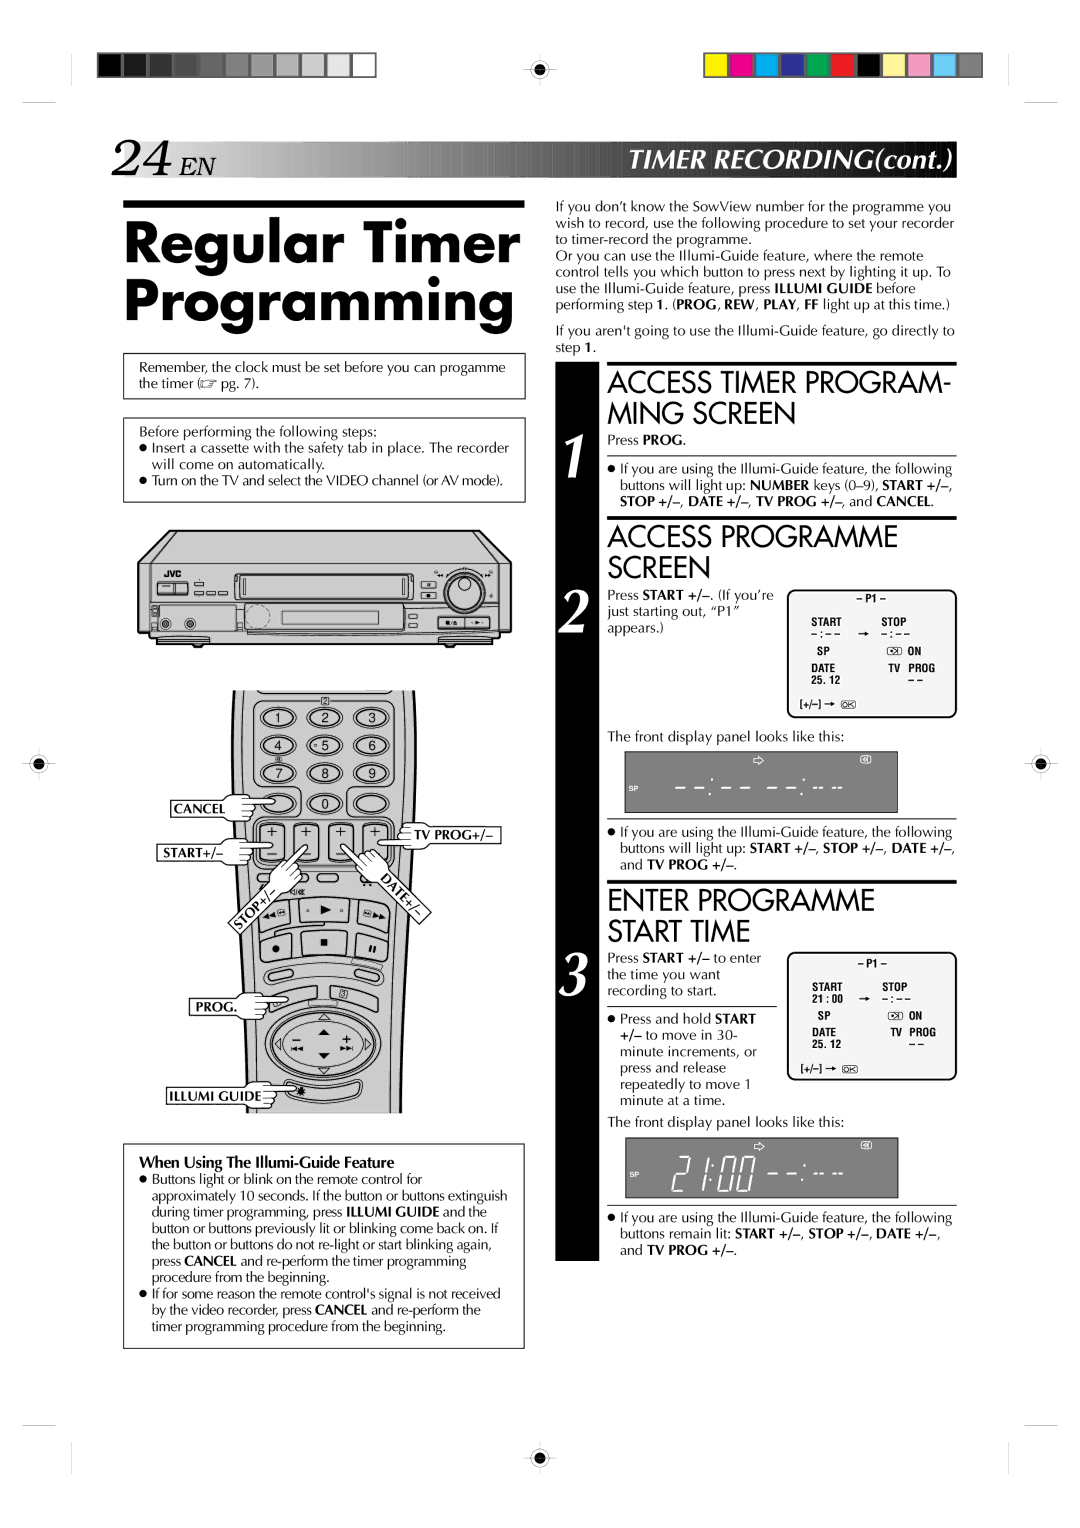
Press PROG.

If you are using the Illumi-Guide feature, the following buttons will light up: NUMBER keys (0–9), START +/–, STOP +/–, DATE +/–, TV PROG +/–, and CANCEL.

ACCESS PROGRAMME SCREEN


000

0000

2


000

0

000

000

000

000


00

00


2


1

2

3

Press START +/–. (If you’re just starting out, “P1” appears.)


– P1 –

START

STOP

– : – –

= – : – –

SP


ON


DATE

TV PROG

25. 12


– –

[+/–] =


4

5

6

7

8

9

CANCEL

0


TV PROG+/–

START+/–

DATE+/

STOP+/


The front display panel looks like this:

SP

If you are using the Illumi-Guide feature, the following buttons will light up: START +/–, STOP +/–, DATE +/–, and TV PROG +/–.

ENTER PROGRAMME START TIME

3

3

PROG.

1


ILLUMI GUIDE

Press START +/– to enter the time you want recording to start.

Press and hold START +/– to move in 30- minute increments, or press and release repeatedly to move 1 minute at a time.


– P1 –

START

STOP

21 : 00

= – : – –

SP


ON


DATE

TV PROG

25. 12


– –

[+/–] =


When Using The Illumi-Guide Feature

Buttons light or blink on the remote control for approximately 10 seconds. If the button or buttons extinguish during timer programming, press ILLUMI GUIDE and the button or buttons previously lit or blinking come back on. If the button or buttons do not re-light or start blinking again, press CANCEL and re-perform the timer programming procedure from the beginning.

If for some reason the remote control's signal is not received by the video recorder, press CANCEL and re-perform the timer programming procedure from the beginning.

The front display panel looks like this:

SP

If you are using the Illumi-Guide feature, the following buttons remain lit: START +/–, STOP +/–, DATE +/–, and TV PROG +/–.

Page 24
Image 24
JVC HR-E439EG, HR-E239EG specifications Regular Timer Programming, Will come on automatically, Press Prog

HR-E239EG, HR-E439EG specifications

The JVC HR-E439EG and HR-E239EG are noteworthy models in the realm of VHS video cassette recorders, captivating users with their efficient design, reliability, and a suite of features tailored for both casual viewers and dedicated videophiles. Built with JVC's commitment to quality, these models are designed for ease of use while incorporating advanced technologies that enhance the viewing and recording experience.

Both the HR-E439EG and HR-E239EG boast robust playback capabilities for VHS tapes, ensuring compatibility with a wide variety of video formats. Their construction includes high-quality components that contribute to crisp video reproduction and clear audio playback, maintaining the integrity of the original recordings. The devices utilize JVC’s Super VHS technology, allowing for superior picture quality when playing Super VHS tapes, alongside standard VHS tapes.

One of the standout features of the HR-E439EG is its built-in Time Base Corrector (TBC), which significantly improves the playback quality by reducing jitter and enhancing stability in the video signal. This technology is especially beneficial for older tapes that have degraded over time, allowing users to experience their favorite films and recordings in improved clarity. On the other hand, the HR-E239EG, while lacking the TBC, still delivers solid performance and is equipped with features that cater to everyday recording needs.

Both models support standard recording features including a programmable timer, allowing users to schedule recordings easily. The VCRs come with several playback modes, offering options such as slow-motion and frame advance, enhancing the viewing experience for those who enjoy detailed analysis of their recordings. The convenience of an on-screen display is also featured, making navigation through the settings and tape management intuitive.

In terms of connectivity, the HR-E439EG and HR-E239EG provide composite video and audio outputs, allowing users to connect to various television models seamlessly. The designs are also user-friendly, with straightforward controls that make operation easy for all ages.

These VCRs represent the classic reliability of JVC products, serving as an excellent choice for those looking to preserve their VHS collections or simply enjoy the nostalgic experience of analog video playback. Both the HR-E439EG and HR-E239EG stand out for their practicality, making them beloved devices in the ongoing legacy of cassette recording technology.