18

 EN
EN


 TIMER
TIMER
 RECORDING

Timer Programming
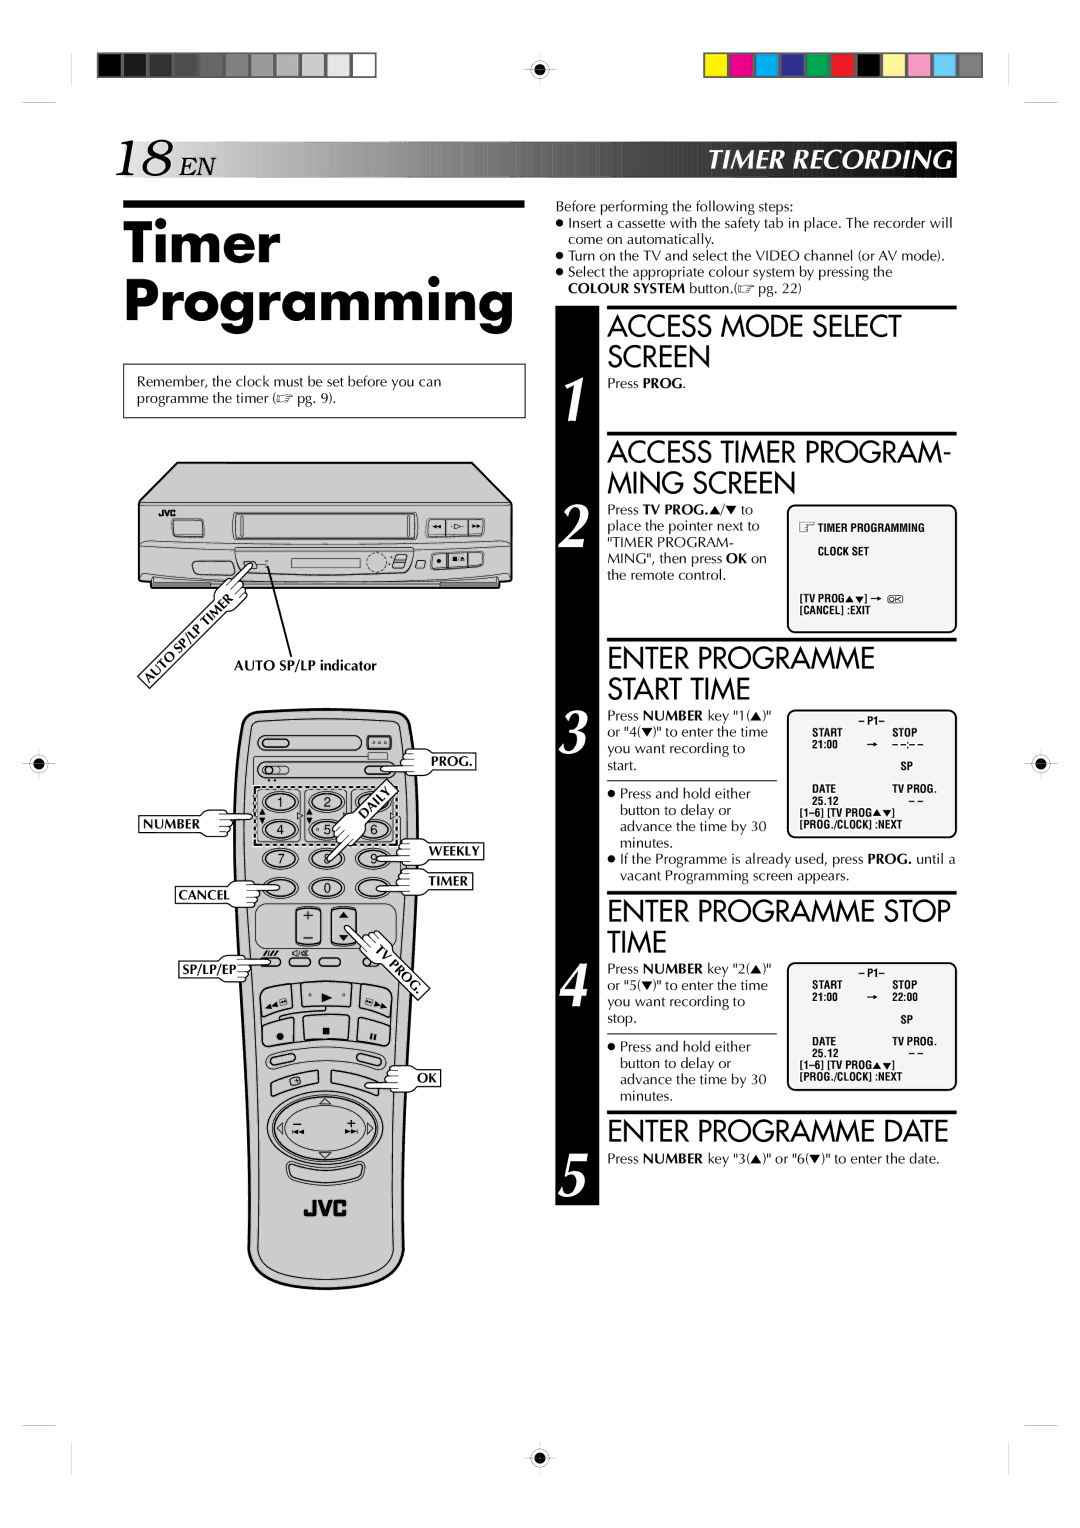
Remember, the clock must be set before you can programme the timer (☞ pg. 9).
2 | 2 |
q ![]() 5/8
5/8 ![]()
| SP/LP | TIMER |
|
|
|
|
AUTO |
| AUTO SP/LP indicator |
| |||
|
|
| ||||
|
|
|
| |||
|
|
|
|
|
| PROG. |
|
|
| 1 | 2 | DAILY |
|
|
|
| 3 |
| ||
NUMBER |
| 4 | 5 | 6 |
| |
|
|
|
| |||
|
|
| 7 | 8 | 9 | WEEKLY |
|
|
|
| |||
| CANCEL |
| 0 |
| TIMER | |
|
|
|
| |||
|
|
|
|
| ||
|
|
|
|
| TV |
|
| SP/LP/EP |
| PROG |
| ||
|
|
|
| |||
|
|
|
|
| . |
|
OK
Before performing the following steps:
●Insert a cassette with the safety tab in place. The recorder will come on automatically.
●Turn on the TV and select the VIDEO channel (or AV mode).
●Select the appropriate colour system by pressing the COLOUR SYSTEM button.(☞ pg. 22)
| ACCESS MODE SELECT | |||
| SCREEN |
|
| |
1 Press PROG. |
|
| ||
| ACCESS TIMER PROGRAM- | |||
2 | MING SCREEN |
|
| |
Press TV PROG.5/° to |
|
| ||
place the pointer next to | TIMER PROGRAMMING | |||
"TIMER PROGRAM- | CLOCK SET |
| ||
| MING", then press OK on |
|
| |
| the remote control. |
|
| |
|
|
| [TV PROG5°] = |
|
|
|
| [CANCEL] :EXIT |
|
|
|
|
| |
| ENTER PROGRAMME |
| ||
| START TIME |
|
| |
| Press NUMBER key "1(5)" | – P1– |
| |
| or "4(°)" to enter the time | START | STOP | |
3 you want recording to | 21:00 = | – | ||
|
| |||
| start. |
| SP | |
|
|
| DATE | TV PROG. |
| ● Press and hold either | |||
| button to delay or | 25.12 | – – | |
| ||||
| advance the time by 30 | [PROG./CLOCK] :NEXT | ||
| minutes. |
|
| |
●If the Programme is already used, press PROG. until a vacant Programming screen appears.
ENTER PROGRAMME STOP TIME
| Press NUMBER key "2(5)" |
| – P1– |
| or "5(°)" to enter the time | START | STOP |
4 you want recording to | 21:00 | = 22:00 | |
|
| ||
| stop. |
| SP |
|
| DATE | TV PROG. |
| ● Press and hold either | ||
| 25.12 | – – | |
| button to delay or | ||
| |||
| advance the time by 30 | [PROG./CLOCK] :NEXT | |
| minutes. |
|
|
|
| ||
| ENTER PROGRAMME DATE | ||
5 Press NUMBER key "3(5)" or "6(°)" to enter the date. | |||
