31

ATTENTION

Be sure not to turn on the satellite receiver before the programme is executed; otherwise, the recorder will start recording when the satellite receiver's power is turned on.

If you have connected another appliance other than a satellite receiver to the AV2 (L-2) IN/DECODER connector, be sure not to engage the Auto Satellite Prog Rec mode; otherwise, the recorder will start recording when the connected appliance's power is turned on.

Auto Satellite Prog recording and timer-recording cannot be done at the same time.

When you press and hold the recorder's SATäbutton to engage the Auto Satellite Prog Rec mode, if the SATä button does not light but instead blinks quickly even though your satellite receiver's power is off, Auto Satellite Prog Recording will not work properly with that satellite receiver*.

If this is the case, perform "Express Timer Programming" (pg. 20) to timer-record a satellite programme.

*Some satellite receivers output signals even if the power is off. Auto Satellite Prog Recording is not possible with those satellite receivers.

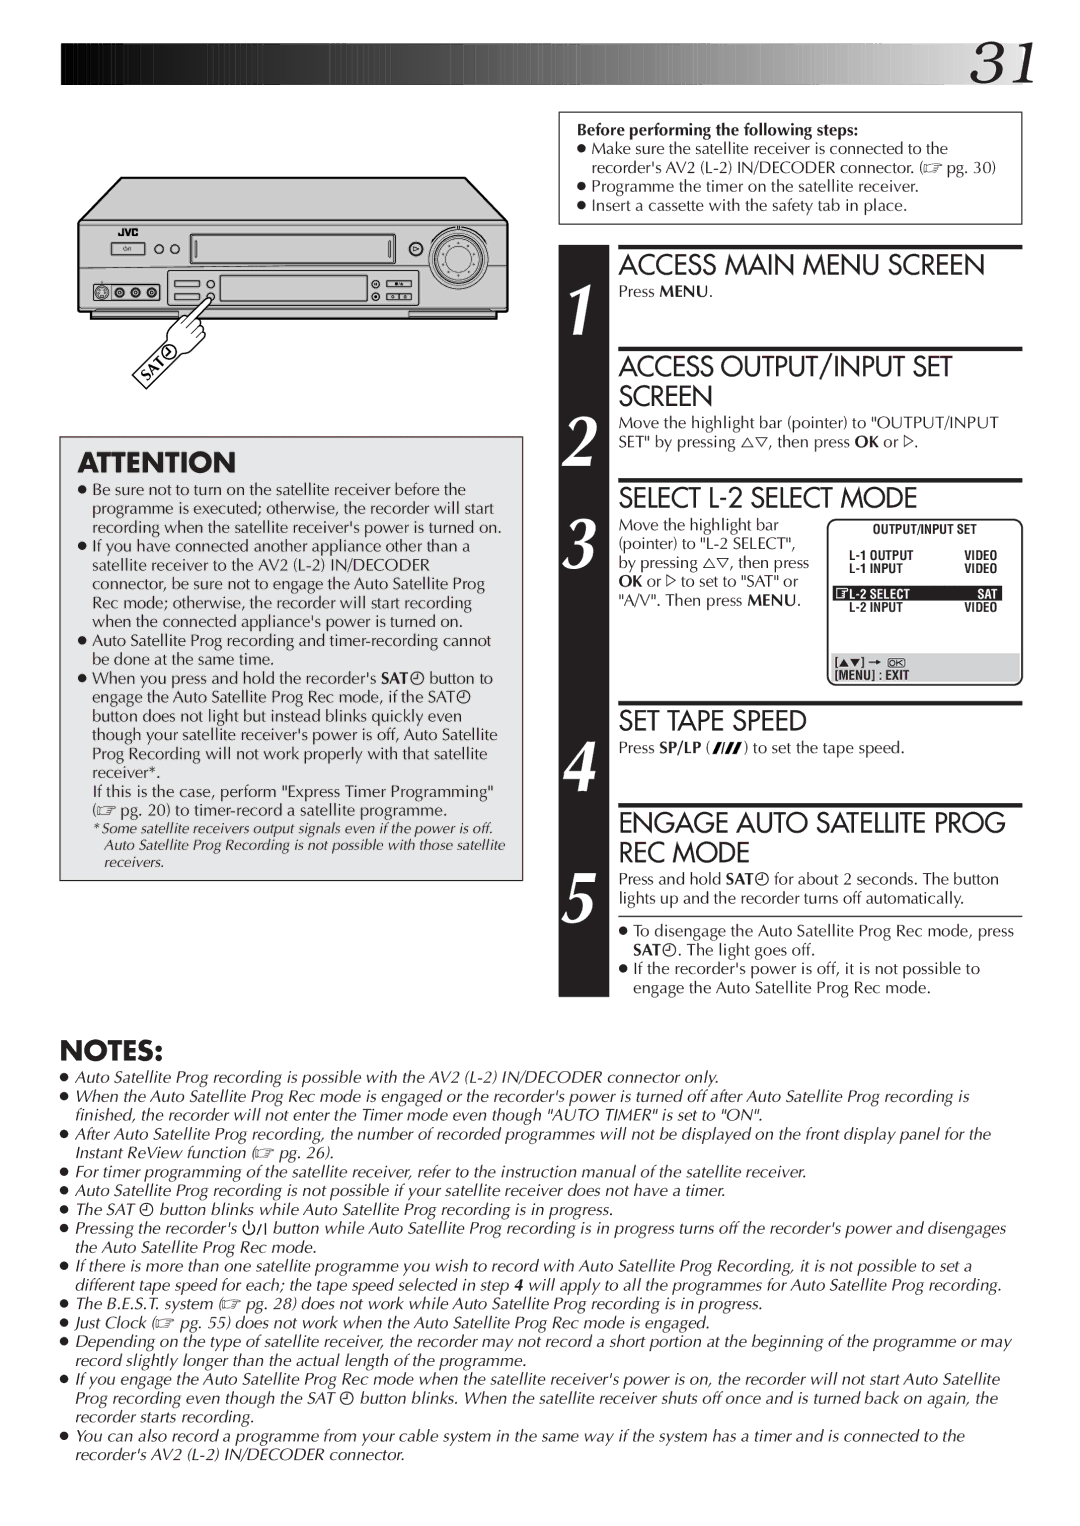
Before performing the following steps:

Make sure the satellite receiver is connected to the recorder's AV2 (L-2) IN/DECODER connector. (pg. 30)

Programme the timer on the satellite receiver.

Insert a cassette with the safety tab in place.

ACCESS MAIN MENU SCREEN

1 Press MENU.


ACCESS OUTPUT/INPUT SET


2

SCREEN


Move the highlight bar (pointer) to "OUTPUT/INPUT

SET" by pressing , then press OK or #.


SELECT L-2 SELECT MODE


Move the highlight bar

OUTPUT/INPUT SET


(pointer) to "L-2 SELECT",

L-1 OUTPUT

VIDEO

3 by pressing , then press

L-1 INPUT

VIDEO


OK or #to set to "SAT" or


L-2 SELECT

SAT


"A/V". Then press MENU.


L-2 INPUT

VIDEO


[] =


[MENU] : EXIT


SET TAPE SPEED


4 Press SP/LP ( ) to set the tape speed.


ENGAGE AUTO SATELLITE PROG

5

REC MODE


Press and hold SATä for about 2 seconds. The button

lights up and the recorder turns off automatically.


To disengage the Auto Satellite Prog Rec mode, press SATä. The light goes off.

If the recorder's power is off, it is not possible to engage the Auto Satellite Prog Rec mode.

NOTES:

Auto Satellite Prog recording is possible with the AV2 (L-2) IN/DECODER connector only.

When the Auto Satellite Prog Rec mode is engaged or the recorder's power is turned off after Auto Satellite Prog recording is finished, the recorder will not enter the Timer mode even though "AUTO TIMER" is set to "ON".

After Auto Satellite Prog recording, the number of recorded programmes will not be displayed on the front display panel for the Instant ReView function (pg. 26).

For timer programming of the satellite receiver, refer to the instruction manual of the satellite receiver.

Auto Satellite Prog recording is not possible if your satellite receiver does not have a timer.

The SAT ä button blinks while Auto Satellite Prog recording is in progress.

Pressing the recorder's button while Auto Satellite Prog recording is in progress turns off the recorder's power and disengages the Auto Satellite Prog Rec mode.

If there is more than one satellite programme you wish to record with Auto Satellite Prog Recording, it is not possible to set a different tape speed for each; the tape speed selected in step 4 will apply to all the programmes for Auto Satellite Prog recording.

The B.E.S.T. system (pg. 28) does not work while Auto Satellite Prog recording is in progress.

Just Clock (pg. 55) does not work when the Auto Satellite Prog Rec mode is engaged.

Depending on the type of satellite receiver, the recorder may not record a short portion at the beginning of the programme or may record slightly longer than the actual length of the programme.

If you engage the Auto Satellite Prog Rec mode when the satellite receiver's power is on, the recorder will not start Auto Satellite Prog recording even though the SAT ä button blinks. When the satellite receiver shuts off once and is turned back on again, the recorder starts recording.

You can also record a programme from your cable system in the same way if the system has a timer and is connected to the recorder's AV2 (L-2) IN/DECODER connector.

Page 31
Image 31
JVC HR-S7722EK Screen, Select L-2 Select Mode, Engage Auto Satellite Prog, REC Mode, Before performing the following steps

HR-S7722EK, HR-S7700EK specifications

The JVC HR-S7700EK and HR-S7722EK are standout models in JVC’s VCR lineup, renowned for their impressive performance and advanced technology designed to enhance video playback quality. These S-VHS VCRs have gained a loyal following among both casual viewers and videophiles looking to enjoy superior picture clarity and fidelity.

One of the most significant features of both models is their support for S-VHS recordings, which offer improvements over standard VHS by providing higher resolution and enhanced color reproduction. This technology enables users to capture and playback videos with remarkable sharpness and detail, making these VCRs ideal for preserving precious memories or enjoying old tapes.

The JVC HR-S7700EK and HR-S7722EK are equipped with the JVC's Super VHS ET (Extended Technology), allowing users to play VHS tapes with S-VHS quality enhancements. This capability ensures that even standard VHS recordings benefit from improved playback quality, making it an excellent choice for those with existing VHS libraries.

Both models shine with their TBC (Time Base Corrector) technology, which stabilizes and cleans the video signal, reducing jitter and improving overall playback performance. This feature is particularly useful when playing older, damaged tapes, making the viewing experience smoother and more enjoyable.

The JVC HR-S7722EK takes it a step further with its advanced features such as digital noise reduction and various playback options, ensuring that users can enjoy an optimized viewing experience tailored to their preferences. With multiple recording speeds, including SP and LP modes, users can choose their desired balance between picture quality and recording time.

An intuitive user interface allows for straightforward navigation, making it easy for users to program recordings or adjust settings. The models also come with features like a child lock and an on-screen display, enhancing the user-friendly experience.

The build quality of the JVC HR-S7700EK and HR-S7722EK is solid, ensuring durability and reliability. Many users appreciate the sleek design, which fits seamlessly into most home entertainment setups. These models remain a favorite for those looking to preserve VHS content with optimal quality, thanks to their advanced technologies and thoughtful features that cater to the needs of users across various demographics.