Audio Dubbing

A. DUB

PLAY


8

• • •

• • •


• •

• •


PAUSE

STOP/EJECT

CD Player etc.

CD Player etc.

Mixer output

Audio mixer

Original sound

AUDIO OUT


8

• • •

• • •

• •

• •

• •

• •

NOTES:

When monitoring the sound during Audio Dubbing, the normal soundtrack is automatically selected. If you wish to hear the mixed sound (Hi-Fi + Normal soundtracks), press AUDIO MONITOR on the remote control to select "L+R+NORM" (pg. 18).

Audio dubbing stops automatically when the counter reaches "0:00:00", and the recorder enters the Play mode. Check the counter reading before dubbing.

Audio dubbing is also possible using the rear panel AV1 IN/ OUT or AV2 IN connector. When using these connectors, make sure to select the correct input mode in step 2.

Audio dubbing cannot be performed on a cassette that has had its record safety tab removed.

When playing back an audio-dubbed tape, press AUDIO MONITOR on the remote control to select the soundtrack you wish to hear (pg. 18).

EN43

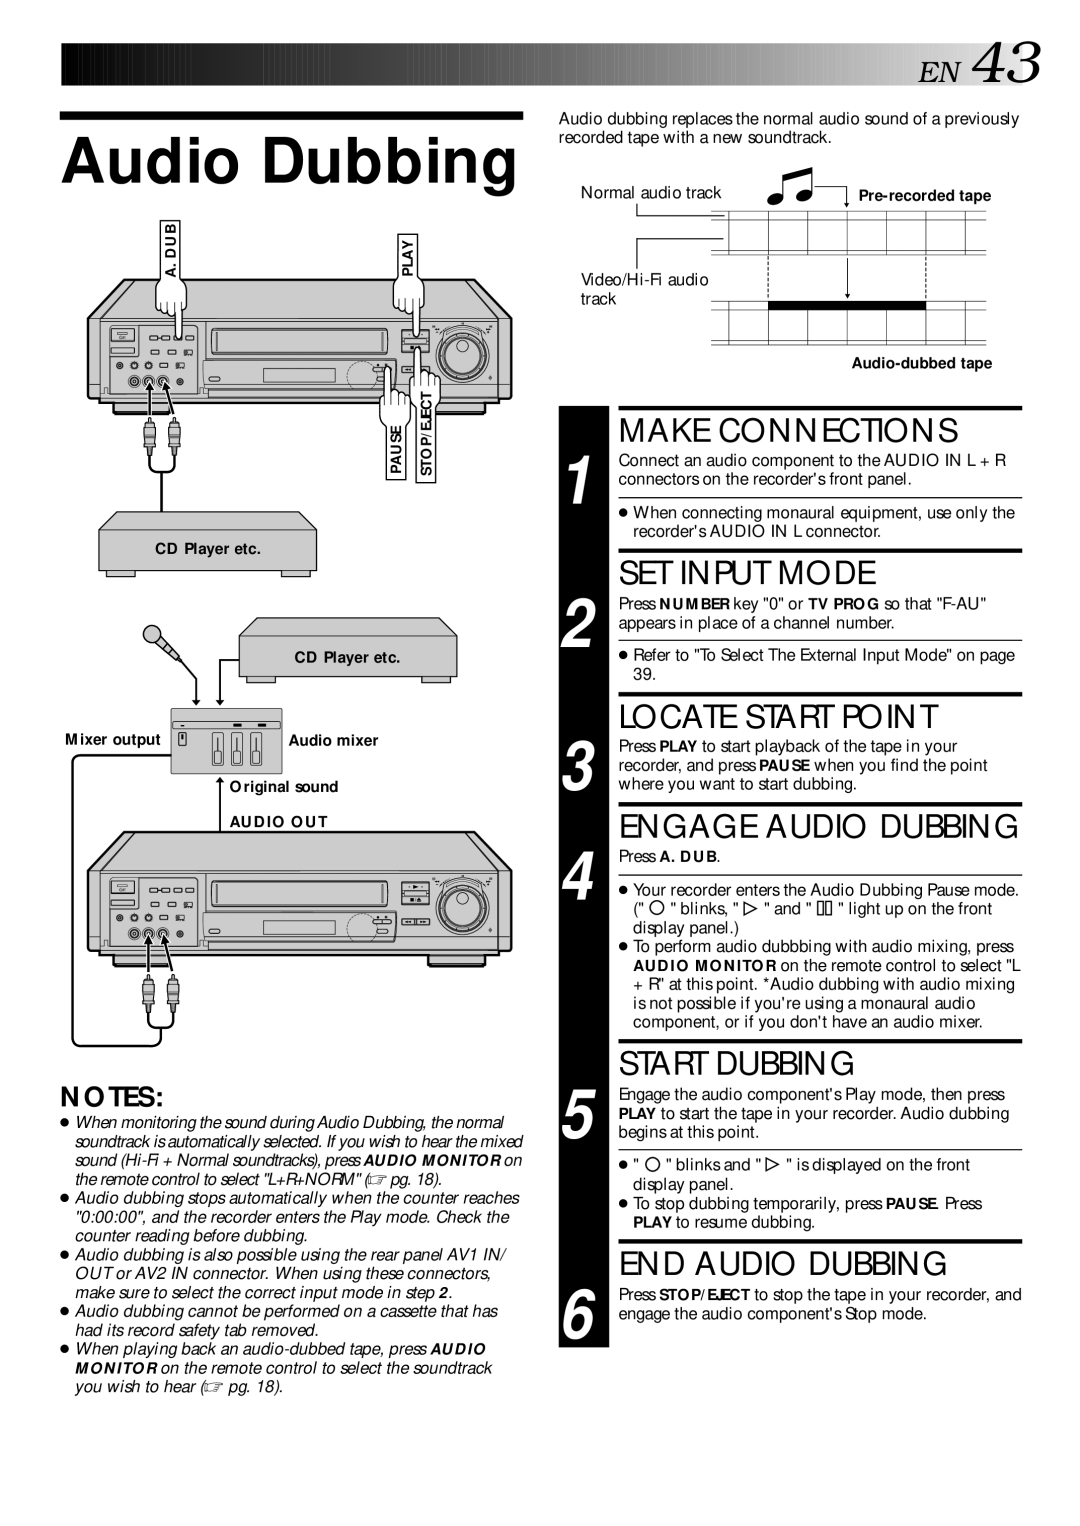
Audio dubbing replaces the normal audio sound of a previously recorded tape with a new soundtrack.

Normal audio track


Pre-recorded tape


Video/Hi-Fi audio track

Audio-dubbed tape

MAKE CONNECTIONS

1 Connect an audio component to the AUDIO IN L + R connectors on the recorder's front panel.

When connecting monaural equipment, use only the recorder's AUDIO IN L connector.

SET INPUT MODE

2 Press NUMBER key "0" or TV PROG so that "F-AU" appears in place of a channel number.

Refer to "To Select The External Input Mode" on page 39.


LOCATE START POINT


Press PLAY to start playback of the tape in your


recorder, and press PAUSE when you find the point

3 where you want to start dubbing.

4

ENGAGE AUDIO DUBBING

Press A. DUB.


Your recorder enters the Audio Dubbing Pause mode.

("

" blinks, "

" and " " light up on the front


display panel.)


To perform audio dubbbing with audio mixing, press


AUDIO MONITOR on the remote control to select "L


+ R" at this point. *Audio dubbing with audio mixing


is not possible if you're using a monaural audio


component, or if you don't have an audio mixer.


START DUBBING


Engage the audio component's Play mode, then press


PLAY to start the tape in your recorder. Audio dubbing

5 begins at this point.


"

" blinks and "

" is displayed on the front


display panel.


To stop dubbing temporarily, press PAUSE. Press


PLAY to resume dubbing.


END AUDIO DUBBING


Press STOP/EJECT to stop the tape in your recorder, and

6 engage the audio component's Stop mode.

Page 43
Image 43
JVC HR-S9400EE specifications SET Input Mode, Engage Audio Dubbing, Start Dubbing, END Audio Dubbing

HR-S9400EE specifications

The JVC HR-S9400EE is a versatile and highly regarded Super VHS (S-VHS) VCR that has been a favorite among video enthusiasts and professionals. Released in the 1990s, it is celebrated for its cutting-edge technology and a plethora of features that cater to both casual users and avid videographers.

One of the standout characteristics of the HR-S9400EE is its Super VHS playback capability. This allows for improved video quality compared to standard VHS, providing sharper images and enhanced color fidelity. The unit incorporates a digital noise reduction system, which significantly minimizes artifacts and enhances the overall clarity of the recorded footage. This technology is particularly important for capturing high-quality home videos or professional content.

The JVC HR-S9400EE also boasts a unique 3D Y/C separation system, which effectively separates the luminance (Y) and chrominance (C) signals, leading to higher resolution and improved picture quality. Additionally, it includes a built-in TBC (Time Base Corrector) that ensures smooth playback by correcting video timing errors, making it particularly useful for older tapes that may have suffered from signal degradation.

Another notable feature is its extensive range of playback formats. The HR-S9400EE can handle not only S-VHS tapes but also standard VHS and VHS-C formats, providing unparalleled flexibility for users with diverse collections. The device comes equipped with a remote control for convenient operation, making it easy to navigate through menus and adjust settings without hassle.

The unit also features stereo audio playback, delivering a rich sound experience that complements its visual capabilities. For those interested in dubbing or transferring tapes, the JVC HR-S9400EE offers high-quality recording options, making it a valuable asset for archiving precious memories.

In terms of design, the HR-S9400EE is built with reliability and user-friendliness in mind. Its intuitive layout and well-placed buttons make it simple to operate, while the sturdy construction ensures that it can withstand regular use without compromising performance.

Overall, the JVC HR-S9400EE VCR stands out as a high-quality option for anyone seeking superior video recording and playback capabilities. Its impressive array of features and technologies makes it a timeless choice for preserving and enjoying video content, even in an age dominated by digital formats.