59

Tuner Set

IMPORTANT

Perform the following steps only if —

Auto Channel Set has not been set correctly by Auto Set Up or by Preset Download. ( pg. 12, 13)

you have moved to a different area or if a new station starts broadcasting in your area.

Your unit needs to memorize all necessary stations in channel positions in order to record TV programmes. Auto Channel Set automatically assigns all receivable stations in your area to call them up by using the PR buttons without going through any vacant channels.

Turn on the TV and select the video channel (or AV mode).

Slide the TV/VCR/DVD switch on the remote control to the right.

Slide to the right.

Auto Channel Set

A Turn on the unit.

Press 1.

B Select the VHS deck.

On the unit

Press VCR/DVD repeatedly so that the VCR indicator lights up.

On the remote control

Press VCR so that the VCR indicator lights up.

C Access the Main Menu screen.

Press SET UP.

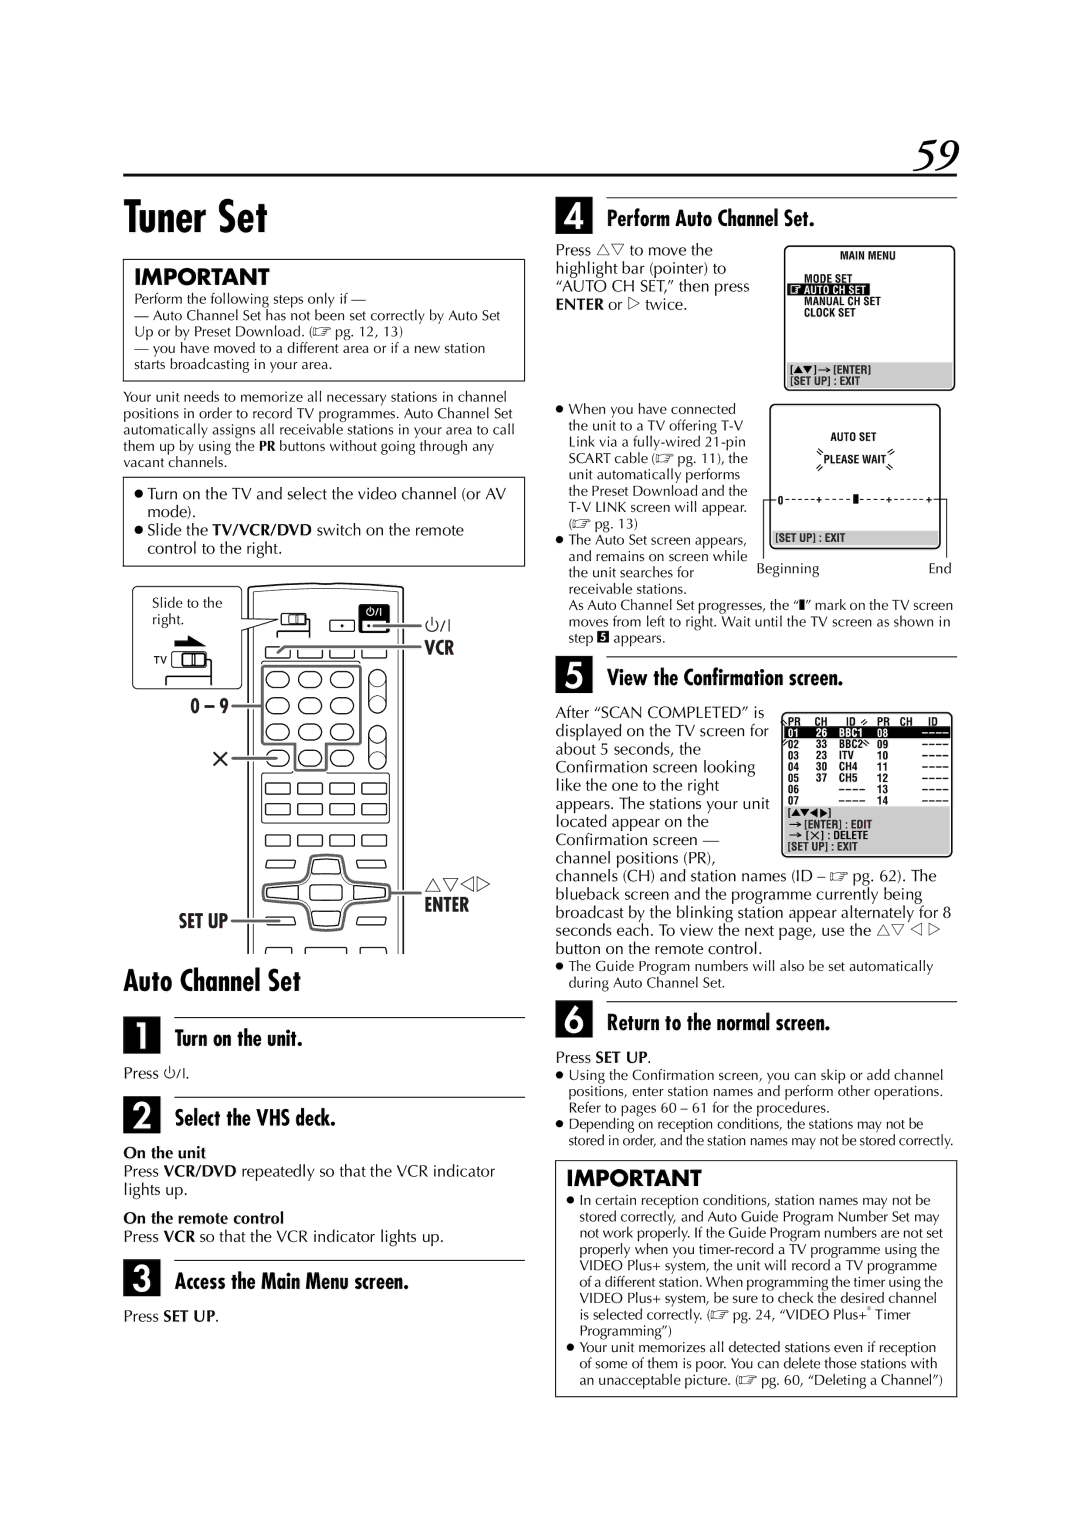
D Perform Auto Channel Set.

Press rt to move the highlight bar (pointer) to “AUTO CH SET,” then press ENTER or e twice.

When you have connected

the unit to a TV offering T-V


Link via a fully-wired 21-pin


SCART cable ( pg. 11), the


unit automatically performs


the Preset Download and the


T-V LINK screen will appear.


( pg. 13)


The Auto Set screen appears,


and remains on screen while

Beginning

End

the unit searches for

receivable stations.

As Auto Channel Set progresses, the “q” mark on the TV screen moves from left to right. Wait until the TV screen as shown in step E appears.

E View the Confirmation screen.

After “SCAN COMPLETED” is

displayed on the TV screen for about 5 seconds, the Confirmation screen looking like the one to the right appears. The stations your unit located appear on the Confirmation screen — channel positions (PR),

channels (CH) and station names (ID –  pg. 62). The blueback screen and the programme currently being broadcast by the blinking station appear alternately for 8 seconds each. To view the next page, use the rt w e button on the remote control.

The Guide Program numbers will also be set automatically during Auto Channel Set.

F Return to the normal screen.

Press SET UP.

Using the Confirmation screen, you can skip or add channel positions, enter station names and perform other operations. Refer to pages 60 – 61 for the procedures.

Depending on reception conditions, the stations may not be stored in order, and the station names may not be stored correctly.

IMPORTANT

In certain reception conditions, station names may not be stored correctly, and Auto Guide Program Number Set may not work properly. If the Guide Program numbers are not set properly when you timer-record a TV programme using the VIDEO Plus+ system, the unit will record a TV programme of a different station. When programming the timer using the

VIDEO Plus+ system, be sure to check the desired channel is selected correctly. ( pg. 24, “VIDEO Plus+® Timer Programming”)

Your unit memorizes all detected stations even if reception

of some of them is poor. You can delete those stations with an unacceptable picture. ( pg. 60, “Deleting a Channel”)

Page 59
Image 59
JVC LPT0991-001A manual Tuner Set, Perform Auto Channel Set, View the Confirmation screen

LPT0991-001A specifications

The JVC LPT0991-001A is a versatile and innovative product from JVC, a brand known for its cutting-edge technology and superior audio-visual solutions. This model stands out in the market due to its exceptional features, making it suitable for both professional and casual users.

One of the key characteristics of the JVC LPT0991-001A is its remarkable sound quality. Equipped with advanced audio technologies, it delivers clear and powerful sound across a wide frequency range. The model incorporates sophisticated engineering that enhances listening experiences, whether it be for music, movies, or gaming. Users can appreciate the full depth and richness of sound, allowing for an engaging auditory experience.

In terms of connectivity, the JVC LPT0991-001A doesn't disappoint. It supports various input options, including Bluetooth, USB, and auxiliary connections, making it compatible with a range of devices. This versatility allows users to seamlessly connect smartphones, tablets, laptops, and other devices without hassle. Furthermore, Bluetooth capability ensures easy wireless streaming, enhancing convenience for users who prefer a clutter-free environment.

The design of the JVC LPT0991-001A is sleek and modern, making it an attractive addition to any setup. Its compact form factor ensures that it can be easily integrated into various spaces, while still providing robust performance. Additionally, the user interface is intuitive, with controls that are easy to understand, allowing users to navigate through settings effortlessly.

Durability is another notable feature of the JVC LPT0991-001A. Constructed with high-quality materials, it is designed to withstand the rigors of regular use, making it a reliable choice for both home and professional environments. The product also emphasizes energy efficiency, appealing to environmentally conscious users while maintaining high performance.

Overall, the JVC LPT0991-001A is an impressive model, combining high-quality sound, versatile connectivity, modern design, and durability. It caters to a wide range of audio needs, making it a solid investment for individuals looking to enhance their audio experience, whether for entertainment or professional applications. As technology continues to evolve, the LPT0991-001A stands out as a model that embraces innovation while delivering outstanding performance and user satisfaction.