Basic Settings
English
Notes:
•This function does not take effect in the following cases:
–While playing an analog source,
–While selecting any of DSP modes (see page 28), or one of the fixed digital input
–While listening with the
•If you select another Surround mode or DSP mode (or deactivate the Surround/DSP mode) manually, Auto Surround, if in use, will be canceled temporarily for the currently selected source.
Auto Surround setting will be restored in the following cases:
–When you turn the receiver off and on,
–When you change the source,
–When you change the analog/digital input, and
–When you select “AUTO SURR ON” again.
¶Virtual Surround Back—VIRTUAL SBACK
You can enjoy the surround back channel while playing back Dolby Digital EX software or
Select “VRTL SB ON” to activate Virtual Surround Back.
VRTL SB ON: While you play Dolby Digital EX software or
VRTL SB OFF: Select to deactivate Virtual Surround Back.
Notes:
•When you have set “NONE” for “SURR SPEAKERS,” this function is not available.
•While playing back
•Virtual Surround Back may not be applied to some software.

 Setting the Digital Input Terminals
When you use the digital input terminals, register which components you have connected to the digital input terminals.
¶Digital Input
Set the components connected to the digital terminals.
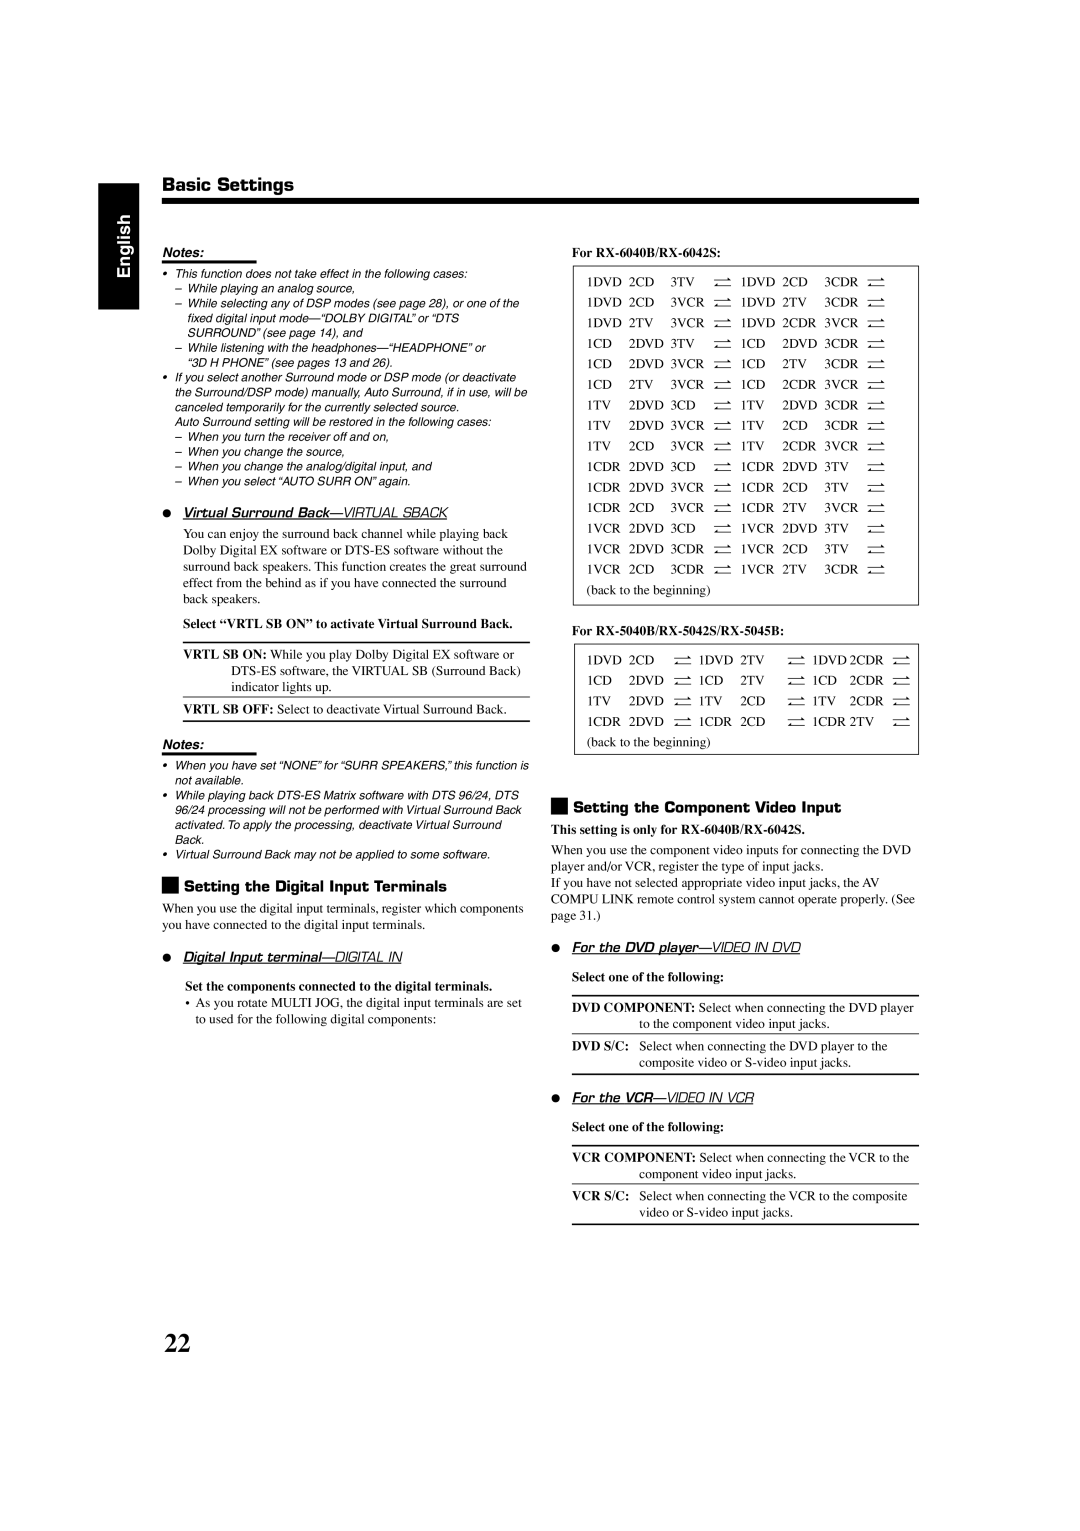
•As you rotate MULTI JOG, the digital input terminals are set to used for the following digital components:
For
1DVD 2CD 3TV “ 1DVD 2CD 3CDR “ 1DVD 2CD 3VCR “ 1DVD 2TV 3CDR “ 1DVD 2TV 3VCR “ 1DVD 2CDR 3VCR “ 1CD 2DVD 3TV “ 1CD 2DVD 3CDR “ 1CD 2DVD 3VCR “ 1CD 2TV 3CDR “ 1CD 2TV 3VCR “ 1CD 2CDR 3VCR “ 1TV 2DVD 3CD “ 1TV 2DVD 3CDR “ 1TV 2DVD 3VCR “ 1TV 2CD 3CDR “ 1TV 2CD 3VCR “ 1TV 2CDR 3VCR “ 1CDR 2DVD 3CD “ 1CDR 2DVD 3TV “ 1CDR 2DVD 3VCR “ 1CDR 2CD 3TV “ 1CDR 2CD 3VCR “ 1CDR 2TV 3VCR “ 1VCR 2DVD 3CD “ 1VCR 2DVD 3TV “ 1VCR 2DVD 3CDR “ 1VCR 2CD 3TV “ 1VCR 2CD 3CDR “ 1VCR 2TV 3CDR “ (back to the beginning)
For RX-5040B/RX-5042S/RX-5045B:
1DVD | 2CD “ 1DVD 2TV | “ 1DVD 2CDR “ | ||
1CD | 2DVD “ 1CD | 2TV | “ 1CD | 2CDR “ |
1TV | 2DVD “ 1TV | 2CD | “ 1TV | 2CDR “ |
1CDR 2DVD “ 1CDR 2CD | “ 1CDR 2TV “ | |||
(back to the beginning) |
|
|
| |
|
|
|
|
|

 Setting the Component Video Input
This setting is only for RX-6040B/RX-6042S.
When you use the component video inputs for connecting the DVD player and/or VCR, register the type of input jacks.
If you have not selected appropriate video input jacks, the AV COMPU LINK remote control system cannot operate properly. (See page 31.)
¶For the DVD
Select one of the following:
DVD COMPONENT: Select when connecting the DVD player to the component video input jacks.
DVD S/C: Select when connecting the DVD player to the composite video or
¶For the
Select one of the following:
VCR COMPONENT: Select when connecting the VCR to the component video input jacks.
VCR S/C: Select when connecting the VCR to the composite video or
22
