LVT1140-001A J
RX-6040B/RX-6042S RX-5040B/RX-5042S/RX-5045B
For U.S.A
Mises en garde, précautions et indications diverses
Table of Contents
Front Panel
Parts Identification
RX-6040B/RX-6042S
RX-5040B/RX-5042S/RX-5045B
Display
Remote Control
Rear Panel
Parts Identification
RX-6040B/RX-6042S
RX-5040B/RX-5042S/RX-5045B
Connecting the FM and AM Antennas
Before Installation
Checking the Supplied Accessories
Putting Batteries in the Remote Control
Getting Started
Connecting the Speakers and Subwoofer
AM antenna connections
Turn the loop until you have the best reception
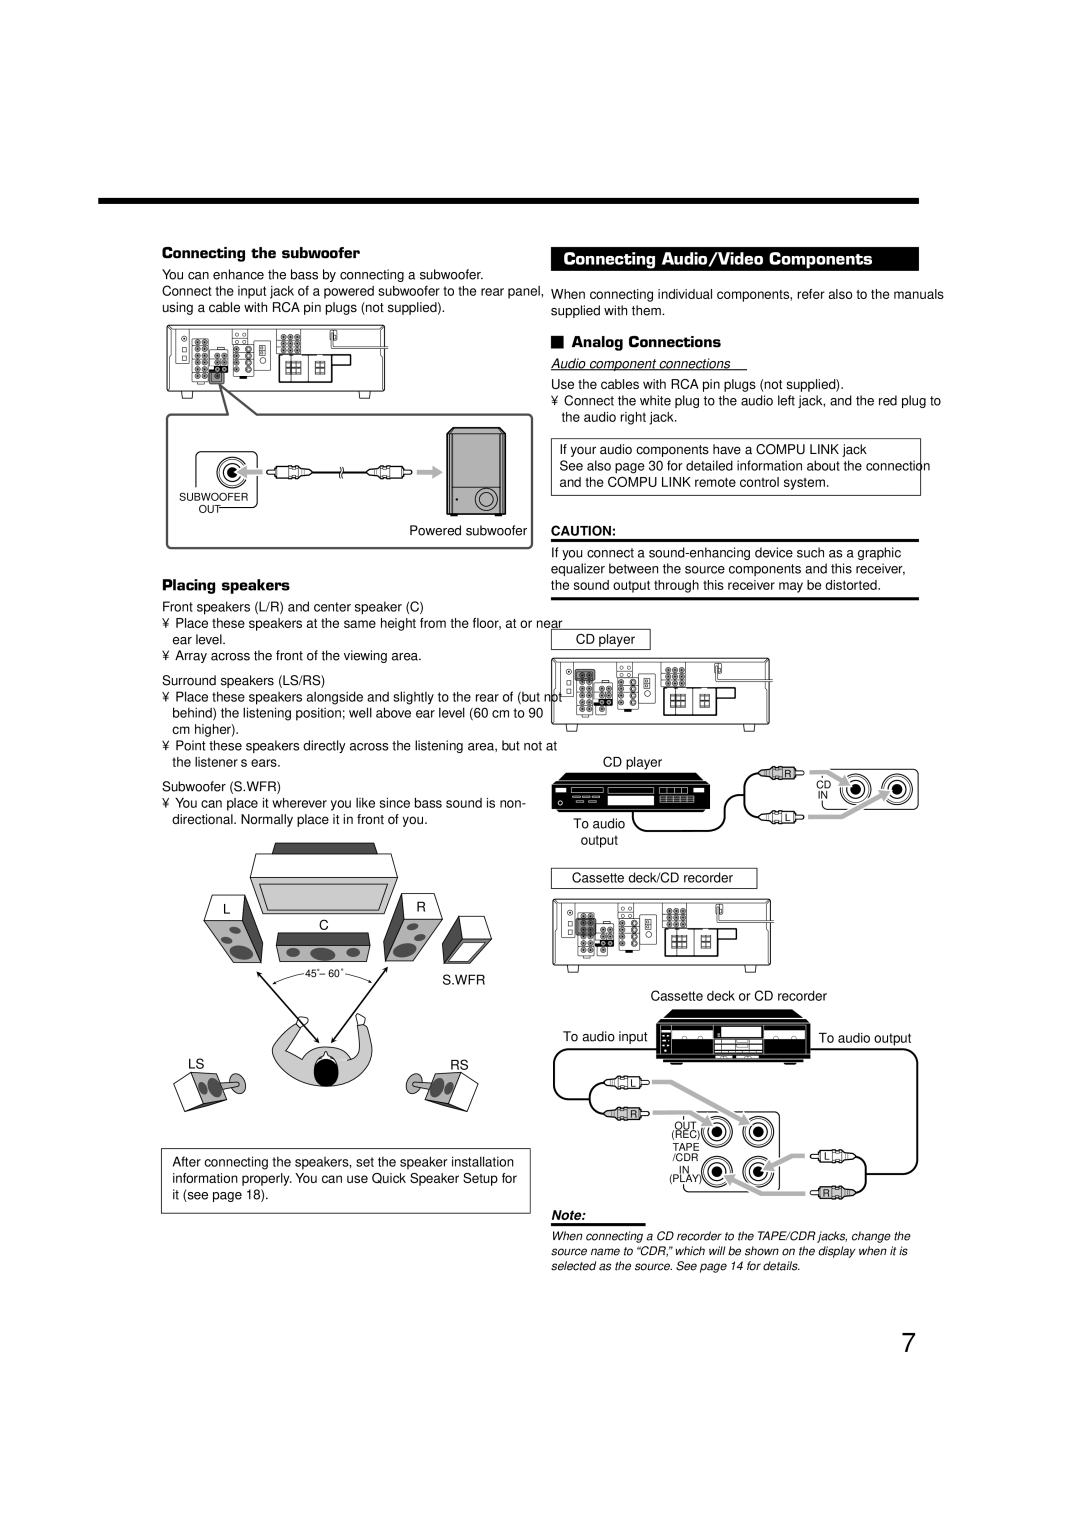
Connecting the subwoofer
Connecting Audio/Video Components
Placing speakers
Analog Connections
Video component connections
If your video components have an AV Compu Link jack
Red Blue Green
Green Blue
When you connect a DVD player with stereo output jacks
Red
DVD player
Connecting the Power Cord
Plug the power cord into an AC outlet
Digital Connections
Daily Operational Procedure Selecting the Source to Play
Turning On the Power
Basic Operations
Adjusting the Volume
Basic Operations
Sound
Listening with headphones
Selecting the Analog or Digital Input Mode
Be sure to turn down the volume
Press Subwoofer OUT ON/OFF to cancel the subwoofer output
To select the analog input mode
Changing the Display Brightness
Press Dimmer
Basic adjustment auto memory
Using the Sleep Timer
Reinforcing the Bass
Muting the Sound
Using Preset Tuning
Tuning in to Stations Manually
Receiving Radio Broadcasts
Select the band FM or AM
Selecting the FM Reception Mode
Press the 10 keys to select a preset channel number
While listening to an FM station, press FM Mode
To tune in a preset station
Press Quick Speaker Setup
Basic Settings
Channel number
Press in Multi JOG Push SET
Basic Setting Items
Press Setting
Ex. When setting Auto Surround to Auto Surr on
Setting the Speakers
Basic Settings
Setting the Speaker Distance
Setting the Bass Sounds
Selecting the Main or Sub Channel
Setting for Easy and Effective Surround Operations
Select the playback sounds channel
Select Auto Surr on to activate Auto Surround
Setting the Component Video Input
Setting the Digital Input Terminals
This setting is only for RX-6040B/RX-6042S
Select Vrtl SB on to activate Virtual Surround Back
Basic Adjustment Items
Adjusting Sound
Press Adjust
Ex. When adjusting the subwoofer level to
Adjusting Sound
Adjusting the Equalization Patterns
Adjusting the Speaker Output Levels
Reproducing Theater Ambience Introducing the Surround Modes
Using the Surround Modes
Dolby Digital*1
Dolby Digital 5.1CH
DTS Digital Surround
Using the Surround Modes
DTS 96/24
3D Headphone Mode-3D H Phone
To cancel the Surround mode
Press Surround to activate the Surround mode
Activating the Surround Modes
Activating the Surround Modes Automatically
3D Headphone Mode
Using the DSP Modes
Reproducing the Sound Field
Introducing the DSP Modes
Multi-channel digital signals
To cancel the DSP mode
To adjust the effect level except All Channel Stereo, see
Activating the DSP Modes
Remote Control through the Remote Sensor on the Receiver
Compu Link Remote Control System
Press the play 3 button on the CD player
Automatic Source Selection
AV Compu Link Remote Control System
Connections 1 AV Compu Link Connection
Connections 2 Video Cable Connection
Connecting procedure
AV Compu Link Remote Control System
Operating JVC’s Audio/Video Components
Operating Audio Components
Press CD-DISC, then press Press CD, then press +10
Operating Video Components
Operating JVC’s Audio/Video Components
CD recorder
DVD player
Release STANDBY/ON TV/CATV
Operating Other Manufacturers’ Video Equipment
Try to operate your Catv converter by pressing
Try to operate your TV by pressing
Release STANDBY/ON VCR
Operating Other Manufacturers’ Video Equipment
Release STANDBY/ON DVD
Try to operate your VCR by pressing
Problem Possible Cause Solution
Troubleshooting
Per channel, min. RMS, driven into 8 Ω
Specifications
Hz to 20 kHz with no more than 0.8% total
Harmonic distortion
FM tuner IHF
Main differences between the models
AM tuner
General
Limited WARRANTYAUDIO-2
Toll Free 1 800
Do not service the television yourself
RX-5040B/RXRX-6040B/RX -5042S/RX-6042S -5045B
LVT1140-002A C
Mises en garde, précautions et indications diverses
English
Parts Identification
3 4 5 6 7 8 90 -= ~ ! @
Monitor Audioout
Do not insert any metal object into the receiver
Getting Started
You can enhance the bass by connecting a subwoofer
Video component connections
DVD player
Connecting the Power Cord
Basic Operations
Basic Operations
Turning On and Off
When Dolby Digital or DTS Surround is selected
Press Bassboost to boost the bass level
Tuning in to Stations Manually
Selecting the FM Reception Mode
Basic Settings
Basic Procedure
Front speakers 0m 10FT Center speaker Surround speakers 9FT
Selecting the Main or Sub Channel
Setting the Digital Input Terminals
Press in Multi JOG Push SET
Adjusting Sound
Using the Surround Modes
Using the Surround Modes
Activating the Surround Modes
Using the DSP Modes
Activating the DSP Modes
Compu Link Remote Control System
This receiver
AV Compu Link Remote Control System
Operating JVC’s Audio/Video Components
Set the TV/CATV selector to TV
Operating Other Manufacturers’ Video Equipment
Operating Other Manufacturers’ Video Equipment
Troubleshooting
Specifications
Main differences between the models
EN, FR Victor Company of JAPAN, Limited 0104RYMMDWJEIN