RX-7001PGD
Precaución
English Español Português
Table of Contents
Parts Identification
Remote Control Front Panel
Checking the Supplied Accessories
Before Installation
Connecting the FM and AM Antennas
Setting the Voltage Selector Switch
Basic connecting procedure
Connecting the Speakers
Connecting the front speakers
AM Antenna Connections
Connecting the rear and center speakers
Connecting Audio/Video Components
Connecting the subwoofer speaker
About the speaker impedance
Video component connections
CD player
To audio input Cassette deck To audio output
MD recorder To audio output
DVD player
When you connect the DVD player with stereo output jacks
To composite video input To S-video input
DBS tuner
MD recorder, etc
Digital connections
DBS tuner DVD player
CD player MD recorder
Putting Batteries in the Remote Control
Connecting the Power Cord
Plug the power cord into an AC outlet
R6PSUM-3/AA15F
From the remote control
Turning the Power On and Off Standby
Basic Operations
Selecting the Source to Play
Selecting the Front Speakers
Adjusting the Volume
Etc
Turn Source Selector to
Adjusting the Subwoofer Output Level
Attenuating the Input Signal
Muting the Sound
Reinforcing the Bass
Adjusting the Front Speaker Output Balance
Basic Settings
Recording a Source
Changing the Source Name
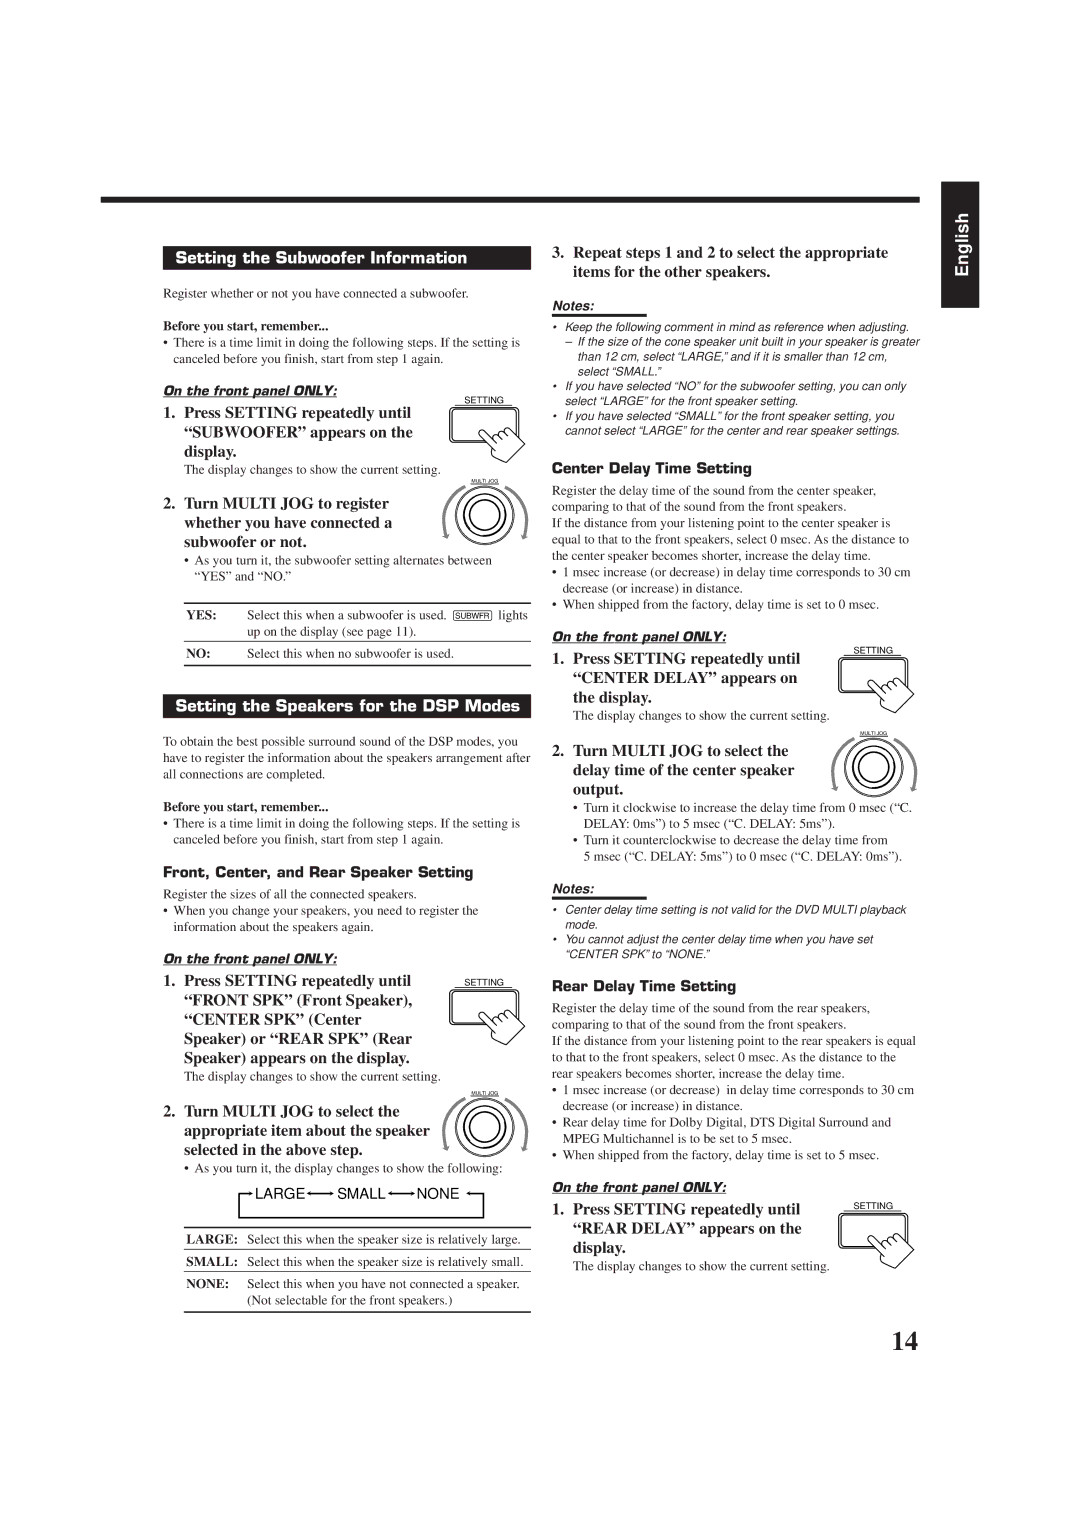
Setting the Speakers for the DSP Modes
Setting the Subwoofer Information
Press Setting repeatedly until
Rear Delay appears on Display
Turn Multi JOG to select
Delay time of the rear speaker Output
Crossover FRQ Crossover Frequency appears on the display
LFE ATT Low Frequency Effect Attenuator appears on Display
Selecting the Analog or Digital Input Mode
Digital Input Digital in Terminal Setting
Showing the Text Information on Display
Setting the AM Tuner Interval Spacing
Using the Sleep Timer
Receiving Radio Broadcasts
Tuning in Stations Manually
Using Preset Tuning
Selecting the FM Reception Mode
Assigning Names to Preset Stations
Selecting Your Favorite SEA Mode Creating Your Own SEA Mode
Using the SEA Modes
Press SEA Adjust repeatedly
SEA level of the selected frequency Range
DAP modes
Using the DSP Modes
3D-PHONIC modes
Surround modes
DVD Multi Playback Mode
Front
Available DSP Modes According to the Speaker Arrangement
Adjusting the DAP Modes
Adjusting the 3D-PHONIC Modes
Adjusting the Surround Modes
Repeatedly until Theater
JVC Theater Surround adjustments
Ù PRO Logic and DSP indicators also light up on the display
Activating the DSP Modes
To cancel the Dolby/DTS/MPEG Surround mode
Select and play a sound source
To enjoy Dolby Pro Logic, play back a software encoded with
To cancel the DSP mode
Repeatedly until the DSP mode you
Want appears on the display
For the other DSP modes
Activating the DVD Multi Playback Mode
Using the DVD Multi Playback Mode
DVD Multi appears on Display
Press DVD Multi so that DVD
When you finish, press Exit
Using the On-Screen Menus
Press Menu
Press %/ Þto move to Visual
@/ #
Press %/ Þto move to Sound CONTROL, then press @/ #
Selecting Your Favorite SEA Mode
Adjusting the DVD Multi Playback Mode
Creating Your Own SEA Mode
Press %/ Þto move to Surround LEVEL, then press @/ #
Press SET to store the setting into the SEA Usermode
Press %/ Þ/ @/ #to adjust the SEA mode as you want
Press %/ Þto move To SETTING, then press @/ #
Setting the Basic Setting Items Also see
Press %/ Þ / @/ #to Move in front of a character you want
Storing the Preset Stations Also see
Assigning Names to Preset Stations
Remote Control through the Remote Sensor on the Receiver
Compu Link Remote Control System
Same time
Automatic Source Selection
Displaying the Disc Information on the TV screen
Text Compu Link Remote Control System
Disc Search Only for CD Player
Disc Title Input
Showing the Disc Information on the TV Screen
Press Text Display while CD or MD is selected as the source
To exit from the Disc information screen
Disc Information screen appears on the TV
Press %/ Þto move to SEARCH, then Press SET
Press Text Display while CD is selected as the source
Press %/ Þto move to Performer Then press SET
Press SET again
Press %/ Þto move To GENRE, then Press SET
Press %/ Þto move to Search Then press SET
Press %/ Þto move To Title INPUT, then press SET
Entering the Disc Information
Enter the disc title Referring to steps 3
Press Text Display while MD is selected as the source
Press %/ Þto move to the genre you want, then press SET
Press %/ Þto move to Title Input Then press SET
If the AV Compu Link terminal
AV Compu Link Remote Control System
On the TV is RECEIVER/AMP
Case 4 If only the DVD player is equipped with the S
Automatic Power On/Off
Automatic Selection of TV’s Input Mode
One-Touch Video Play
One-Touch DVD Play
Operating Audio Components
Operating JVC’s Audio/Video Components
Tuner
Sound control section Amplifier
7/P
CD player-changer
Turntable
Cassette deck
0, 100+
Operating Video Components
DVD player
Operating Other Manufacturers’ Video Equipment
If there are more than one code listed for your brand of TV
Release TV/CATV/DBS
Try to operate your TV by pressing TV/CATV DBS
Release VCR
If there are more than one code listed for your brand
Try to operate your VCR by pressing VCR
10, 0, 100+ +10
Manufacturers’ codes for TV
Manufacturers’ codes for Catv converters
Manufacturers’ codes for DBS tuner
SEI
Problem Possible Cause Solution
Troubleshooting
Amplifier
Specifications
Audio
Video
FM tuner IHF
Tuning Range Usable Sensitivity Signal-to-Noise Ratio
AM tuner
General
Precaução para a ligação à tensão da rede CA
Precaución para la línea de la red CA