English

Common Operations

Turning On the Power

When you press the play button — CD 3/8 SELECT, TAPE 2 3, or the source selecting button — FM/AM and AUX, the unit automatically turns on and starts playback if the source is ready.

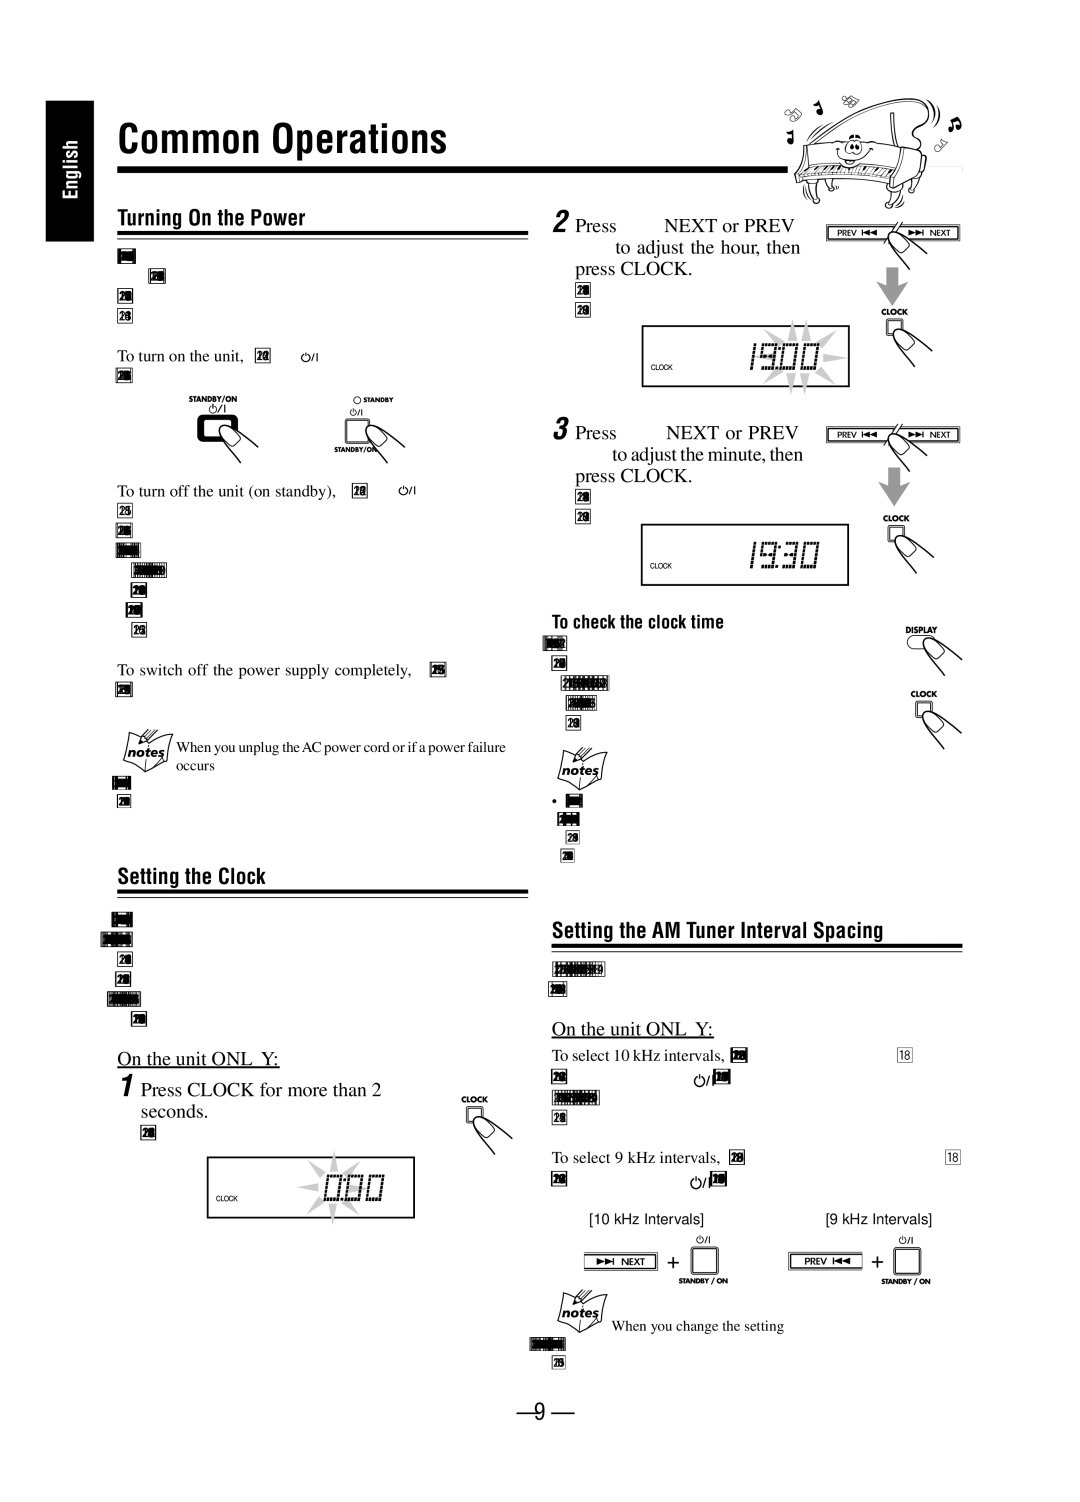
To turn on the unit, press STANDBY/ON. The STANDBY lamp on the unit lights green.

2 Press ¢ NEXT or PREV

4to adjust the hour, then

press CLOCK.

The minute digits start flashing on the display.

To turn off the unit (on standby), press STANDBY/ON again.

The STANDBY lamp lights red.

The CLOCK indicator flashes on the display until you set the built-in clock. After setting the clock, the clock time will appear on the display while the power is off.

A little power is always consumed even while the unit is on standby.

To switch off the power supply completely, unplug the AC

power cord from the AC outlet.

When you unplug the AC power cord or if a power failure occurs

The clock is reset to “0:00” right away, while the tuner preset stations (see page 11) will be erased in a few days.

3 Press ¢ NEXT or PREV

4to adjust the minute, then

press CLOCK.

The CLOCK indicator remains lit on the display.

To check the clock time

Press DISPLAY on the remote control (or CLOCK on the unit) while playing any source.

• Each time you press the button, the source indication and the clock time alternate on the display.

When you unplug the AC power cord or if a power failure occurs, the clock loses the setting and is reset to “0:00.” You need to set the clock again.

The clock may gain or lose 1 to 2 minutes per month.

Setting the Clock

Before operating the unit any further, first set the clock built in this unit. When you plug the AC power cord into the wall outlet, the CLOCK indicator starts flashing on the display.

You can set the clock whether the unit is on or off.

There is a time limit in doing the following steps. If the setting is canceled before you finish, start from step 1 again.

On the unit ONLY:

1 Press CLOCK for more than 2 seconds.

The hour digits start flashing on the display.

Setting the AM Tuner Interval Spacing

When shipped, the AM tuner interval is set to 10 kHz or 9 kHz spacing. You can change it to 10 kHz or 9 kHz spacing.

On the unit ONLY:

To select 10 kHz intervals, while holding down ¢ NEXT in

standby mode, press STANDBY/ON to turn on the power (at the same time, the 10 kHz spacing is selected for AM broadcast.)

To select 9 kHz intervals, while holding down PREV 4 in

standby mode, press STANDBY/ON to turn on the power.

[10 kHz Intervals]

[9 kHz Intervals]


When you change the setting

The preset stations are erased. You will need to preset the stations again. (See page 11.)

– 9 –

Page 12
Image 12
JVC SP-UXP38V, A-UXP38V Common Operations, Turning On the Power, Setting the Clock, Setting the AM Tuner Interval Spacing

A-UXP38V, SP-UXP38V specifications

The JVC SP-UXP38V and A-UXP38V are compact audio systems that exemplify the blend of modern design and advanced sound technology. Both models cater to audio enthusiasts who value portability and quality, making them perfect for home use or on-the-go entertainment.

One of the standout features of the SP-UXP38V and A-UXP38V is their impressive sound performance. Equipped with a powerful amplifier and high-quality speakers, they deliver clear and rich sound reproduction across various genres of music. The systems support multiple audio formats, ensuring versatility for users who enjoy diverse playlists.

The design of these models is notable, featuring a sleek and contemporary aesthetic that fits well in any environment. The compact size allows for easy placement on shelves or tables, vital for those with limited space. The user-friendly interface, complete with an LCD display, simplifies navigating through different functions and settings.

One of the key technologies integrated into the JVC SP-UXP38V and A-UXP38V is Bluetooth connectivity. This allows for seamless wireless streaming from smartphones, tablets, and other Bluetooth-enabled devices. Users can enjoy their favorite music without the hassle of tangled wires, promoting a clean and organized setup.

Additionally, both systems come equipped with USB ports for direct playback from flash drives, alongside auxiliary input for connecting various devices. This versatility enhances their functionality, accommodating different listening preferences and scenarios.

The JVC SP-UXP38V and A-UXP38V also feature FM radio capabilities, allowing users to tune into their favorite stations. The built-in presets make it easy to access frequently listened-to channels, ensuring that users never miss out on their top radio shows or music.

For those who prioritize sound quality, the systems employ technologies that minimize distortion and enhance clarity, including a dedicated equalizer for sound customization. This empowers users to tailor their listening experience, whether they prefer deep bass or crisp highs.

In summary, the JVC SP-UXP38V and A-UXP38V audio systems combine stylish design with cutting-edge audio technology. Their compact size, Bluetooth connectivity, and versatile playback options make them an ideal choice for music lovers seeking exceptional sound quality in a portable format. Whether at home or on the move, these systems stand out as reliable companions for all audio needs.