 CONTROLS AND FEATURES
FRONT VIEW
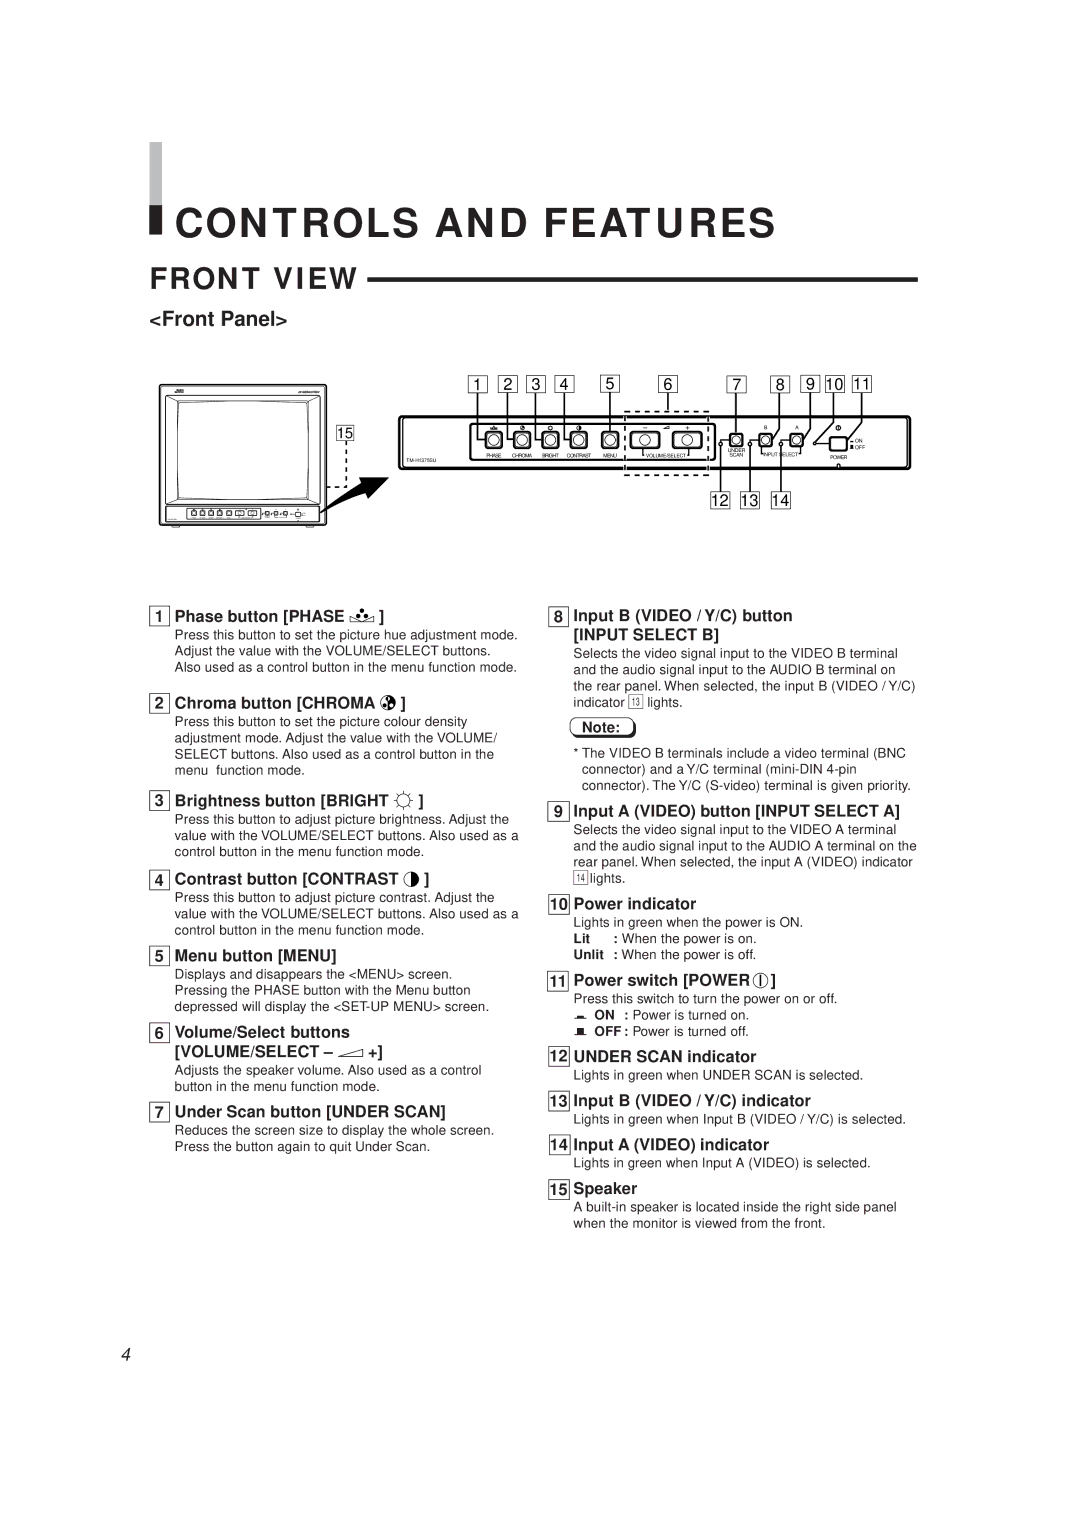
<Front Panel>
15
|
| – | + | B | A |
|
|
|
|
|
|
| ON |
|
|
| UNDER | INPUT SELECT | OFF | |
PHASE | CHROMA BRIGHT CONTRAST | MENU | SCAN | POWER | ||
1 | 2 | 3 | 4 | 5 |
| 6 | 7 | 8 | 9 | 10 11 |
|
|
|
|
| – | + |
| B | A |
|
|
|
|
|
|
|
|
|
|
| ON |
|
|
|
|
|
|
| UNDER |
|
| OFF |
PHASE | CHROMA | BRIGHT CONTRAST | MENU | VOLUME/SELECT | SCAN | INPUT SELECT | POWER | |||
|
|
|
|
|
|
|
|
| ||
|
|
|
|
|
|
|
|
|
| |
12![]()
![]() 13
13![]()
![]() 14
14
1 Phase button [PHASE 
 ]
]
Press this button to set the picture hue adjustment mode. Adjust the value with the VOLUME/SELECT buttons. Also used as a control button in the menu function mode.
2 Chroma button [CHROMA 
 ]
]
Press this button to set the picture colour density adjustment mode. Adjust the value with the VOLUME/ SELECT buttons. Also used as a control button in the menu function mode.
3 Brightness button [BRIGHT  ]
]
Press this button to adjust picture brightness. Adjust the value with the VOLUME/SELECT buttons. Also used as a control button in the menu function mode.
4 Contrast button [CONTRAST  ]
]
Press this button to adjust picture contrast. Adjust the value with the VOLUME/SELECT buttons. Also used as a control button in the menu function mode.
5 Menu button [MENU]
Displays and disappears the <MENU> screen. Pressing the PHASE button with the Menu button depressed will display the
6 Volume/Select buttons
[VOLUME/SELECT – +]
Adjusts the speaker volume. Also used as a control button in the menu function mode.
7 Under Scan button [UNDER SCAN]
Reduces the screen size to display the whole screen. Press the button again to quit Under Scan.
8 Input B (VIDEO / Y/C) button
[INPUT SELECT B]
Selects the video signal input to the VIDEO B terminal and the audio signal input to the AUDIO B terminal on the rear panel. When selected, the input B (VIDEO / Y/C) indicator # lights.
Note:
*The VIDEO B terminals include a video terminal (BNC connector) and a Y/C terminal
9 Input A (VIDEO) button [INPUT SELECT A]
Selects the video signal input to the VIDEO A terminal and the audio signal input to the AUDIO A terminal on the rear panel. When selected, the input A (VIDEO) indicator
$lights.
10 Power indicator
Lights in green when the power is ON.
Lit : When the power is on.
Unlit : When the power is off.
11 Power switch [POWER  ]
]
Press this switch to turn the power on or off.
gON : Power is turned on. G OFF : Power is turned off.
12 UNDER SCAN indicator
Lights in green when UNDER SCAN is selected.
13 Input B (VIDEO / Y/C) indicator
Lights in green when Input B (VIDEO / Y/C) is selected.
14 Input A (VIDEO) indicator
Lights in green when Input A (VIDEO) is selected.
15 Speaker
A
4
