MANUAL CLOCK SETTING

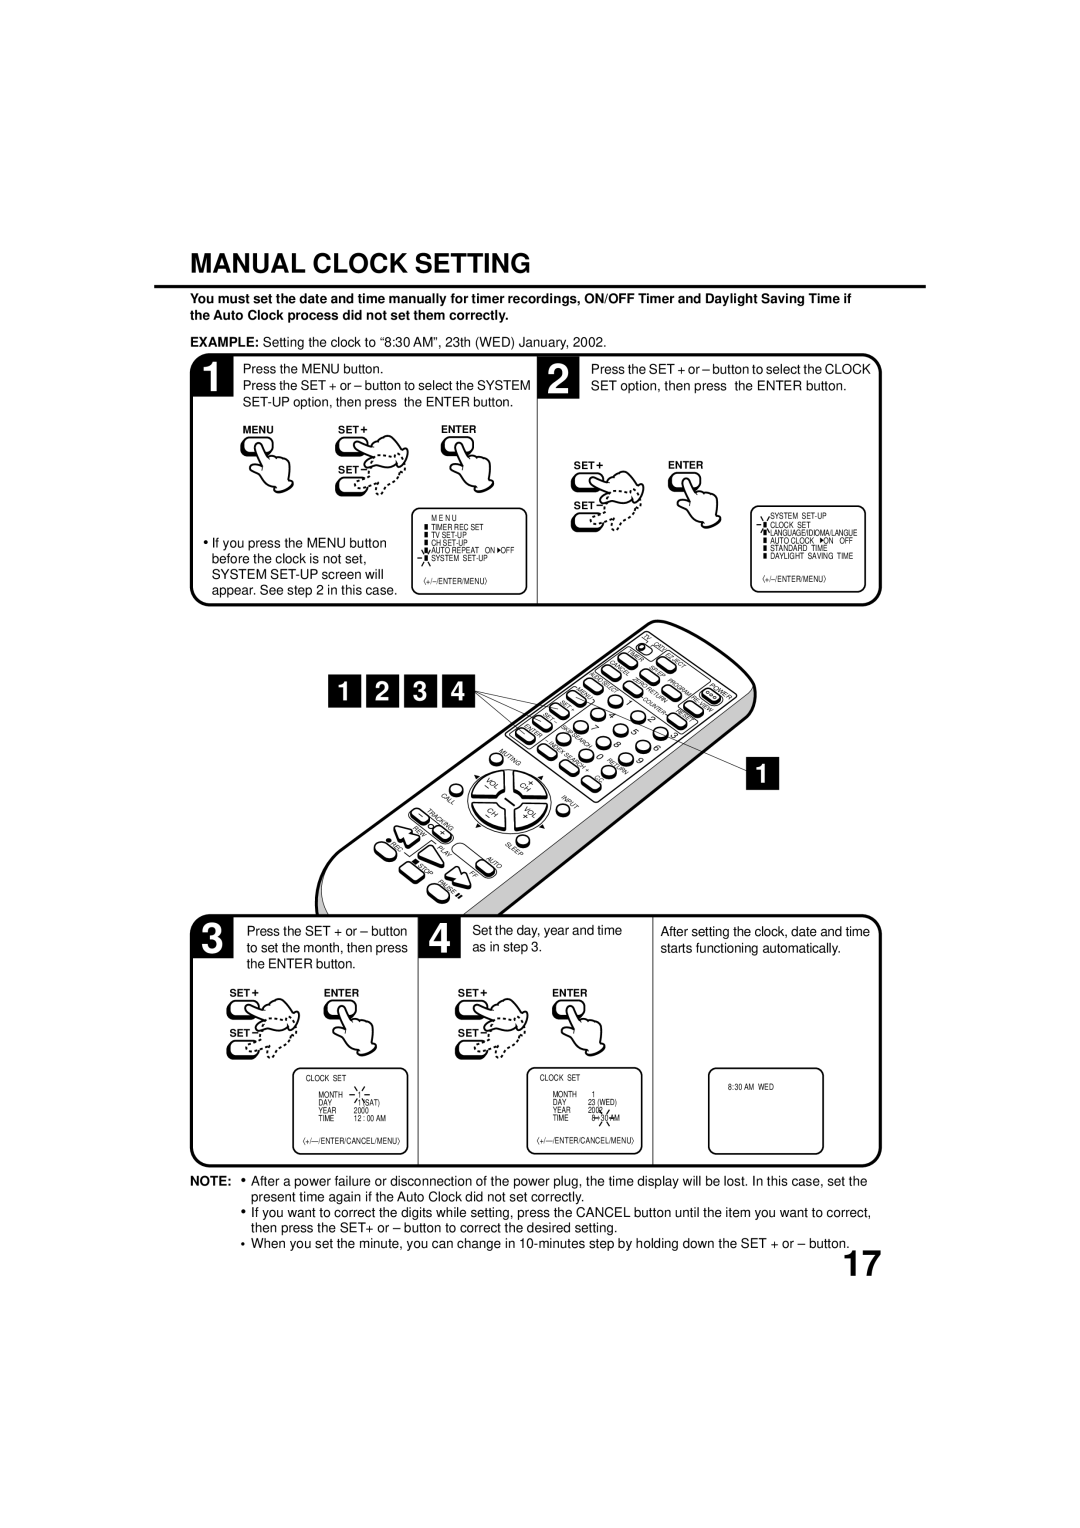
You must set the date and time manually for timer recordings, ON/OFF Timer and Daylight Saving Time if the Auto Clock process did not set them correctly.

EXAMPLE: Setting the clock to “8:30 AM”, 23th (WED) January, 2002.

1

Press the MENU button.


Press the SET + or – button to select the SYSTEM


SET-UP option, then press the ENTER button.


MENU

SET

ENTER


SET


M E N U


TIMER REC SET

If you press the MENU button

TV SET-UP

CH SET-UP

before the clock is not set,

AUTO REPEAT ON OFF

SYSTEM SET-UP

SYSTEM SET-UP screen will

+/–/ENTER/MENU

appear. See step 2 in this case.


2


Press the SET + or – button to select the CLOCK


SET option, then press the ENTER button.


SET


ENTER


SET

SYSTEM SET-UP

CLOCK SET

LANGUAGE/IDIOMA/LANGUE

AUTO CLOCK ON OFF

STANDARD TIME

DAYLIGHT SAVING TIME

+/–/ENTER/MENU

TV

1 2 3 4


CALL

REW

TRACKING


ENTER


MUTING

VOL

CH


CH

VOL


TIMER


CATV

EZ


JECT


AU


CANCEL


SP/

EP


D


LE


ZERO


IO

SE


PROGRAM


P

E


MENU


C


ORETURN


O


RE-


T


R


W


SET


1


C

U


VIEW


+


NT


2

E


RESET


SET


4


R


SKIP

SEARCH

7


5


3


INDEX


8


6


SEARCH


0


RETURN

9


+


C.


C.


INPUT


1

REC


PLAY


AUTO


STOP


FF


PAUSE


SLEEP

3

Press the SET + or – button

to set the month, then press


the ENTER button.


SET

ENTER


SET


CLOCK SET


MONTH

1


DAY

1

(SAT)


YEAR

2000


TIME

12

: 00 AM

+/— /ENTER/CANCEL/MENU

4

Set the day, year and time


as in step 3.


SET

ENTER


SET


CLOCK SET


MONTH

1


DAY

23

(WED)


YEAR

2002


TIME

8

: 30 AM

+/— /ENTER/CANCEL/MENU

After setting the clock, date and time starts functioning automatically.

8:30 AM WED

NOTE: After a power failure or disconnection of the power plug, the time display will be lost. In this case, set the present time again if the Auto Clock did not set correctly.

If you want to correct the digits while setting, press the CANCEL button until the item you want to correct, then press the SET+ or – button to correct the desired setting.

When you set the minute, you can change in 10-minutes step by holding down the SET + or – button.

17

Page 19
Image 19
JVC TV-20F243 manual Manual Clock Setting, System SET-UP screen will, Appear. See in this case, As in step

TV-20F243 specifications

The JVC TV-20F243 is a compact yet capable television that caters to those looking for affordable, practical entertainment options without compromising on quality. With a screen size of 20 inches, this model is designed for smaller spaces such as bedrooms, kitchens, or offices, where a larger screen might be overwhelming. Its slim design allows for easy placement on shelves or wall mounts, making it a versatile choice for various room layouts.

One of the main features of the JVC TV-20F243 is its high-resolution display. The television boasts a 720p resolution, offering viewers sharp images and vibrant colors. This level of clarity makes it suitable for watching a variety of content, from movies to television shows and even video games. The LED backlighting technology enhances the overall picture quality, providing improved brightness and contrast, which helps in delivering a more immersive viewing experience.

The JVC TV-20F243 integrates multiple connectivity options, making it easy to connect to external devices. It is equipped with HDMI ports, which allow users to connect devices such as DVD players, gaming consoles, or streaming devices. Additionally, a USB input is available for direct playback of multimedia files, further increasing its versatility for various entertainment needs.

Another noteworthy feature is the built-in digital tuner, which enables viewers to access over-the-air broadcasts without the need for an external set-top box. This capability provides access to free TV channels, a great advantage for those looking to cut the cord and save on subscription fees.

The JVC TV-20F243 also includes a variety of audio technologies, such as virtual surround sound, aimed at providing a more engaging audio experience. The television's speakers are designed to deliver clear and balanced sound, allowing users to enjoy their favorite content without the need for external audio systems in smaller spaces.

In conclusion, the JVC TV-20F243 is a practical and reliable choice for those seeking a compact television that does not sacrifice performance. With its solid display quality, multiple connectivity options, and built-in features, this model meets the needs of various users, whether they're looking to binge-watch their favorite series or play the latest video games. It effectively combines affordability with functionality, making it a commendable addition to any home entertainment setup.