UX-A52 - Consists of CA-UXA52and SP-UXA52
MICRO COMPONENT SYSTEM
INSTRUCTIONS
CA-UXA52SP-UXA52
G-1
Warnings, Cautions and Others
Caution -- STANDBY/ON button
G-2
English
G-3
Caution Proper Ventilation
Front view
IMPORTANT FOR LASER PRODUCTS
G-4
CLASS LASER PRODUCT
English
Power sources
Precautions
Installation
Introduction
Using External Equipment
Contents
Listening to FM and AM Broadcasts
Basic and Common Operations
Top view
Location of the Buttons
Main Unit
English
Pressing this button also turns on the unit
Display-indicators
Main unit
English
Remote Control
Remote control
English
Unpacking
Putting the Batteries into the Remote Control
Getting Started
English
AM antenna
Connecting Antennas
FM antenna
To connect an outdoor FM antenna
To connect speakers
Connecting Speakers
Connecting Other Equipment
English
To connect analog audio equipment
Adjusting the Voltage Selector
NOW, you can plug the AC power cord
English
Main unit Front view
Basic and Common Operations
Main unit Top view
Remote control
Turning On the Power
Selecting the Sources and Starting Play
English
Turning On/Off the Key-touchTone
Adjusting the Volume
Reinforcing the Bass Sound
Selecting the Sound Modes
To select the color pattern
Setting the Display Illumination
To adjust and register the color
COLORCOLOR RANDOMGRADATION
Listening to FM and AM Broadcasts
English
Presetting Stations
Setting the AM Tuner Interval Spacing
Tuning in a Station
To change the FM reception mode
Tuning in a Preset Station
English
Remote control
Playing Back a CD
1 2 4 5 7 8 10 0 +10
English
Precautions on CD Playback
Playing Back the Entire CD-NormalPlay
English
To go to another track
Basic CD Operations
To stop playback for a moment
To check the clock time while playing back CD
Programing the Playing Order of the Tracks
To check the program contents
ProgramPlay
To modify the program
Playing at Random-RandomPlay
Repeating Tracks-RepeatPlay
English
VOLUME
Playing Back a Tape
Remote control
VOLUME
To check the clock time while playing back a tape
Playing Back a Tape
To play both sides-ReverseMode
English
English
Using External Equipment
Remote control
Main unit Top view
Listening to External Equipment
Recording from This Unit to External Equipment
English
English
Recording on Tapes
Remote control
Main unit Top view
Before You Start Recording
To protect your recordings
English
What’s a Recording Mode and Reverse Mode ?
Recording FM/AM Broadcasts
Recording CD-CDSynchronized Recording
English
Recording External Equipment
To record a single track during play or pause
English
Remote control
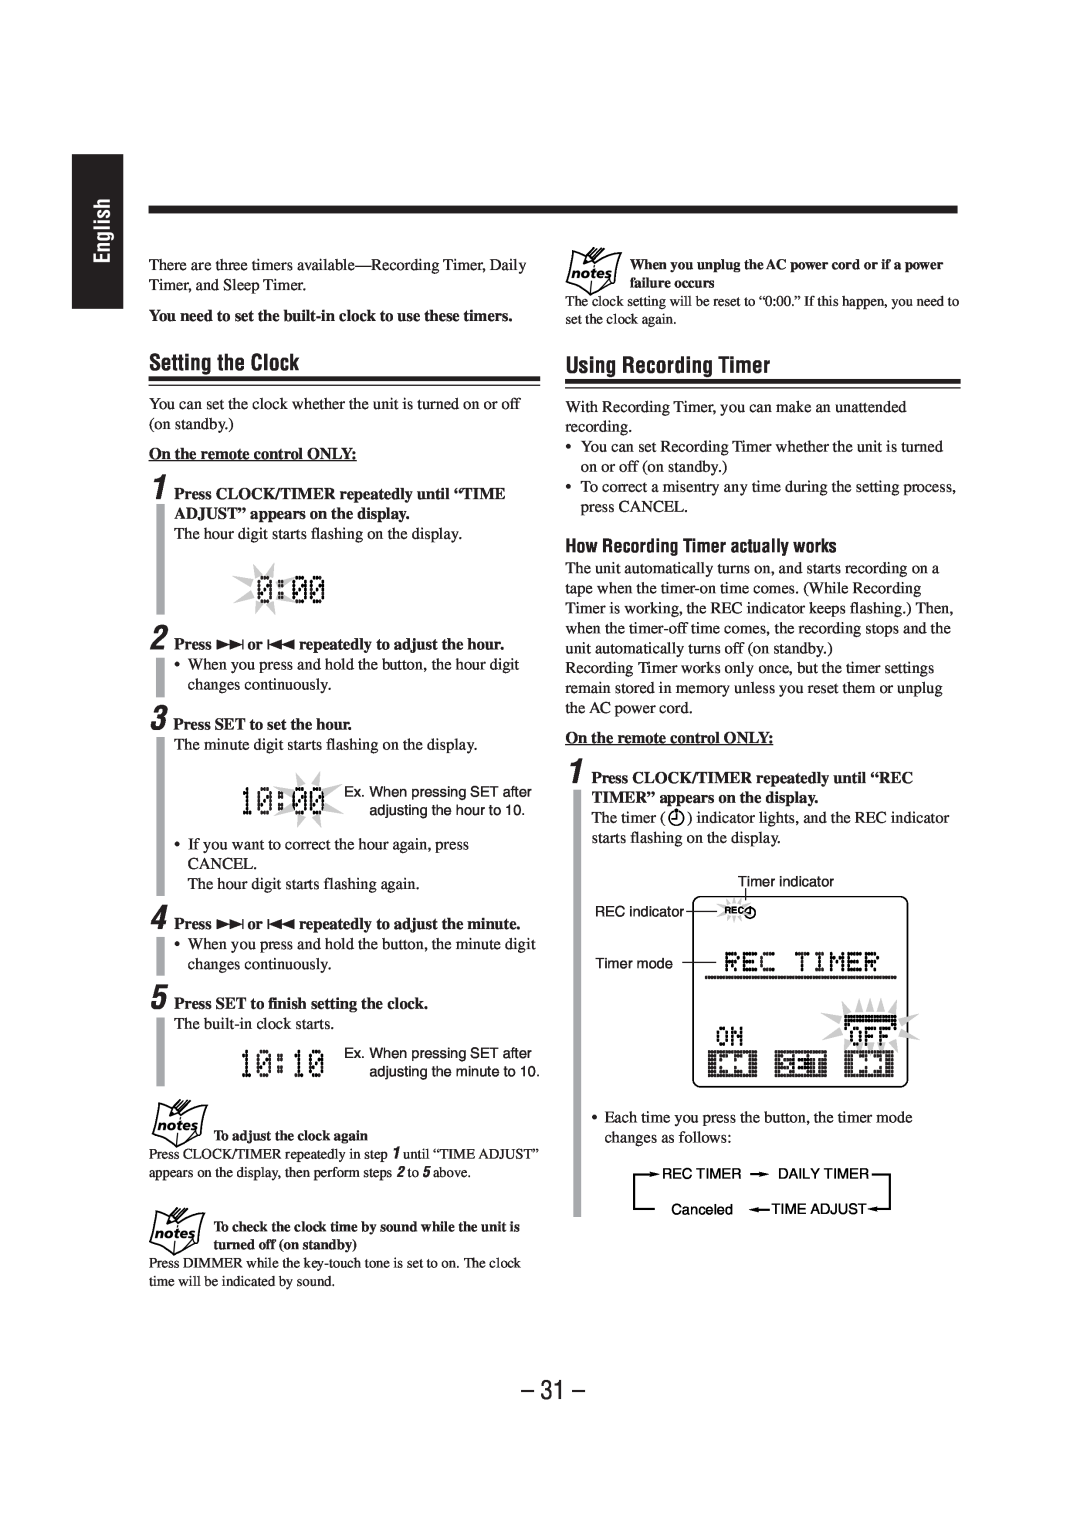
Using the Timers
1 2 4 5 7 8 10 0 +10
TIMER
How Recording Timer actually works
Setting the Clock
Using Recording Timer
English
Using Daily Timer
How Daily Timer actually works
English
How Sleep Timer actually works
Using Sleep Timer
Timer Priority
English
General Notes
Maintenance
Cleaning the unit
Handling discs
Symptom
Troubleshooting
Specifications UX-A52 CA-UXA52and SP-UXA52
Possible Cause
VOLTAGE
EN, CH
230V
127V
GVT0071-013A
SISTEMAS DE MICROCOMPONENTES
SISTEMA DE MICRO COMPONENTES
MICRO COMPONENT SYSTEM
Advertências, precauções e outras notas
Warnings, Cautions and Others
Avisos, precauciones y otras notas
Caution -- STANDBY/ON button
PRECAUÇÃO
English Español Português
PRECAUCIÓN
G-2
G-3
Precaución el aparato debe estar bien ventilado
Precaução Ventilação adequada
Caution Proper Ventilation
IMPORTANTE PARA PRODUCTOS LÁSER
English Español
Português
IMPOTANTE PARA PRODUTOS LASER
Power sources
Precautions
Installation
Introduction
Listening to FM and AM Broadcasts
Contents
Using External Equipment
Basic and Common Operations
English
Front view
Location of the Buttons
Main Unit
Main unit
Display-indicators
English
Pressing this button also turns on the unit
Remote Control
Remote control
English
Unpacking
Putting the Batteries into the Remote Control
Getting Started
English
FM antenna
Connecting Antennas
English
AM antenna
English
Connecting Speakers
Connecting Other Equipment
To connect speakers
English
Adjusting the Voltage Selector
NOW, you can plug the AC power cord
To connect analog audio equipment
VOLUME
Remote control
VOLUME
Basic and Common Operations
Selecting the Sources and Starting Play
Turning On the Power
English
STANDBY/ON
Reinforcing the Bass Sound
ROCK POP CLASSIC
Adjusting the Volume
Turning On/Off the Key-touchTone
To adjust and register the color
COLORCOLOR RANDOM GRADATION
Setting the Display Illumination
English
Listening to FM and AM Broadcasts
English
Presetting Stations
Setting the AM Tuner Interval Spacing
Tuning in a Station
English
Tuning in a Preset Station
Ex. For preset number 5, press
English
English
Remote control
Playing Back a CD
1 2 4 5 7 8 10 0 +10
Precautions on CD Playback
English
Playing Back the Entire CD-NormalPlay
To stop playback for a moment
English
Basic CD Operations
To go to another track
Programing the Playing Order of the Tracks
To check the program contents
ProgramPlay
To modify the program
English
CD indicator Current track number Play mode
CD indicator
Playing at Random-RandomPlay
VOLUME
Remote control
VOLUME
Playing Back a Tape
To play both sides-ReverseMode
English
Playing Back a Tape
To check the clock time while playing back a tape
English
Using External Equipment
Remote control
Main unit Top view
English
Listening to External Equipment
Recording from This Unit to External Equipment
English
Remote control
Recording on Tapes
Main unit Top view
To protect your recordings
English
Before You Start Recording
While recording, the display lights red
English
Recording FM/AM Broadcasts
Recording CD-CDSynchronized Recording
What’s a Recording Mode and Reverse Mode ?
English
Recording External Equipment
To record a single track during play or pause
English
Using the Timers
Remote control
1 2 4 5 7 8 10 0 +10
How Recording Timer actually works
Setting the Clock
Using Recording Timer
English
Using Daily Timer
How Daily Timer actually works
2 Press 4to select “ON,” then press SET
On the remote control ONLY
English
How Sleep Timer actually works
Using Sleep Timer
Timer Priority
English
English
Maintenance
Cleaning the unit
General Notes
Symptom
Troubleshooting
Specifications UX-A52 CA-UXA52and SP-UXA52
English
IMPORTANTE para la línea de la red CA
EN, SP, PR
IMPORTANT for mains AC line
IMPORTANTE para a ligação à tensão da rede CA