Assernb{ingThe LP Gas Tank Hook

Attachthe PressureCylinderHolderandTank Guideto the CartLegs-WheelSideof grillas shownin Fig.6. Alignthe tappedholesof both partswith the holeson SidePanel.Securefirmly using4 of the 1/4"xl/2"Phillipsheadscrewsand nutsprovided.

AssemblingTheGrilmPulled-outSpiceTray

1.install2 of the 1/4"xl/2"Phillipsheadscrews to the rearof the Track.Withoutthesescrews the Pulled-outSpiceTraywill notstopproperly.

2.SlidethePulled-outSpiceTrayintotheTracksuntil it stops.See Fig. 7.

Install2 of the 1/'4"xl/2"Phillipsheadscrews to the frontof the Track.This importantstep preventsthe Pulled-outSpiceTrayfrom being pulledoutsidethe tracks.See Fig.7.

Installing The GrimmHead

Nowthat you'veassembledthe grillcart you can installthe pre-assembledGrill Head.See Fig. 8. To reducethe weightof the Grill Head,we suggestyou openthe Grill Lid and removethe packedcomponentsEvenwith. the componentsremoved,this steprequires2 peopleto lift and positionthe Grill Headonto the grill cart. Be sure to alignthe 2 holes beneaththe hangledgeon eachside of the Grill Headwith the 2 holeson each cross braceof cart. RaiseGrill Lid and insert4 of

the 1/4"xl-3/8"Phillipsheadscrewsand lock nutsand tightensecurely.
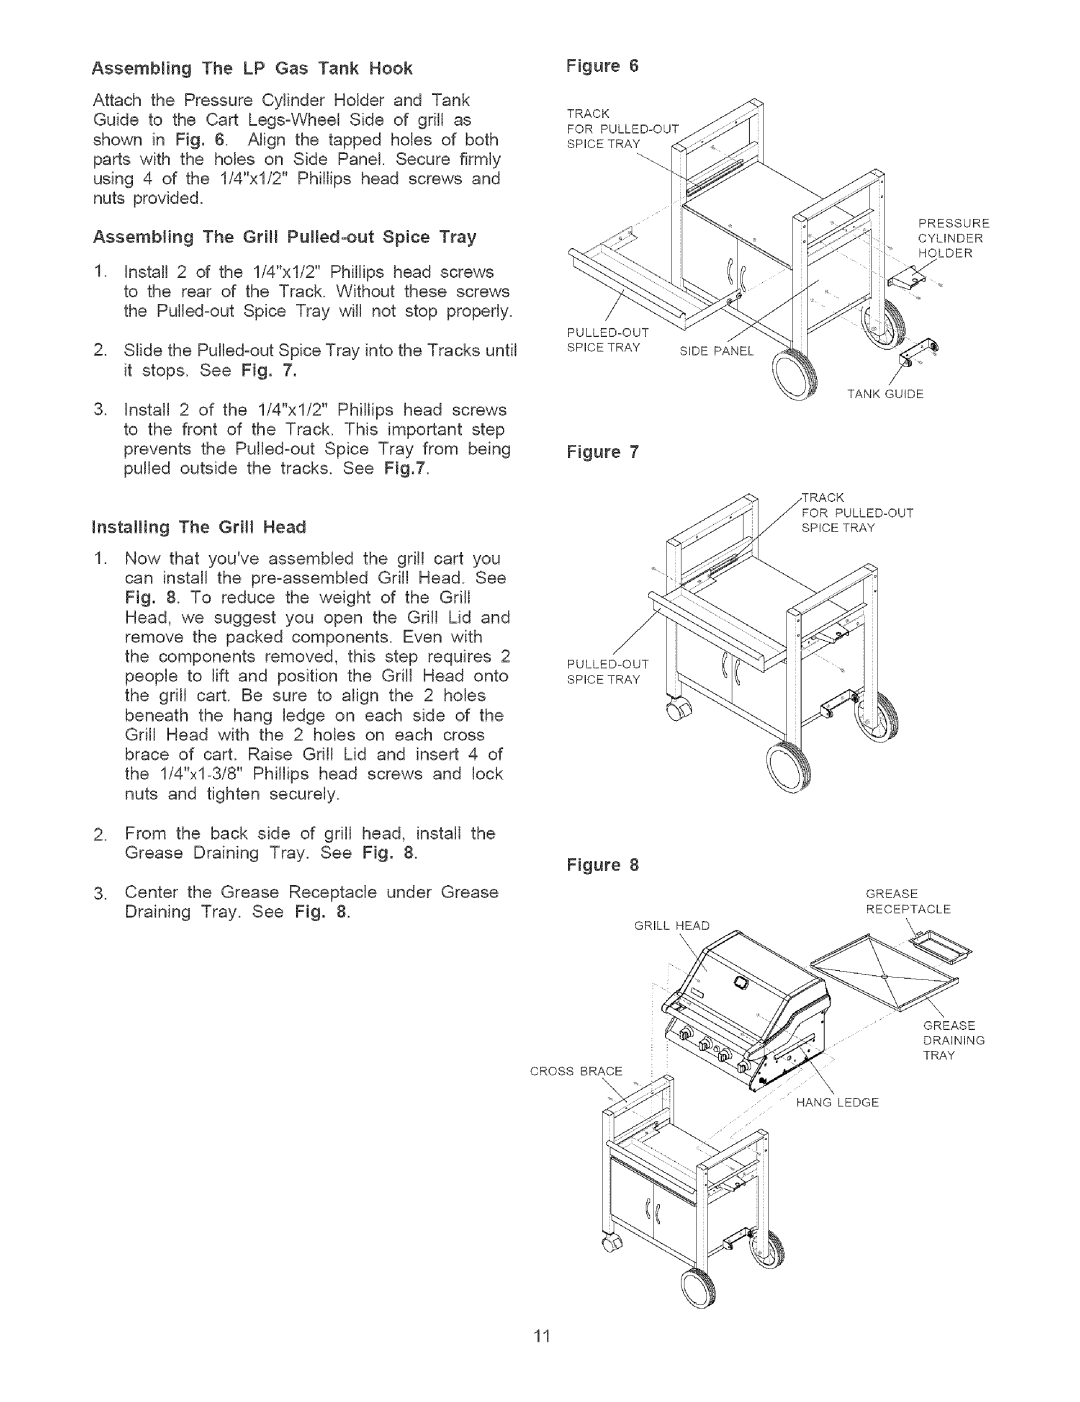
Figure6

TRACK

FOR PULLED-OUT

SPICE TRA_

PRESSURE

CYLINDER

HOLDER

PULLED-OUT


SPICE TRAY

SIDE PANEL

TANK GUIDE

Figure 7

PULLED-OUT

SPICE TRAY

PULLED-OUT

SPICE TRAY

2.Fromthe backside of grill head,installthe GreaseDrainingTray. See Fig. 8.

Figure 8

3.Centerthe GreaseReceptacleunderGrease DrainingTray.See Fig. 8.

GRILL HEAD

CROSS BRACE

GREASE

RECEPTACLE

\

GREASE

DRAINING

TRAY

\

HANG LEDGE

11

Page 11
Image 11
Kenmore 141.1664, 141.1764 owner manual 1/4xl-3/8Phillipsheadscrewsand lock nutsand tightensecurely