-_II _VENT

F BACK SIDES

TOP --S°ESlll"IH

VIEW l

FIGURE 10.

Open the cold water supply valve to the water heater. NOTE: The cold water supply valve must be left open when the water heater is in use.

To ensure complete filling of the tank, allow air to exit by opening the nearest hot water faucet. Allow water to run until a constant flow is obtained. This will let air out of the water heater and the piping.

Check all water piping and connections for leaks. Repair as needed.

Filling the Water Heater

Never use this water heater unless it is completely full of water. To prevent damage to the tank, the tank must be filled with water. Water must flow from the hot water faucet before turning "ON" gas to the water heater. To fill the water heater with water:

Close the water heater drain valve by turning the handle to the right (clockwise). The drain valve is on the lower front of the water heater.

Explosion Hazard

Use a new CSA approved gas supply line.

Install a shut-off valve.

Do not connect a natural gas water heater to an L.P. gas supply.

Do not connect an L.P. gas water heater to a natural gas supply.

Failure to follow these instructions can result in

death, explosion, or carbon monoxide poisoning.

Gas Requirements

IMPORTANT: Read the rating plate to be sure the water heater is made for the type of gas you wilt be using in your home. This information wilt be found on the rating plate located near the gas control valve/thermostat. If the information does not agree with the type of gas available, do not install or light. Call your dealer.

NOTE: An odorant is added by the gas supplier to the gas used by this water heater. This odorant may fade over an extended period of time. Do not depend upon this odorant as an indication of leaking gas.

Gas Piping

The gas piping must be installed according to all local and state

Property Damage Hazard

Avoid water heater damage.

Fill tank with water before operating.

codes or, in the absence of local and state codes, the "National Fuel Gas Code", ANSI Z223.1(NFPA 54)-current edition.

Tables 1 and 2 on the following page provide a sizing reference for commonly used gas pipe materials. Consult the "National Fuel Gas Code" for the recommended gas pipe size of other materials.

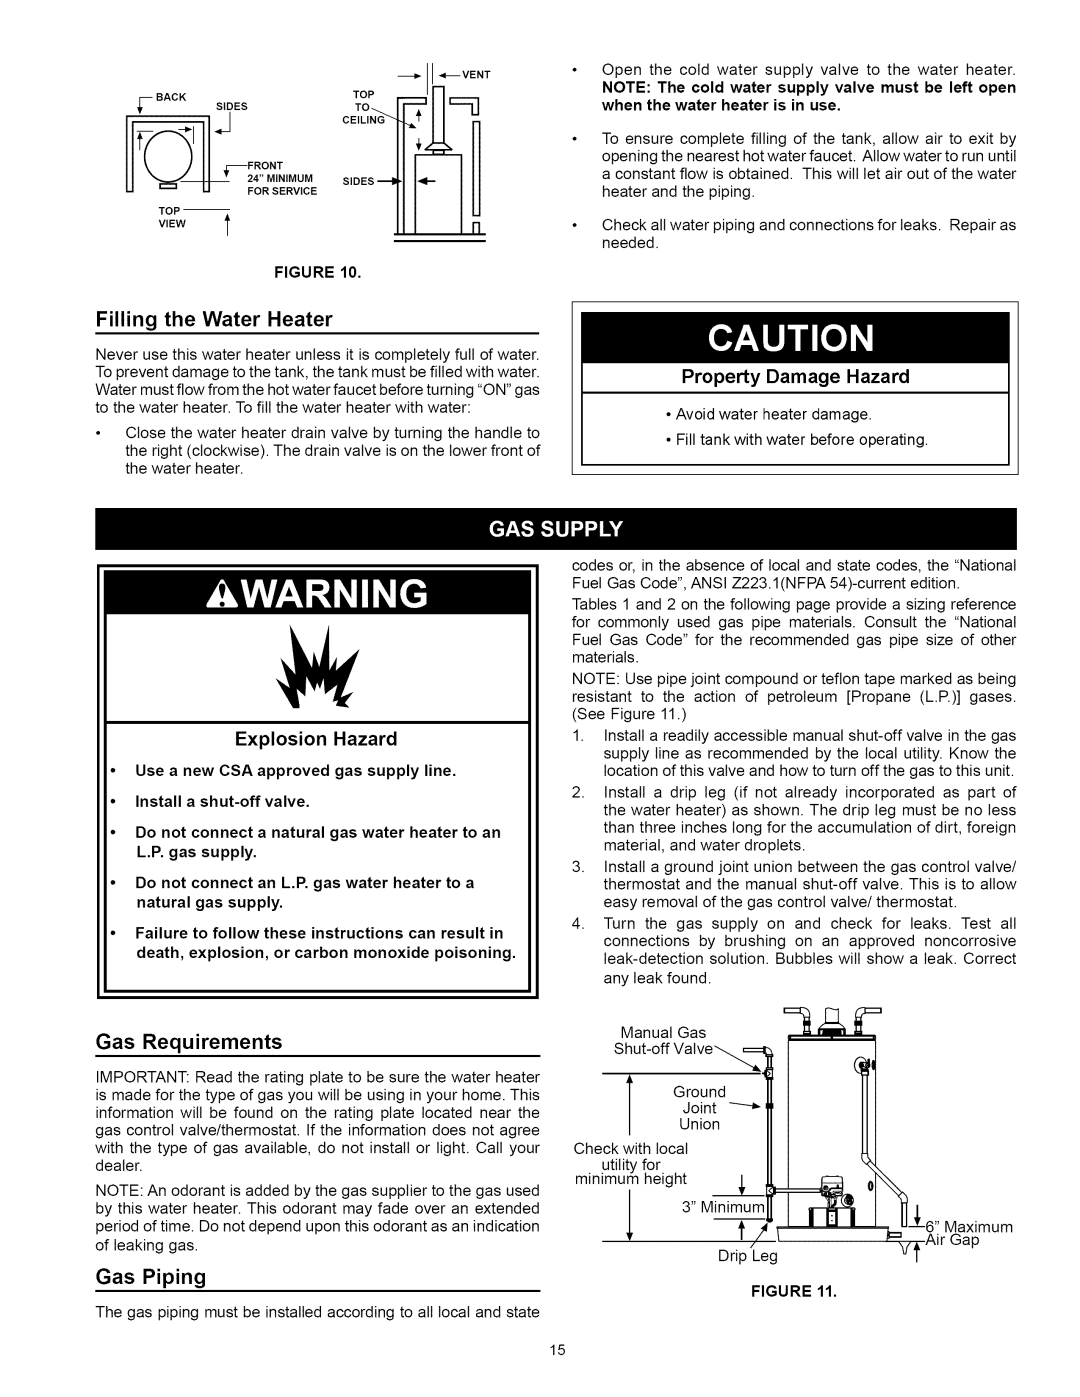
NOTE: Use pipe joint compound or teflon tape marked as being resistant to the action of petroleum [Propane (L.P.)] gases. (See Figure 11.)

1.Install a readily accessible manual shut-off valve in the gas supply line as recommended by the local utility. Know the location of this valve and how to turn off the gas to this unit.

2.Install a drip leg (if not already incorporated as part of the water heater) as shown. The drip leg must be no less than three inches tong for the accumulation of dirt, foreign material, and water droplets.

3.Install a ground joint union between the gas control valve/ thermostat and the manual shut-off valve. This is to allow

easy removal of the gas control valve/thermostat.

4.Turn the gas supply on and check for leaks. Test all connections by brushing on an approved noncorrosive leak-detection solution. Bubbles will show a leak. Correct

any leak found.

Manual Gas

Shut-off Valve'--..,._

Joint

TGround Union

Check with local

utility for

minimum height3" Mini _u m

]

Drip Leg

FIGURE 11.

15

Page 15
Image 15
Kenmore 153.33114, 153.33115 manual Filling the Water Heater, Gas Requirements, Gas Piping, Property Damage Hazard

153.33114, 153.33115 specifications

The Kenmore 153.33115 and 153.33114 are high-efficiency dehumidifiers designed to effectively manage moisture levels in residential spaces, providing comfort and safeguarding homes against the damaging effects of excess humidity. Both models embody Kenmore's commitment to quality, innovative technologies, and user-friendly features, making them ideal choices for maintaining optimal indoor air quality.

One of the standout features of the Kenmore 153.33115 and 153.33114 is their powerful dehumidification capability. With the capacity to remove up to 70 pints of moisture per day, these dehumidifiers efficiently tackle dampness in areas of up to 1,500 square feet. This makes them suitable for various spaces, including basements, laundry rooms, and even larger living areas, ensuring a healthy environment free from mold and mildew growth.

The models are equipped with an adjustable humidistat, which allows users to set their desired humidity levels easily. This feature not only enhances user control but also ensures energy efficiency by allowing the machines to operate only when necessary. Alongside energy efficiency, these dehumidifiers are designed to comply with Department of Energy guidelines, making them an eco-friendly choice.

Both models also feature a continuous drainage option, enabling hassle-free operation without the need for constant manual emptying of the water tank. When the water tank reaches capacity, an automatic shut-off function prevents overflow, ensuring peace of mind for users.

In terms of convenience, the Kenmore 153.33115 and 153.33114 have a user-friendly digital control panel with an easy-to-read LED display. This intuitive interface makes it simple to adjust settings, check humidity levels, and monitor overall performance. Additionally, the inclusion of wheels and a lightweight design enhances portability, allowing users to move the dehumidifiers where they are needed most.

Another notable aspect is the enhanced air filtration system. These dehumidifiers come with a removable, washable filter that effectively captures dust, allergens, and other airborne particles, contributing to better indoor air quality.

In conclusion, the Kenmore 153.33115 and 153.33114 are exemplary dehumidifiers that combine efficient moisture removal, user-friendly features, and eco-conscious designs. With their robust performance, effective humidity control, and added convenience features, these models stand out as reliable solutions for maintaining a comfortable and healthy indoor environment.