BEFORE LIGHTING: ENTIRE SYSTEM MUST BE FILLED WITH WATER AND AIR PURGED FROM ALL LINES

A. This appliance has.a .pi.Iotwhich is lit.by a piezo- elec_ncsparKgas j,gnluonsystem, uo n_.gqpen.o _neinner aoor of me appliance and _ry_oIIgh_ the pilot by hand.

B.BEFORE LIGHTINGsmell aII around the appliance area for gas. Be sure to smell next to the floor

because some gas is heavier than air and will settle on the floor.

WHAT TO DO IF YOU SMELL GAS oDo not try to light any appliance.

*Do not touch any electric switch; do not use any phone in your building.

elmmediately call your gas supplier from a neighbor's

*If you cannot reach your gas supplier, call the fire department.

C.Use only your hand to push in or turn the gas control knob. Never use tools. If the knob wilt not push in or turn by hand, don'ttry to repair it, call a qualified service technician. Force or attempted repair may result in a fire or explosion.

D. Do not use this appliance if any part has been under water. Immediately contact a qualified installer or service agency to replace a flooded water heater. Do not attempt to repair the unit! It must be replaced!

phone. Follow the gas supptier'sinstructions.

-Gas Control/Temperature Knob

FIGURE W

FIGURE 'B'

FIGURE 'C'

120°F

C

..,.

120°F

C

.-..

Mi;'


LOW


LOW


HO_


HUr_


"OFF" POSITION

"PILOT"

POSITION

"ON" POSITION


MAINBURNER_

"PILOT !

--IgniterGASCONTROL

CONTROL

KNOB

FIGURE 'D'

.STOP!It is imyou readall safety lightingthe pilot.

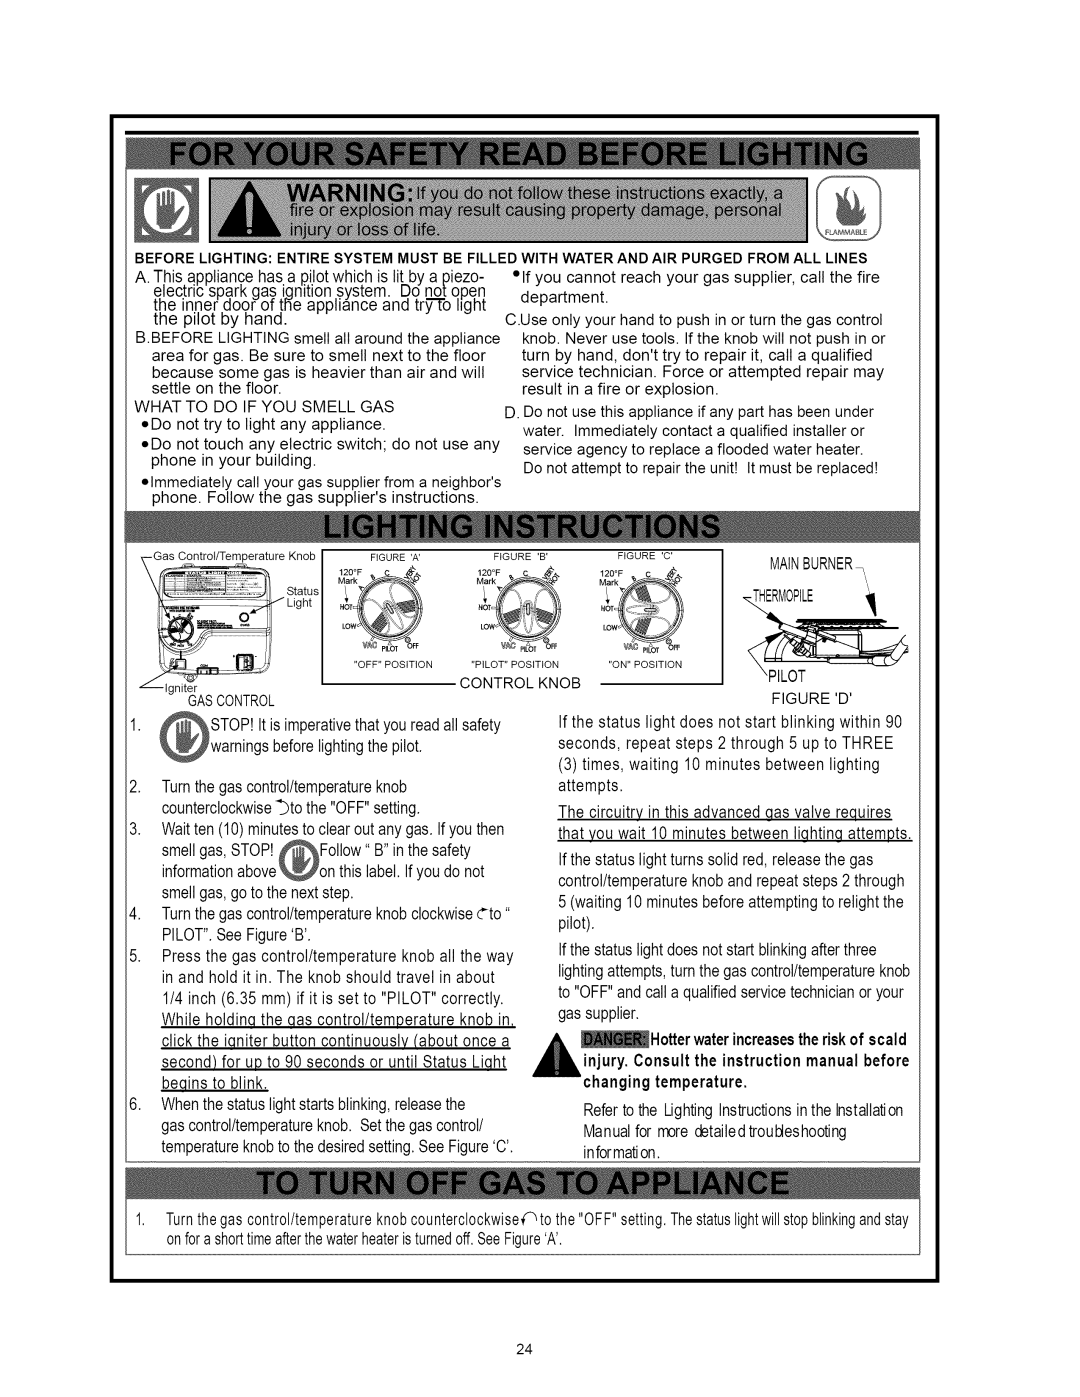
2.Turnthe gascontrol/temperatureknob counterclockwise_to the "OFF"setting.

3.Waitten (10)minutesto clearout any gas. Ifyou then

smell gas, STOP._Follow B in the safety

informationabove,on thislabel.If youdo not smellgas,goto the nextstep.

4.Turnthe gascontrol/temperatureknobclockwise¢to" PILOT".SeeFigure'B'.

5.Pressthe gas control/temperature knob all the way in and hold it in. The knob should travel in about

1/4 inch (6.35 mm) if it is set to "PILOT" correctly. While holdinq the qas control/temperature knob in, click the iqniter button continuously (about once a second) for up to 90 seconds or until Status Liqht beqins to blink.

6.Whenthestatuslightstartsblinking,releasethe gas control/temperatureknob. Setthe gascontrol/ temperatureknobto the desiredsetting.SeeFigure'C'.

If the status light does not start blinking within 90 seconds, repeat steps 2 through 5 up to THREE

(3)times, waiting 10 minutes between lighting attempts.

The circuitry in this advancedqas valve requires that you wait 10 minutes between liqhtinq attempts.

Ifthe statuslight turnssolid red, releasethe gas control/temperatureknoband repeatsteps2 through

5(waiting10minutesbeforeattemptingto relightthe pilot).

Ifthestatuslightdoesnotstart blinkingafterthree lightingattempts,turnthe gascontrol/temperatureknob to "OFF"and calla qualifiedservicetechnicianor your gassupplier.

_Hotter waterincreasestheriskof scald

injury. Consultthe instruction manualbefore changing temperature.

Refertothe UghtingInstructionsinthe Installation

Manualfor moredetailedtroubleshooting information.

1.Turnthegascontrolltemperatureknobcounterclockwise€to the"OFF"setting.Thestatuslightwillstopblinkingandstay onforashorttimeafterthewaterheateristurnedoff.SeeFigure'A'.

24

Page 24
Image 24
Kenmore 153.33115 Phone. Follow the gas supptiersinstructions, IgniterGASCONTROL, Hotter waterincreasestheriskof scald

153.33114, 153.33115 specifications

The Kenmore 153.33115 and 153.33114 are high-efficiency dehumidifiers designed to effectively manage moisture levels in residential spaces, providing comfort and safeguarding homes against the damaging effects of excess humidity. Both models embody Kenmore's commitment to quality, innovative technologies, and user-friendly features, making them ideal choices for maintaining optimal indoor air quality.

One of the standout features of the Kenmore 153.33115 and 153.33114 is their powerful dehumidification capability. With the capacity to remove up to 70 pints of moisture per day, these dehumidifiers efficiently tackle dampness in areas of up to 1,500 square feet. This makes them suitable for various spaces, including basements, laundry rooms, and even larger living areas, ensuring a healthy environment free from mold and mildew growth.

The models are equipped with an adjustable humidistat, which allows users to set their desired humidity levels easily. This feature not only enhances user control but also ensures energy efficiency by allowing the machines to operate only when necessary. Alongside energy efficiency, these dehumidifiers are designed to comply with Department of Energy guidelines, making them an eco-friendly choice.

Both models also feature a continuous drainage option, enabling hassle-free operation without the need for constant manual emptying of the water tank. When the water tank reaches capacity, an automatic shut-off function prevents overflow, ensuring peace of mind for users.

In terms of convenience, the Kenmore 153.33115 and 153.33114 have a user-friendly digital control panel with an easy-to-read LED display. This intuitive interface makes it simple to adjust settings, check humidity levels, and monitor overall performance. Additionally, the inclusion of wheels and a lightweight design enhances portability, allowing users to move the dehumidifiers where they are needed most.

Another notable aspect is the enhanced air filtration system. These dehumidifiers come with a removable, washable filter that effectively captures dust, allergens, and other airborne particles, contributing to better indoor air quality.

In conclusion, the Kenmore 153.33115 and 153.33114 are exemplary dehumidifiers that combine efficient moisture removal, user-friendly features, and eco-conscious designs. With their robust performance, effective humidity control, and added convenience features, these models stand out as reliable solutions for maintaining a comfortable and healthy indoor environment.