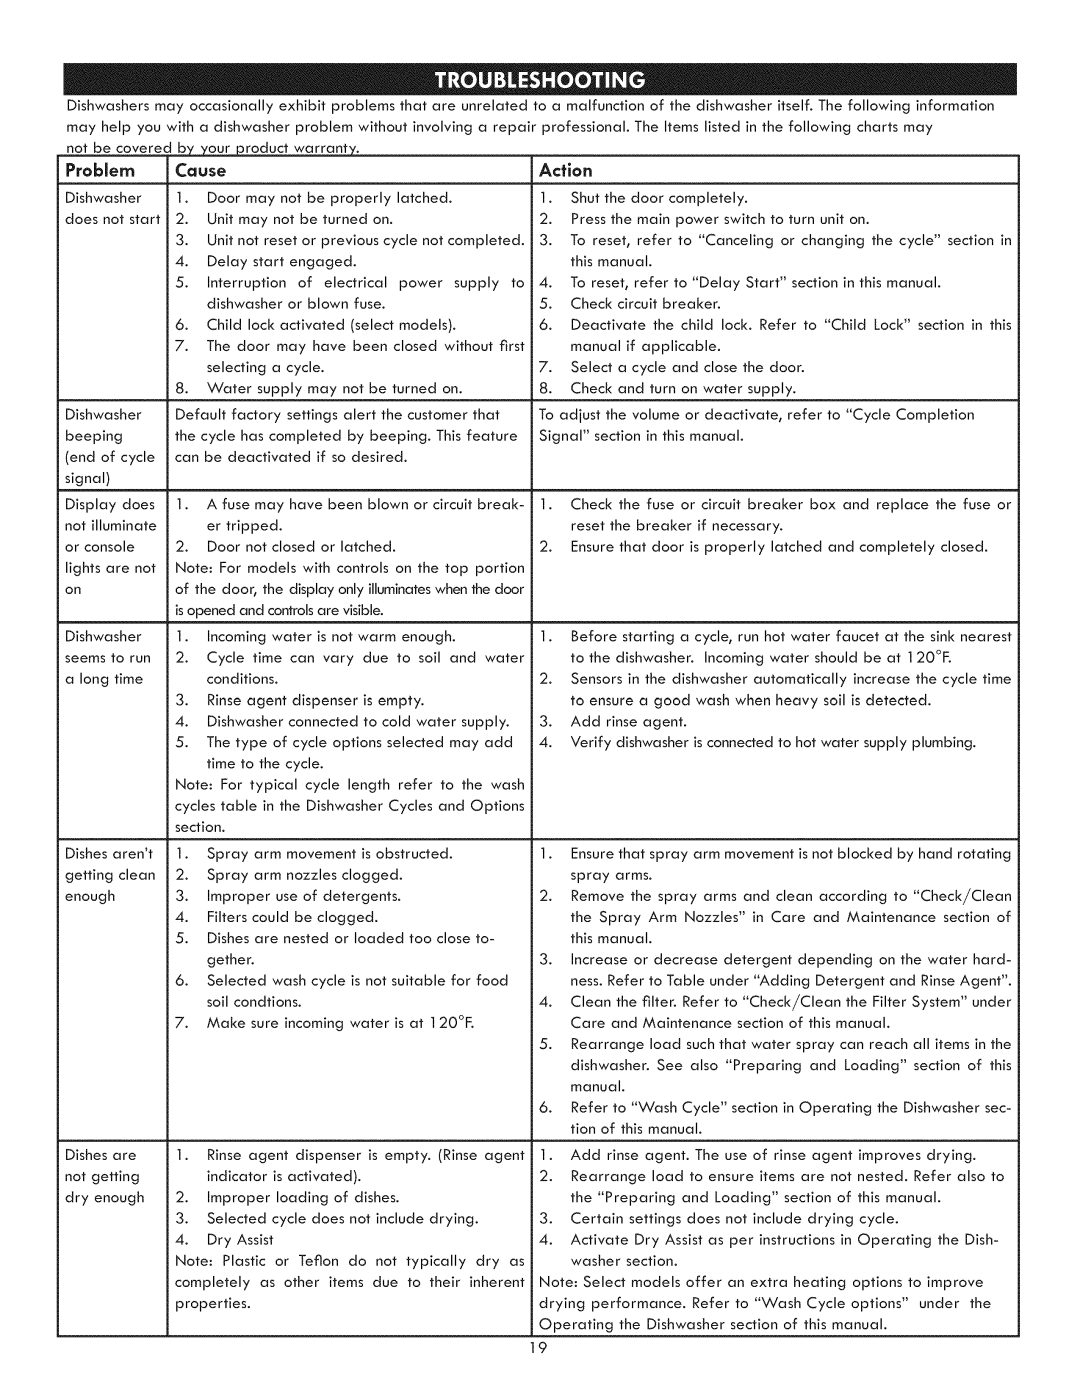
Dishwashers may occasionally exhibit problems that are unrelated to a malfunction of the dishwasher itself. The following information may help you with a dishwasher problem without involving a repair professional. The Items listed in the following charts may

not be covered by your product warranty.

Problem Cause

Dishwasher 1. Door may not be properly latched. does nat start 2. Unit may not be turned on.

3.Unit not reset or previous cycle nat completed.

4.Delay start engaged.

5.Interruption of electrical power supply to dishwasher or blown fuse.

6.Child lock activated (select models).

7.The door may have been closed without first selecting a cycle.

8.Water supply may nat be turned on.

Dishwasher

Default

factory settings

alert the customer

that

beeping


the

cycle

has

completed


by

beeping.

This feature

(end

of

cycle

can

be

deactivated

if

so desired.


signal)


Display

does

1.

A

fuse may

have

been

blown

or

circuit

break-

not

illuminate


er

tripped.


or

console


2.

Door

nat

closed

or

latched.


lights

are

nat

Note:

For

models

with


controls

on

the

top

portion

on


of the

door,

the

display


only

illuminates

when

the door


is opened

and

controls

are

visible.


Dishwasher

1.

Incoming

water

is not warm

enough.


seems

to

run

2.

Cycle

time

can

vary

due

to

soil

and

water

a long

time


conditions.


3.Rinse agent dispenser is empty.

4.Dishwasher connected to cold water supply.

5.The type of cycle options selected may add time to the cycle.

Note: For typical cycle length refer to the wash cycles table in the Dishwasher Cycles and Options section.

Action

1.Shut the door completely.

2.Press the main power switch to turn unit on.

3.To reset, refer to "Canceling or changing the cycle" section in this manual.

4.To reset, refer to "Delay Start" section in this manual.

5.Check circuit breaker.

6.Deactivate the child lack. Refer to "Child Lock" section in this manual if applicable.

7.Select a cycle and close the door.

8.Check and turn on water supply.

To adjust the volume or deactivate, refer to "Cycle Completion Signal" section in this manual.

1.Check the fuse or circuit breaker box and replace the fuse or reset the breaker if necessary.

2.Ensure that door is properly latched and completely closed.

1.Before starting a cycle, run hot water faucet at the sink nearest to the dishwasher. Incoming water should be at 120°F.

2.Sensors in the dishwasher automatically increase the cycle time to ensure a good wash when heavy soil is detected.

3.Add rinse agent.

4.Verify dishwasher is connected to hat water supply plumbing.

Dishes

aren't

1.

Spray

arm

movement

is obstructed.


1.

Ensure that

spray

arm

movement

is nat


blocked

by

hand

rotating

getting

clean

2.

Spray

arm

nozzles

clogged.


spray

arms.


enough


3.

Improper


use

of

detergents.


2.

Remove the spray arms and clean

according

to

"Check!Clean


4.

Filters

could

be

clogged.


the

Spray


Arm

Nozzles"

in

Care

and

Maintenance

section

of


5.

Dishes

are

nested

or

loaded

too

close

to-


this

manual.


gether.


3.

Increase

or decrease


detergent

depending

on

the

water

hard-


6.

Selected

wash

cycle

is nat

suitable for

food


ness. Refer

to

Table

under

"Adding

Detergent

and

Rinse

Agent".


soil

condtions.


4.

Clean

the

filter.

Refer

to "Check!Clean


the Filter

System"


under


7.

Make

sure

incoming


water

is

at

120°F.


Care


and


Maintenance

section of

this


manual.


5.

Rearrange


load

such that

water

spray


can reach


all

items

in

the


dishwasher.

See

also "Preparing


and


Loading"


section


of

this


manual.


6.

Refer

to

"Wash

Cycle"

section

in Operating

the

Dishwasher

sec-


tian

of

this

manual.


Dishes are

1.

Rinse

agent

dispenser


is

empty.

(Rinse agent

1.

Add

rinse

agent.

The

use

of

rinse

agent

improves


drying.


not

getting


indicator

is activated).


2.

Rearrange


load

to

ensure

items

are

nat

nested.


Refer

also

to

dry

enough

2.

Improper


loading


of

dishes.


the

"Preparing


and

Loading"

section


of

this

manual.


3.

Selected

cycle

does

nat

include

drying.


3.

Certain

settings

does

not

include


drying

cycle.


4.

Dry

Assist


4.

Activate

Dry

Assist

as

per

instructions


in

Operating


the


Dish-


Note:

Plastic


or

Teflon

do

nat

typically

dry as


washer

section.


completely


as

other

items

due

to

their

inherent

Note:

Select

models

offer

an

extra

heating

options

to

improve


properties.


drying performance.


Refer

to

"Wash


Cycle options"


under


the


Operating


the

Dishwasher

section

of

this

manual.


9


Page 19
Image 19
Kenmore 630.1390, 630.1391 manual Problem Cause

630.1390, 630.1391 specifications

The Kenmore 630.1391 and 630.1390 models stand out in the realm of kitchen appliances, particularly as top-tier microwave ovens. Kenmore, a brand synonymous with home convenience and quality, has equipped these models with advanced features and technologies to enhance the cooking experience.

These microwave ovens boast a robust design, available in a variety of finishes that can complement any kitchen décor. The sleek exterior is matched by an intuitive control panel, which allows users to operate the unit with ease. The digital display clearly indicates cooking times and settings, making it user-friendly for all age groups.

One of the standout features of the Kenmore 630.1391 and 630.1390 is their powerful cooking capability. With high wattage, these microwaves can quickly heat and cook food, significantly reducing preparation times. The inverter technology incorporated into these models ensures that food is cooked evenly without the risk of overcooking. This feature allows for more consistent results, whether reheating leftovers or defrosting frozen items.

Another notable characteristic is the spacious interior that caters to various cooking needs. The 630.1391 model, in particular, offers a large turntable that accommodates larger dishes, providing flexibility in meal preparation. The interior is also designed for easy cleanup, with a material that resists stains and odors.

The sensor cooking feature is another technological advancement found in these models. This function automatically adjusts cooking time and power levels based on the moisture released by the food, resulting in perfectly cooked meals every time. Along with pre-programmed settings for popular dishes, this feature takes the guesswork out of cooking.

Safety is a top concern in any home appliance, and Kenmore has addressed this by including several safety features in the 630.1391 and 630.1390 models. Child lock functions prevent unintentional operation, ensuring that young hands cannot easily access the microwave.

In summary, the Kenmore 630.1391 and 630.1390 microwave ovens combine style, power, and innovative technology to meet the diverse needs of modern kitchens. With features designed to simplify cooking while ensuring safety and quality, these models are an excellent addition for anyone looking to enhance their culinary capabilities.