Manuals
/
Kenmore
/
Kitchen Appliance
/
Dishwasher
Kenmore
630.13952, 630.13959, 630.13953
manual
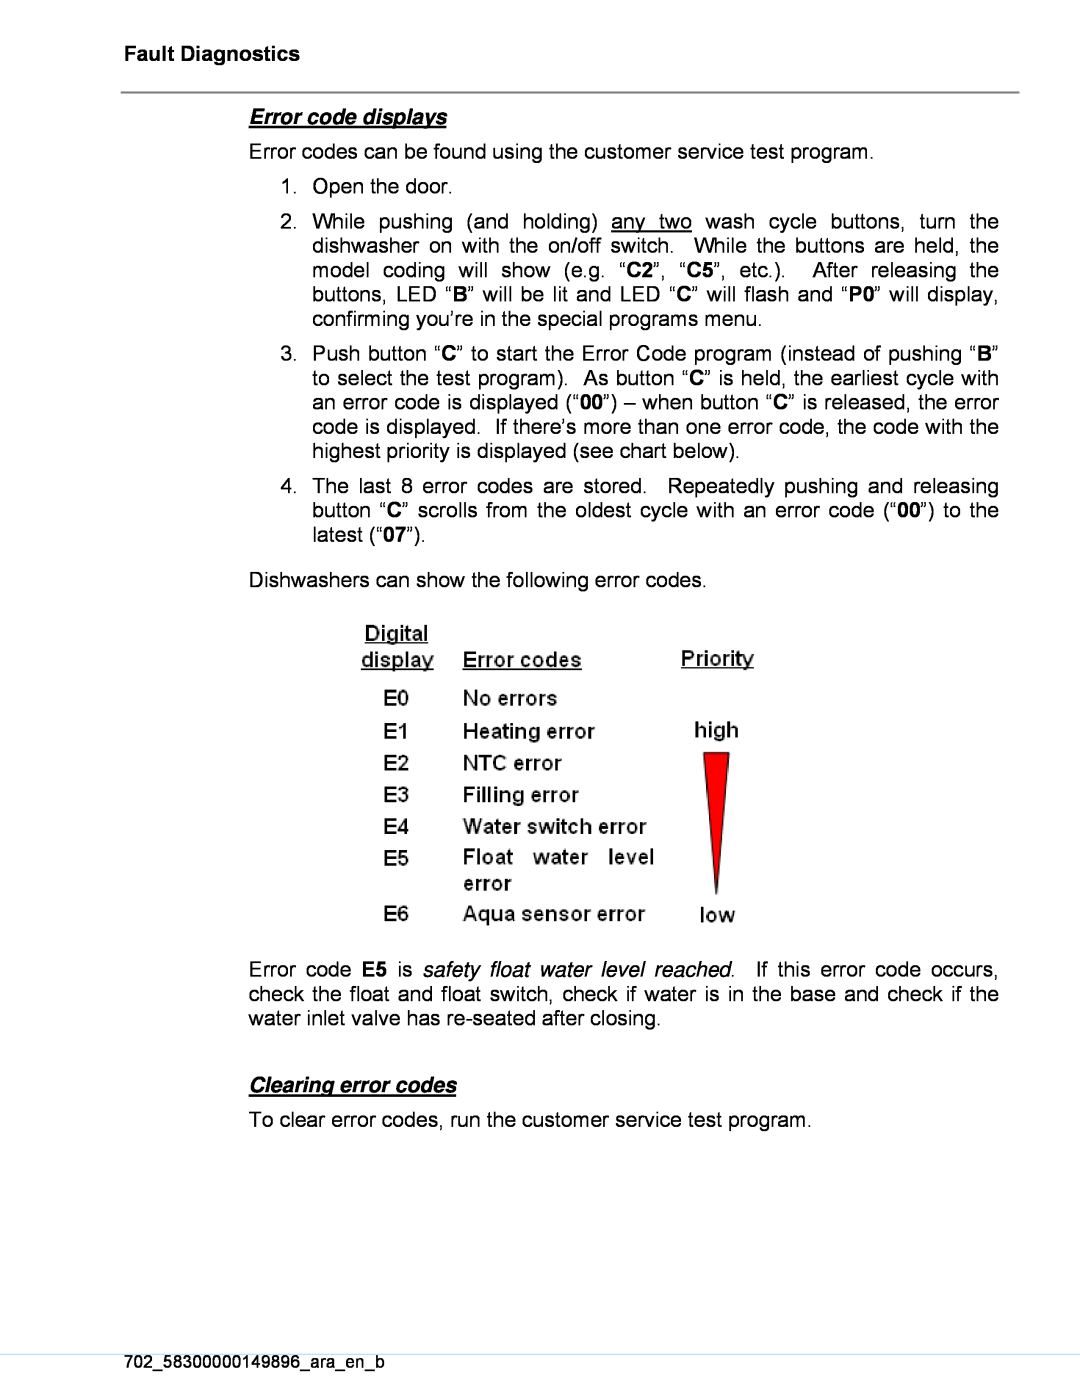
Error code displays, Clearing error codes
Models:
630.13953
630.13952
630.13959
1
40
51
51
Download
51 pages
22.21 Kb
37
38
39
40
41
42
43
44
Troubleshooting
Specs
Install
Error codes
NTC resistance chart
Symbol
Fault Diagnostics
For access to circulation pump
Water fill assembly
Adjusting rinse-aiddosage
Page 40
Image 40
Page 39
Page 41
Page 40
Image 40
Page 39
Page 41
Contents
KENMORE ELITE DISHWASHERS
Sears Brands Management Corporation
Hoffman Estates, IL 60179 U.S.A
Toronto, Ontario, Canada M5B 2C3
FAULT DIAGNOSTICS
TECHNICAL SPECIFICATIONS
WIRING DIAGRAMS
COMPONENTS
I. SAFETY
SAFETY
IA. General hazards m
IB. Electrical shock / fire hazards c h
II. INSTALLATION
INSTALLATION
IIA. Pre-Installchecklist
IIB. Alignment
IIC. Electrical connection
INSTALLATION IID. Water connection
IIE. Drain and condensation hose connections
Reset “Cancel – Reset”
III. OPERATION
Sanitized and Refill Rinse Agent lights
Dry Assist
Changing basic features
The End of cycle tone volume can be changed
End of cycle tone
IIIC. Entering special programs and coding
EX Error codes
PX Program codes
P4 = Control coding see CX control codes
CX Control codes
Preparing a showroom dishwasher for resale
Preparing a dishwasher for showroom use
WARNING: Danger of electrical shock
Dispenser
Adjusting rinse-aiddosage
Closing dispenser doors
IV.COMPONENTS
Tank
Heater Operation
Heater ratings
Water switch
Leveling feet front and rear
Microswitch Cam
Disk
BLDC
Circulation pumps
Float
Pump specifications
Solving installation issues
Drain pump
Cavitating
Terminal connections Rast 5 connectors
Johnson Tee installations Washington State
Water fill assembly
Siphoning
Flowmeter
Condensation tube
Using hinge slider sliding pulley
Door spring
Hinge bushing
Water inlet valve
On/off switch
Door latch
Terminal block
Terminal box
Drain hose
Optical rinse-aidsensors
Display and power modules
Aqua sensor
Power module
Control module
Sump
Sump parts
Backflow check valve
Spray arm feed tube
Info lights
Operation
Water circulation
Serial label warranty information
Understanding the 17-digitserial #
V. Repair
To remove outer door
Tools needed: T20 Torx screwdriver
To remove toe kick
To flip dishwasher upside-down
To raise block up right side of tank
Tools needed: T20 Torx screwdriver and pliers
For access to circulation pump
To remove water valve
Tools needed: T20 Torx screwdriver & pliers
Connection hints
To remove complete pump
Tools needed: flat blade screwdriver
Fascia panel mounted controls
Tools needed: T-20Torx & flat blade screwdrivers
To access base-mountedcontrols
Base mounted controls
Tools needed: T-20Torx screwdriver & pliers
1.Remove outer door – see section VA
To remove heater, NTC & flow switch
For access to heaters & NTC’s
VE. Heaters
Softer bearing heaters
4.Push NTC latches and lift NTC from heater
To remove dispensers
1.Remove outer door --section VA
Repair VF. 2-piecedrain hose connection
VG. Drain pumps
1.Remove fascia panel --section VD
To remove door latches
VI. Door latches
Misaligned door latches
VI.Fault Diagnostics
Entering customer service test program
Fault Diagnostics
VIA. Customer service test program
Error code displays
Clearing error codes
Viewing customer service program
Symbol
Dishwasher troubleshooting
Fault
Failure Resolution
Steps to determine failure
Dispenser
Heater diagnosing
Will not fill
or does not
fill with
Heating system checklist if controls time out
Controls timing out and showing “1”
NTC resistance chart
Where to measure NTC resistances
Checklist if water leaks past doors
Cosmetic / Customer Use / Installation Issues
Water Leaking Past Doors
Not cleaning or locking sump filters
Customer self-helpdiagnosing
Technical Specifications
VII. Technical Specifications
Unsatisfactory washing results
VIII. Wiring Diagrams
Wiring Diagrams
Wiring Diagrams
702_58300000149896_ara_en_b
Top
Page
Image
Contents