Before Setting Surface Controls

Assembly of the Surface Burner Heads, Burner Caps and Burner Grates for Regular Burners

It is very important to make sure that all of the Surface Burner Heads, Surface Burner Caps and Surface Burner Grates are installed correctly and at the correct locations.

1.Remove all packing tape from cooktop area. Remove all Burner Caps and Burner Heads.

2.Discard all packing material located under Burner Heads (if applicable).

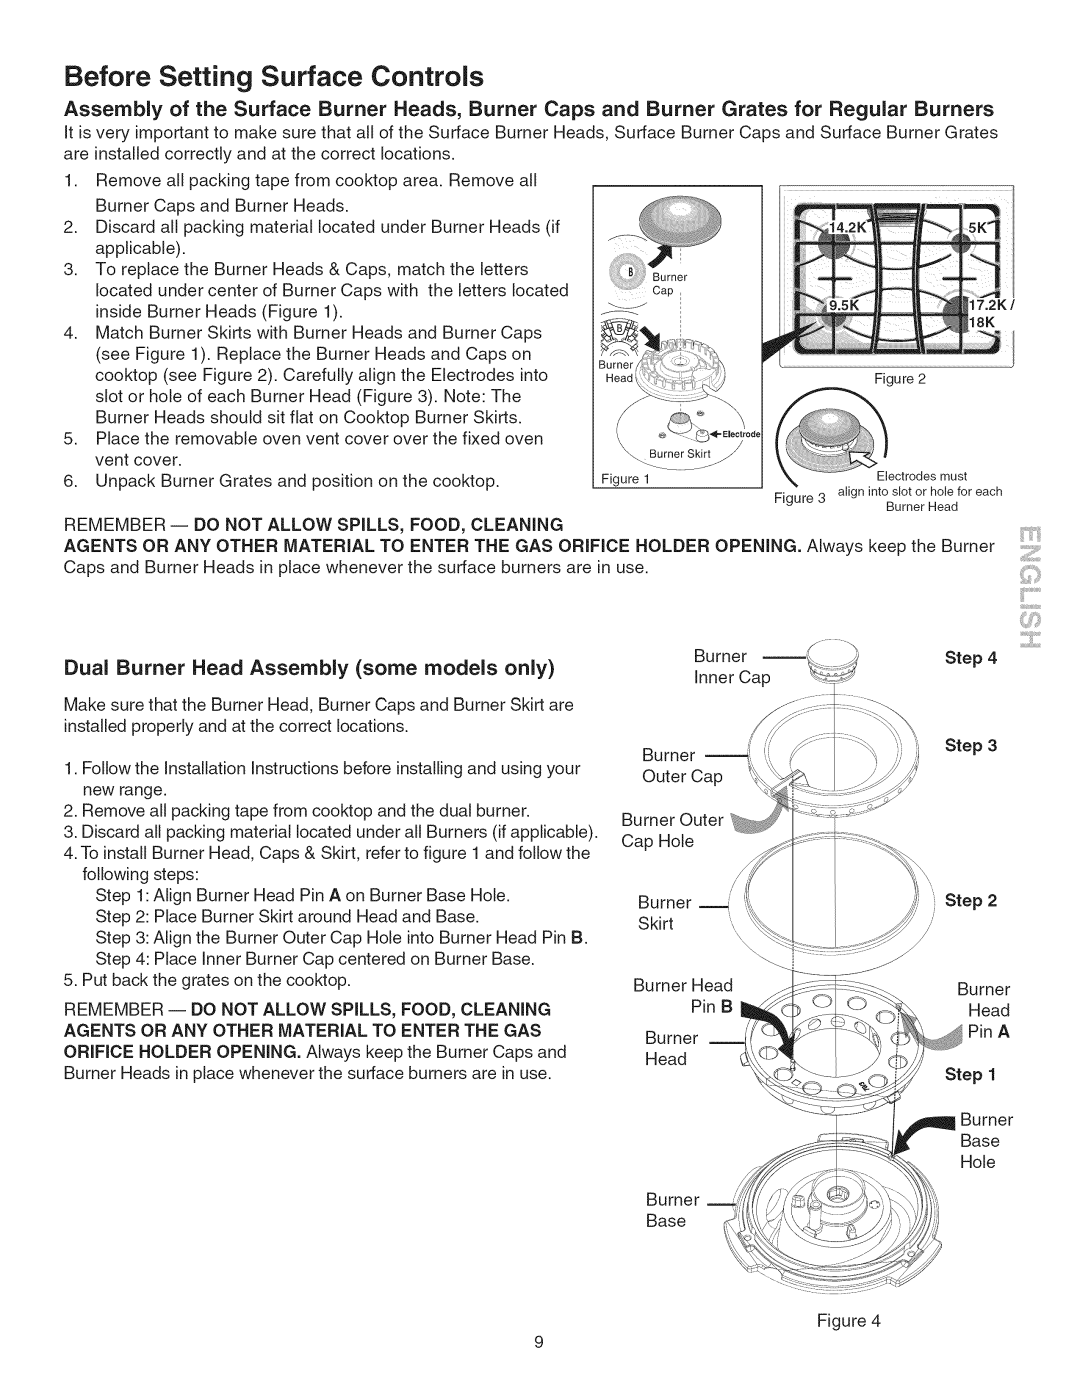
3.To replace the Burner Heads & Caps, match the letters located under center of Burner Caps with the letters located inside Burner Heads (Figure 1).

4.Match Burner Skirts with Burner Heads and Burner Caps (see Figure 1). Replace the Burner Heads and Caps on


cooktop (see Figure 2). Carefully align the Electrodes into

Figure

2


slot or hole of each Burner Head (Figure 3). Note: The


Burner Heads should sit flat on Cooktop Burner Skirts.


5.

Place the removable oven vent cover over the fixed oven


vent cover.


6.

Unpack Burner Grates and position on the cooktop.

Figure 1


Figure 3 align into slot

or

hole for each


Burner

Head

REMEMBER = DO NOT ALLOW SPILLS, FOOD, CLEANING

AGENTS OR ANY OTHER MATERIAL TO ENTER THE GAS ORIFICE HOLDER OPENING. Always keep the Burner Caps and Burner Heads in place whenever the surface burners are in use.

Dual Burner Head Assembly (some models only)

Burner

Step 4

Inner Cap


Make sure that the Burner Head, Burner Caps and Burner Skirt are installed properly and at the correct locations.

1.Follow the Installation Instructions before installing and using your new range.

2.Remove all packing tape from cooktop and the dual burner.

3.Discard all packing material located under all Burners (if applicable).

4.To install Burner Head, Caps & Skirt, refer to figure 1 and follow the following steps:

Step 1: Align Burner Head Pin A on Burner Base Hole.

Step 2: Place Burner Skirt around Head and Base.

Step 3: Align the Burner Outer Cap Hole into Burner Head Pin B.

Step 4: Place Inner Burner Cap centered on Burner Base.

5.Put back the grates on the cooktop.

REMEMBER -- DO NOT ALLOW SPILLS, FOOD, CLEANING AGENTS OR ANY OTHER MATERIAL TO ENTER THE GAS ORIFICE HOLDER OPENING. Always keep the Burner Caps and Burner Heads in place whenever the surface burners are in use.

Burner

Outer Cap

Burner Outer Cap Hole

Burner

Skirt \

',\

Burner Head Pin B

Burner

Head

Burner

Base

Step 3

Step 2

//

/

/

Burner

Head

PinA

Step 1

Burner

Base

Hole

Figure 4

9

Page 9
Image 9
Kenmore 790.3104, 790.3103 manual Before Setting Surface Controls, Dual Burner Head Assembly some models only

790.3104, 790.3103 specifications

The Kenmore 790.3103 and 790.3104 are part of Kenmore's reliable line of freestanding gas ranges, designed specifically to blend functionality with modern kitchen aesthetics. Both models encompass several standout features that cater to the needs of home cooks ranging from novices to culinary enthusiasts.

One of the most notable characteristics of the 790 series is its convection cooking capability. This technology circulates hot air around the oven, promoting even baking and roasting results. It ensures that dishes come out perfectly cooked and browner on all sides, eliminating concerns about uneven heat distribution. The models also boast an advanced oven design with multiple rack positions, allowing for greater flexibility in cooking multiple dishes at once.

The two models feature a powerful burner system that includes a high-BTU burner, which is perfect for searing and quick boiling, along with simmer burners that provide precise control for delicate tasks like melting chocolate or preparing sauces. This versatility makes these ranges suitable for a wide range of cooking techniques, from quick weeknight meals to elaborate dinner parties.

In terms of convenience, the Kenmore 790.3103 and 790.3104 come equipped with easy-to-use controls. Their intuitive digital displays allow users to set cooking times, temperatures, and select cooking modes with just a few taps. Additionally, both models feature self-cleaning options, saving users the hassle of manual scrubbing after a busy cooking session.

Energy efficiency is another key consideration with these ranges. Both models are designed to consume less energy compared to traditional ranges, thanks to their improved insulation and optimized burner designs. This not only benefits the environment but also helps keep utility bills in check.

From a design perspective, the Kenmore 790.3103 and 790.3104 offer a sleek and modern appearance that fits seamlessly into various kitchen styles. Available in multiple finishes, including stainless steel, they add a touch of elegance and are easy to clean.

In summary, the Kenmore 790.3103 and 790.3104 combine powerful cooking technologies, user-friendly features, and an aesthetically pleasing design, making them excellent choices for any modern kitchen. These ranges are built to deliver high performance while ensuring ease of use, making them a reliable partner for any home cook.