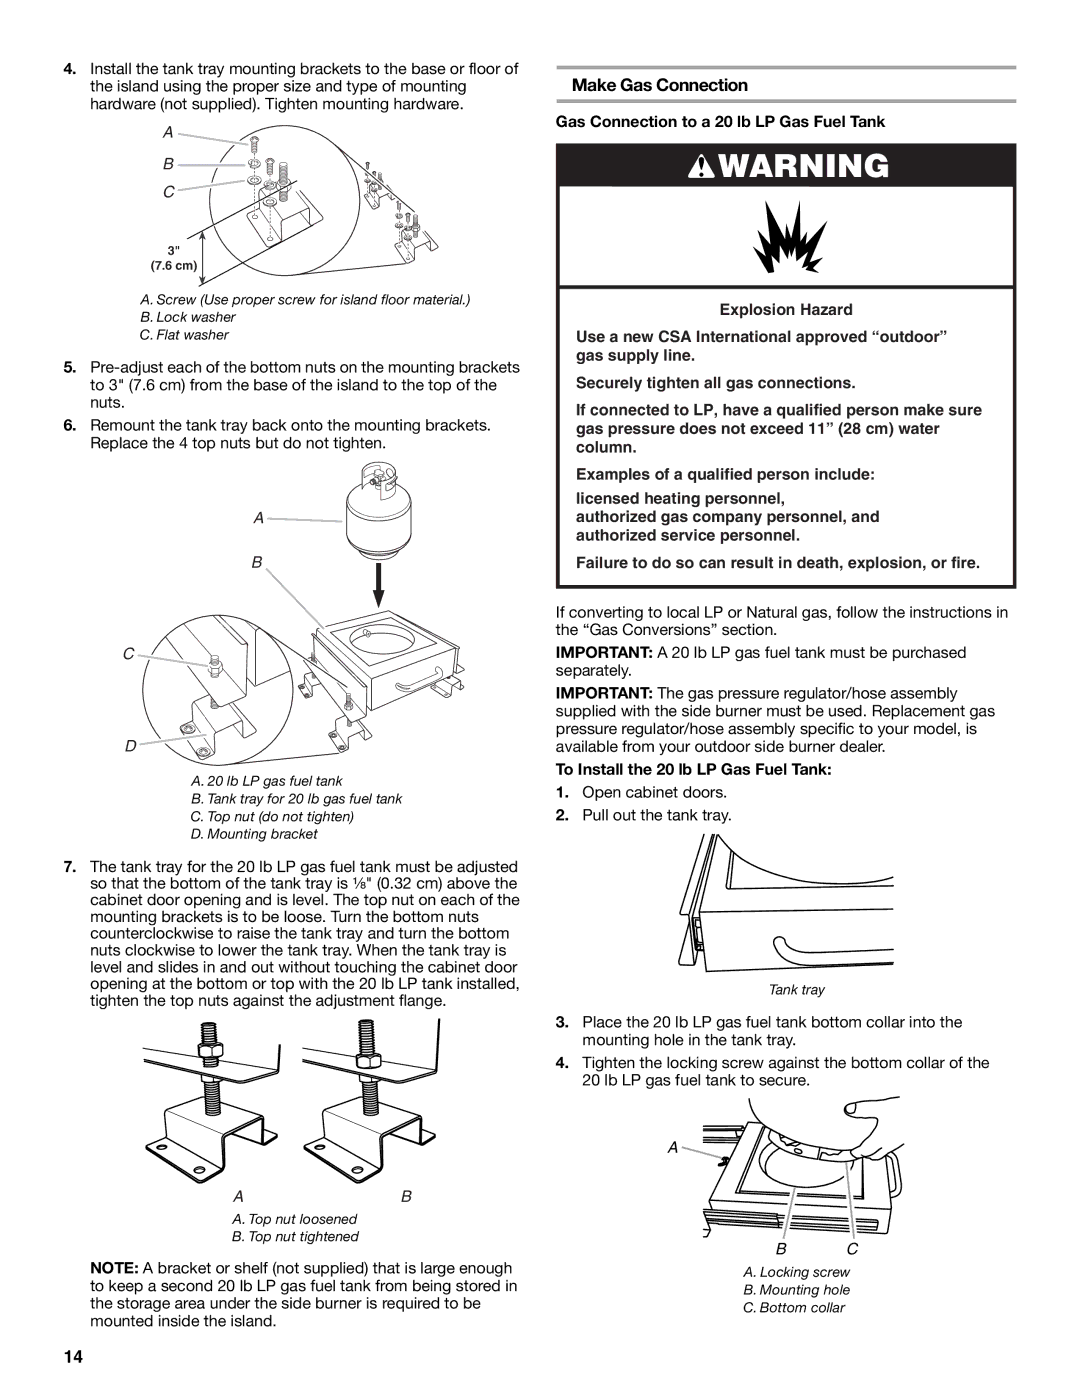
4.Install the tank tray mounting brackets to the base or floor of the island using the proper size and type of mounting hardware (not supplied). Tighten mounting hardware.

A

B

C

3"

(7.6 cm)

A. Screw (Use proper screw for island floor material.)

B. Lock washer

C. Flat washer

5.Pre-adjust each of the bottom nuts on the mounting brackets to 3" (7.6 cm) from the base of the island to the top of the nuts.

6.Remount the tank tray back onto the mounting brackets. Replace the 4 top nuts but do not tighten.

A

B

C

D

A. 20 lb LP gas fuel tank

B. Tank tray for 20 lb gas fuel tank

C. Top nut (do not tighten)

D. Mounting bracket

7.The tank tray for the 20 lb LP gas fuel tank must be adjusted so that the bottom of the tank tray is ¹⁄₈" (0.32 cm) above the cabinet door opening and is level. The top nut on each of the mounting brackets is to be loose. Turn the bottom nuts counterclockwise to raise the tank tray and turn the bottom nuts clockwise to lower the tank tray. When the tank tray is level and slides in and out without touching the cabinet door opening at the bottom or top with the 20 lb LP tank installed, tighten the top nuts against the adjustment flange.

AB

A. Top nut loosened

B. Top nut tightened

NOTE: A bracket or shelf (not supplied) that is large enough to keep a second 20 lb LP gas fuel tank from being stored in the storage area under the side burner is required to be mounted inside the island.

Make Gas Connection

Gas Connection to a 20 lb LP Gas Fuel Tank

WARNING

Explosion Hazard

Use a new CSA International approved “outdoor” gas supply line.

Securely tighten all gas connections.

If connected to LP, have a qualified person make sure gas pressure does not exceed 11” (28 cm) water column.

Examples of a qualified person include:

licensed heating personnel,

authorized gas company personnel, and authorized service personnel.

Failure to do so can result in death, explosion, or fire.

If converting to local LP or Natural gas, follow the instructions in the “Gas Conversions” section.

IMPORTANT: A 20 lb LP gas fuel tank must be purchased separately.

IMPORTANT: The gas pressure regulator/hose assembly supplied with the side burner must be used. Replacement gas pressure regulator/hose assembly specific to your model, is available from your outdoor side burner dealer.

To Install the 20 lb LP Gas Fuel Tank:

1.Open cabinet doors.

2.Pull out the tank tray.

Tank tray

3.Place the 20 lb LP gas fuel tank bottom collar into the mounting hole in the tank tray.

4.Tighten the locking screw against the bottom collar of the 20 lb LP gas fuel tank to secure.

A

BC

A.Locking screw

B.Mounting hole

C.Bottom collar

14

Page 14
Image 14
KitchenAid KBZU122VSS installation instructions Make Gas Connection, To Install the 20 lb LP Gas Fuel Tank

KBZU122VSS specifications

The KitchenAid KBZU242VSS, KBZU122VSS, KBZU122TSS, and W10176789A are a series of impressive kitchen appliances designed to enhance your culinary experience. These products appeal to both amateur and professional chefs due to their innovative features, advanced technologies, and sleek design.

The KBZU242VSS is a built-in refrigerator that offers an impressive combination of style and functionality. It boasts a spacious capacity optimized for convenient organization. The design includes adjustable glass shelves and a customizable door bin system, allowing you to create a layout that suits your storage needs. One of its standout features is the ExtendFresh technology, which ensures that all your food items are stored at the ideal temperature to maintain freshness.

Next, the KBZU122VSS is known for its compact size, making it perfect for smaller kitchens or as an additional cooling solution wherever you need it. With a stylish stainless steel finish, it seamlessly integrates into any kitchen decor. Its Energy Star rating reflects its efficient power consumption, making it an eco-friendly choice. The interior layout includes removable shelving and a dedicated crisper drawer for fruits and vegetables, ensuring that your produce stays fresh longer.

The KBZU122TSS shares many features with its counterpart but may include additional customizable options or slightly varied designs, catering to diverse consumer preferences. This model emphasizes flexibility, allowing chefs to maximize their kitchen space without sacrificing functionality. The bright LED lighting inside provides excellent visibility, making it easy to find items even in densely packed storage.

Finally, the W10176789A is not just an accessory but a significant upgrade for your kitchen. This model is designed for seamless compatibility with various appliances, enhancing their overall performance. Whether it's improving temperature regulation or streamlining your cooking process, it has been engineered with precision in mind.

In summary, the KitchenAid KBZU series, featuring the KBZU242VSS, KBZU122VSS, KBZU122TSS, and the W10176789A, represents a range of high-quality kitchen appliances that prioritize efficiency, adaptability, and style. Their unique features and innovative technologies provide users with smart and practical solutions for all their cooking and cooling needs. Ideal for enhancing any kitchen, these appliances are a testament to KitchenAid's commitment to quality and design excellence.