Disconnect power.

Installation steps

For easier installation, it is recommended that both the 120-volt supply wiring to be connected to the hood liner wiring box and the exterior blower system be installed first. Pull enough wiring through the wall to allow for making the electrical connections at the hood liner wiring box. Label which cable is the 120-volt supply wire and which is the exterior blower cable.

Now Start...


14-3/16"


2"


hood


(5.1 cm)


support

(36.0 cm)


knockout location

on wall

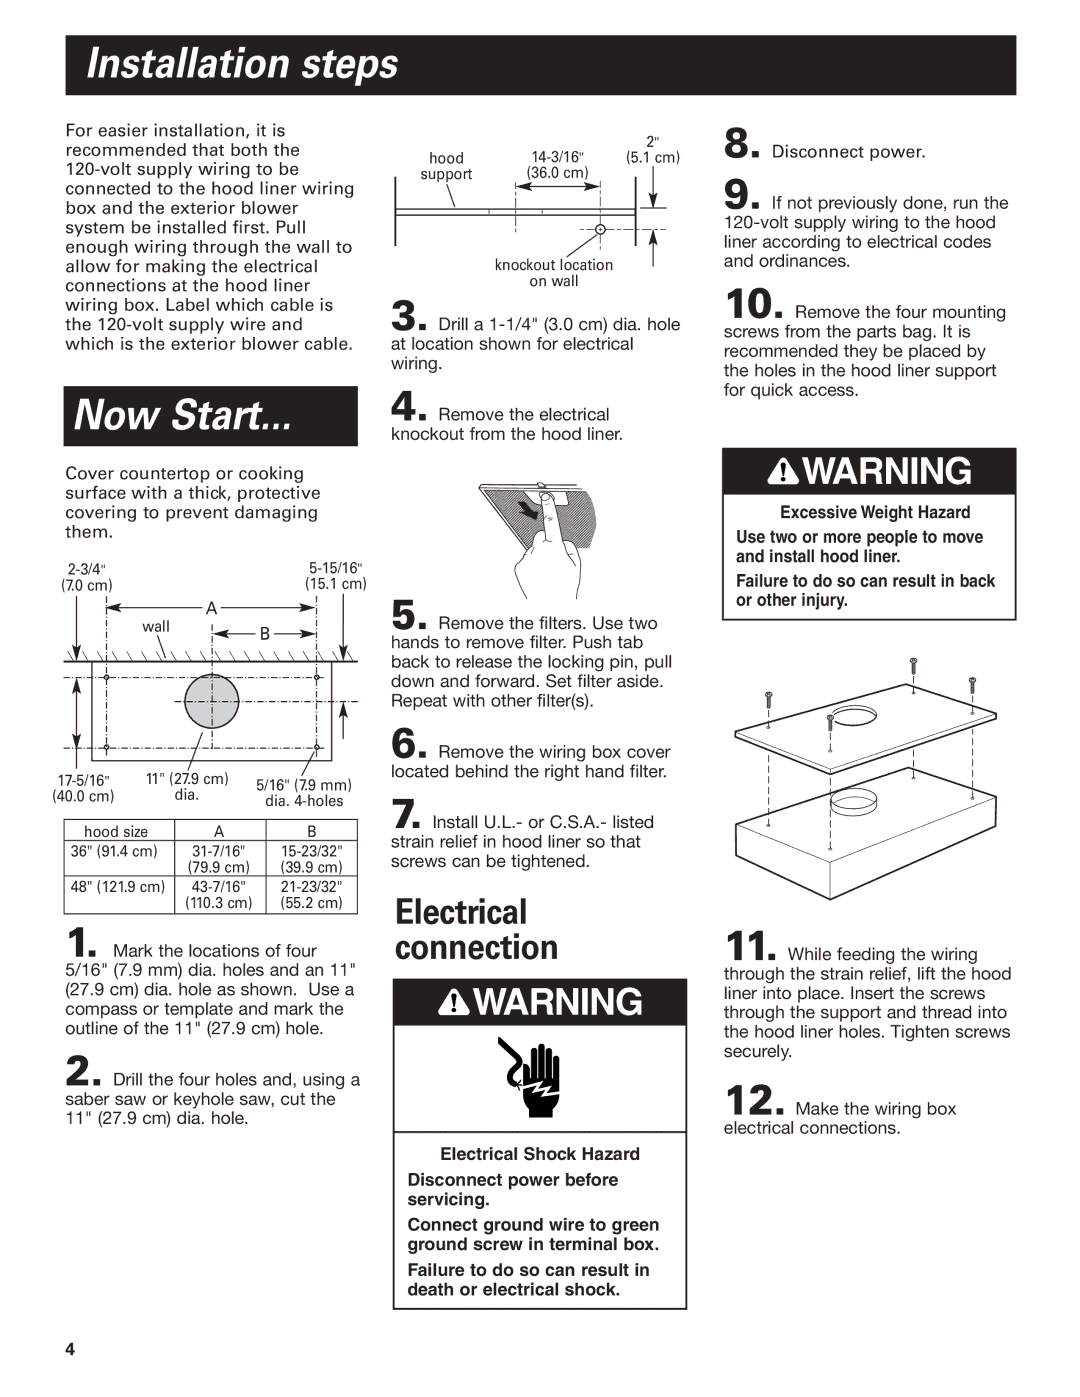
3. Drill a 1-1/4" (3.0 cm) dia. hole at location shown for electrical wiring.

4. Remove the electrical knockout from the hood liner.

8.

9. If not previously done, run the

120-volt supply wiring to the hood liner according to electrical codes and ordinances.

10. Remove the four mounting screws from the parts bag. It is recommended they be placed by the holes in the hood liner support for quick access.

Cover countertop or cooking surface with a thick, protective covering to prevent damaging them.

2-3/4"


5-15/16"

(7.0 cm)


(15.1 cm)


wall

A


B


17-5/16"

11" (27.9 cm)

5/16"

(7.9 mm)

(40.0 cm)


dia.


dia.

4-holes


hood size

A


B


36" (91.4 cm)

31-7/16"


15-23/32"


(79.9 cm)


(39.9 cm)


48" (121.9 cm)

43-7/16"


21-23/32"


(110.3 cm)


(55.2 cm)

1. Mark the locations of four 5/16" (7.9 mm) dia. holes and an 11" (27.9 cm) dia. hole as shown. Use a compass or template and mark the outline of the 11" (27.9 cm) hole.

2. Drill the four holes and, using a saber saw or keyhole saw, cut the 11" (27.9 cm) dia. hole.

5. Remove the filters. Use two hands to remove filter. Push tab back to release the locking pin, pull down and forward. Set filter aside. Repeat with other filter(s).

6. Remove the wiring box cover located behind the right hand filter.

7. Install U.L.- or C.S.A.- listed strain relief in hood liner so that screws can be tightened.

Electrical connection

WARNING

Electrical Shock Hazard

Disconnect power before servicing.

Connect ground wire to green ground screw in terminal box.

Failure to do so can result in death or electrical shock.

WARNING

Excessive Weight Hazard

Use two or more people to move and install hood liner.

Failure to do so can result in back or other injury.

11. While feeding the wiring through the strain relief, lift the hood liner into place. Insert the screws through the support and thread into the hood liner holes. Tighten screws securely.

12. Make the wiring box electrical connections.

4

Page 4
Image 4
KitchenAid KPEC992M installation instructions Installation steps, Now Start

KPEC992M specifications

The KitchenAid KPEC992M is an innovative and versatile kitchen appliance that brings professional-grade performance to home cooking. Designed with both functionality and aesthetics in mind, this product embodies the brand's legacy of quality craftsmanship.

One of the standout features of the KPEC992M is its powerful motor, which delivers remarkable efficiency and speed. With multiple speed settings, users can easily adjust the performance to suit a variety of cooking tasks. This makes it ideal for everything from whipping cream to kneading heavy dough. The unique planetary mixing action ensures that all ingredients are thoroughly combined, making the mixing process seamless and effective.

Another significant characteristic of the KitchenAid KPEC992M is its large-capacity bowl, which accommodates generous quantities of ingredients. This is particularly useful for family gatherings or meal prep, as it allows users to mix larger batches without needing to do multiple rounds. Additionally, the bowl is designed with a convenient handle, making it easy to maneuver and pour.

The KPEC992M also features a robust construction that promotes durability and longevity. Made with high-quality materials, it is designed to withstand the rigors of daily use while maintaining its sleek appearance. The unit comes in a variety of stylish colors, allowing it to complement any kitchen décor.

One of the highlighted technologies in the KPEC992M is its attachment hub, which is compatible with a wide range of KitchenAid accessories. This versatility enables users to expand their culinary capabilities, transforming the mixer into a food processor, pasta maker, or even a juicer. The adaptability of the KPEC992M makes it a valuable addition to any kitchen setup.

Furthermore, safety features have not been overlooked. The mixing bowl locks securely into place, and there are built-in mechanisms to prevent operation when the bowl is not properly positioned. This attention to detail provides peace of mind for users, ensuring a safe cooking experience.

In summary, the KitchenAid KPEC992M is a robust and versatile kitchen mixer that combines power, efficiency, and style. With its numerous features, including multiple speed settings, large-capacity bowl, and compatibility with various attachments, this appliance caters to both novice cooks and seasoned chefs alike. Its durable construction and safety mechanisms further enhance its appeal, making it a wise investment for those who cherish culinary exploration.