mounting bracket

screw

flat-blade screwdriver

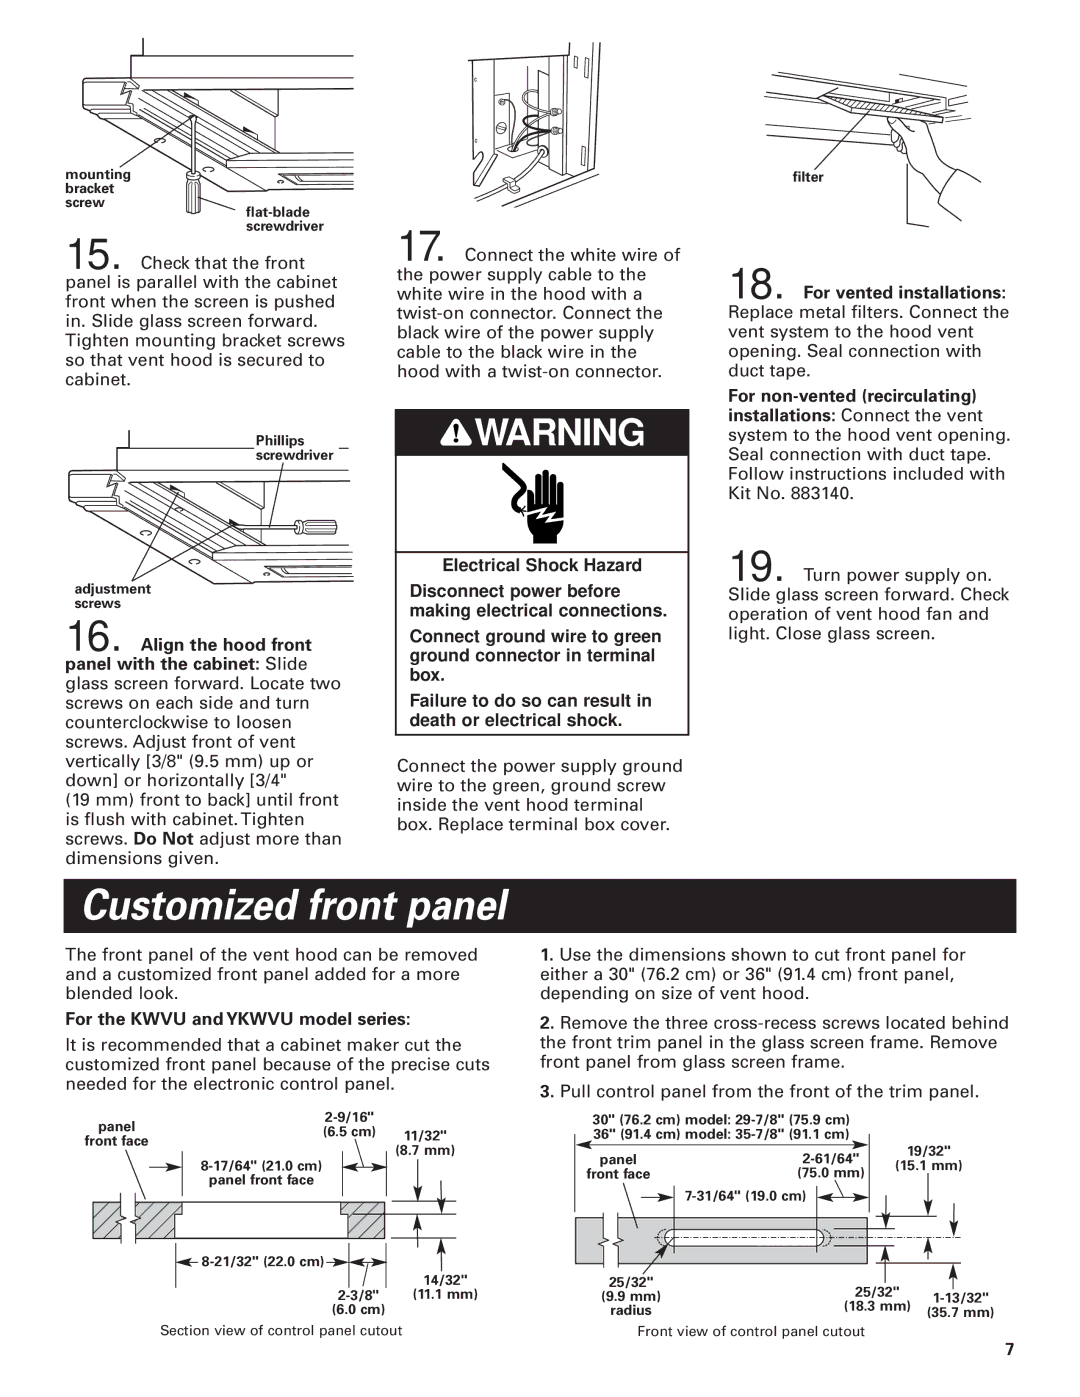
15. Check that the front panel is parallel with the cabinet front when the screen is pushed in. Slide glass screen forward. Tighten mounting bracket screws so that vent hood is secured to cabinet.

Phillips screwdriver

adjustment screws

16. Align the hood front panel with the cabinet: Slide glass screen forward. Locate two screws on each side and turn counterclockwise to loosen screws. Adjust front of vent vertically [3/8" (9.5 mm) up or down] or horizontally [3/4"

(19 mm) front to back] until front is flush with cabinet. Tighten screws. Do Not adjust more than dimensions given.

17. Connect the white wire of the power supply cable to the white wire in the hood with a twist-on connector. Connect the black wire of the power supply cable to the black wire in the hood with a twist-on connector.

WARNING

Electrical Shock Hazard

Disconnect power before making electrical connections.

Connect ground wire to green ground connector in terminal box.

Failure to do so can result in death or electrical shock.

Connect the power supply ground wire to the green, ground screw inside the vent hood terminal box. Replace terminal box cover.

filter

18. For vented installations: Replace metal filters. Connect the vent system to the hood vent opening. Seal connection with duct tape.

For non-vented (recirculating) installations: Connect the vent system to the hood vent opening. Seal connection with duct tape. Follow instructions included with Kit No. 883140.

19. Turn power supply on. Slide glass screen forward. Check operation of vent hood fan and light. Close glass screen.

Customized front panel

The front panel of the vent hood can be removed and a customized front panel added for a more blended look.

For the KWVU and YKWVU model series:

It is recommended that a cabinet maker cut the customized front panel because of the precise cuts needed for the electronic control panel.

1.Use the dimensions shown to cut front panel for either a 30" (76.2 cm) or 36" (91.4 cm) front panel, depending on size of vent hood.

2.Remove the three cross-recess screws located behind the front trim panel in the glass screen frame. Remove front panel from glass screen frame.

3.Pull control panel from the front of the trim panel.

2-9/16"

panel(6.5 cm) front face

8-17/64" (21.0 cm)

panel front face

8-21/32" (22.0 cm)

2-3/8"

(6.0 cm)

11/32"

(8.7 mm)

14/32"

(11.1 mm)

30" (76.2 cm) model: 29-7/8" (75.9 cm)

36" (91.4 cm) model: 35-7/8" (91.1 cm)


19/32"


panel

2-61/64"


(15.1 mm)

front face

(75.0 mm)


7-31/64" (19.0 cm)

25/32"


25/32"


(9.9 mm)

1-13/32"

(18.3 mm)

radius

(35.7 mm)


Section view of control panel cutout

Front view of control panel cutout

7

Page 7
Image 7
KitchenAid Slide-out Vent Hood For the Kwvu and Ykwvu model series, Mounting bracket Screw, Adjustment screws, Filter

Slide-out Vent Hood specifications

The KitchenAid Slide-out Vent Hood offers an innovative solution to maintaining a clean and comfortable kitchen environment. Designed to seamlessly blend into cabinetry, this vent hood provides functionality without compromising aesthetics. Its slide-out feature allows for easy access and efficient ventilation whenever cooking activities heat up, and it can be conveniently tucked away when not in use, preserving the sleek lines of your kitchen design.

One of the main features of the KitchenAid Slide-out Vent Hood is its powerful ventilation system, which effectively captures smoke, steam, and odors, ensuring that your kitchen remains fresh and free from airborne particles. With multiple fan speeds, users can easily adjust the airflow according to their cooking needs. The high-performance blower efficiently moves air, making it suitable for various cooking methods, from gentle simmering to high-heat frying.

In addition to its robust ventilation, this slide-out vent hood is equipped with bright, energy-efficient LED lighting. These lights illuminate the cooking surface below, enhancing visibility and ensuring that every culinary task is well-lit. The LEDs are not only long-lasting but also consume less energy, helping to reduce electricity bills while providing excellent illumination.

The KitchenAid Slide-out Vent Hood features a stainless steel construction, which is not only durable but also adds a modern touch to any kitchen decor. Its easy-to-clean design means that maintenance doesn’t become a chore; simply wipe down the surfaces to keep it looking new.

Another significant characteristic of this vent hood is its integrated grease filters, which are designed to capture and collect grease and other particles effectively. These filters are dishwasher-safe, making them convenient to clean and maintain, allowing for a more hygienic cooking environment.

Moreover, the KitchenAid Slide-out Vent Hood integrates seamlessly with other KitchenAid appliances, creating a cohesive look and feel within your kitchen. With options for customizable sizes and configurations, it can fit perfectly into a variety of kitchen layouts.

In summary, the KitchenAid Slide-out Vent Hood combines style, power, and convenience, making it an essential appliance for any home chef. Its advanced features, modern design, and user-friendly technologies elevate the kitchen experience, ensuring that cooking remains a pleasure rather than a chore.