DETAILED SET-UP GUIDE
BATTERY INSTALLATION
The first step to powering up the weather station is to insert the connector (RJ11) at the end of the wire attached to the wind speed sensor to the remote temperature/humidity sensor. Please ensure when doing this that the connector is inserted with the proper orientation. When seated properly you will hear the connector ‘click’ in place.
A.REMOTE TEMPERATURE/HUMIDITY
1.Remove the mounting bracket and humidity hood.
2.Remove the battery cover by sliding the cover down.
3.Observing the correct polarity install 2 AA batteries. The batteries will fit tightly (to avoid
4.Replace the battery cover by sliding upwards. Be sure battery cover is on securely.
5.Replace the humidity hood.
B.INDOOR WEATHER STATION
1.Remove the battery cover. To do this, insert a solid object in the space provided at the
2.Observe the correct polarity, and install 3 AA batteries.
3.Replace the battery cover.
C.RAINFALL SENSOR (optional)
The optional Rain Sensor does not need batteries to operate. Simply insert the telephone plug
Note: Immediately after the batteries have been installed, the LCD (Liquid Crystal Display) will flash. Within 15 seconds the indoor temperature, indoor relative humidity, and the weather icons (sun and clouds) will be displayed. If not, remove batteries for 10 seconds and reinstall. If the outdoor temperature is not displayed within four minutes, remove batteries from both units, wait 30 seconds, and reinstall making sure to install batteries into the remote temperature sensor first. The time will show
PROGRAM MODE
Programming Note: If 30 seconds are allowed to pass, or the WIND/SNZ button is pressed during the programming mode, the unit will confirm/set the last information
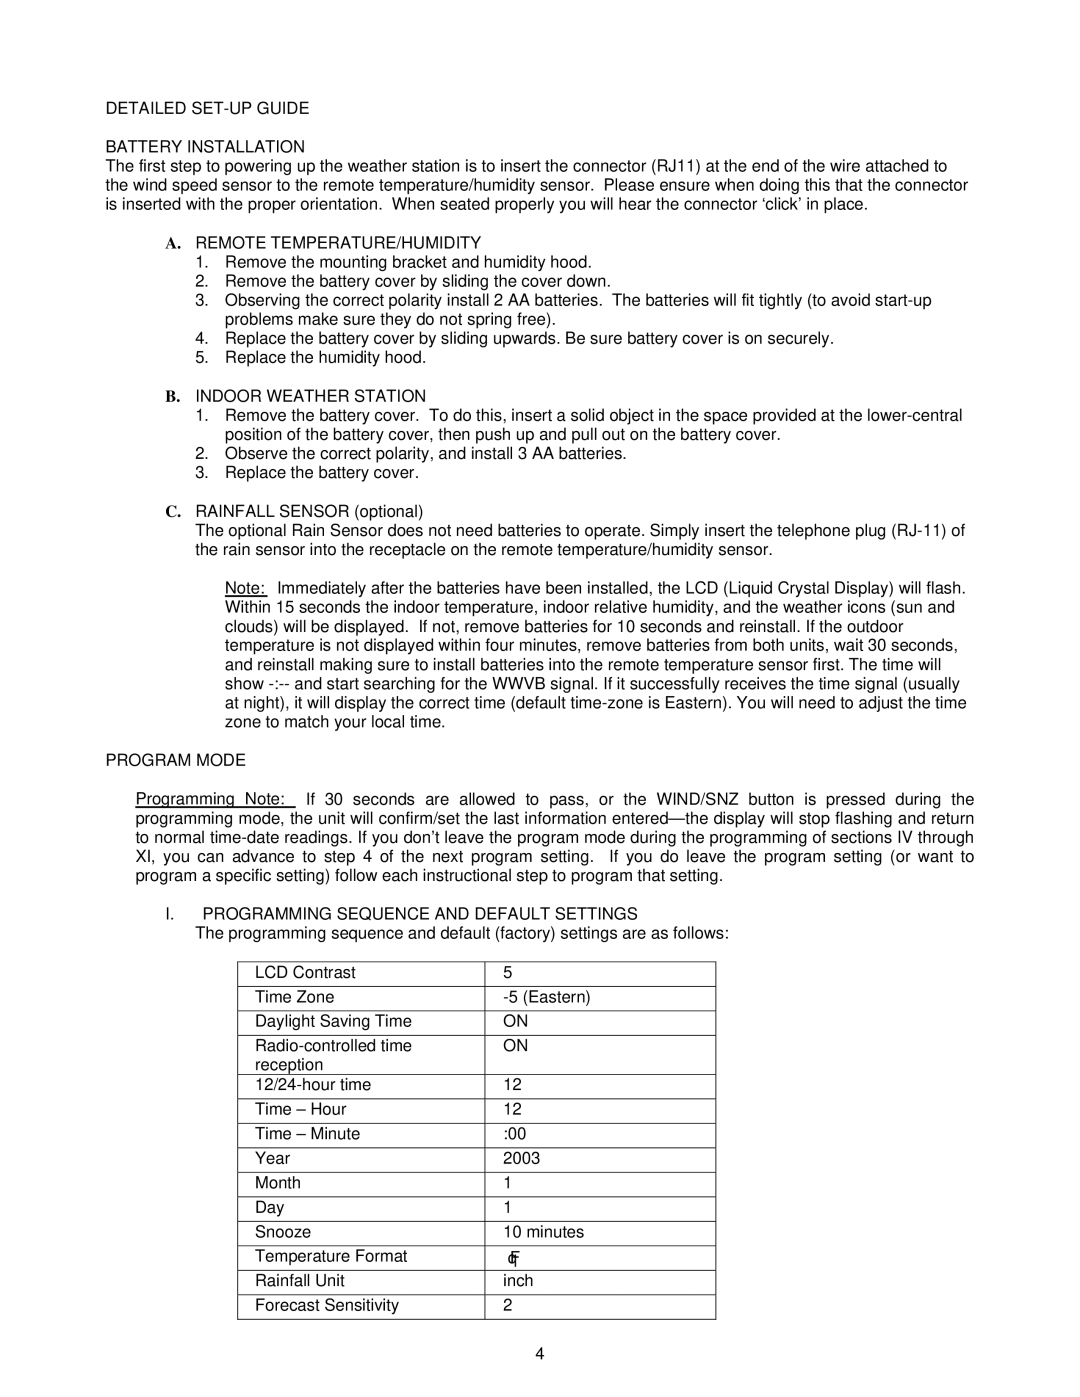
I.PROGRAMMING SEQUENCE AND DEFAULT SETTINGS
The programming sequence and default (factory) settings are as follows:
LCD Contrast | 5 |
Time Zone | |
|
|
Daylight Saving Time | ON |
ON | |
reception |
|
12 | |
Time – Hour | 12 |
Time – Minute | :00 |
Year | 2003 |
Month | 1 |
Day | 1 |
Snooze | 10 minutes |
Temperature Format | °F |
Rainfall Unit | inch |
Forecast Sensitivity | 2 |
| 4 |