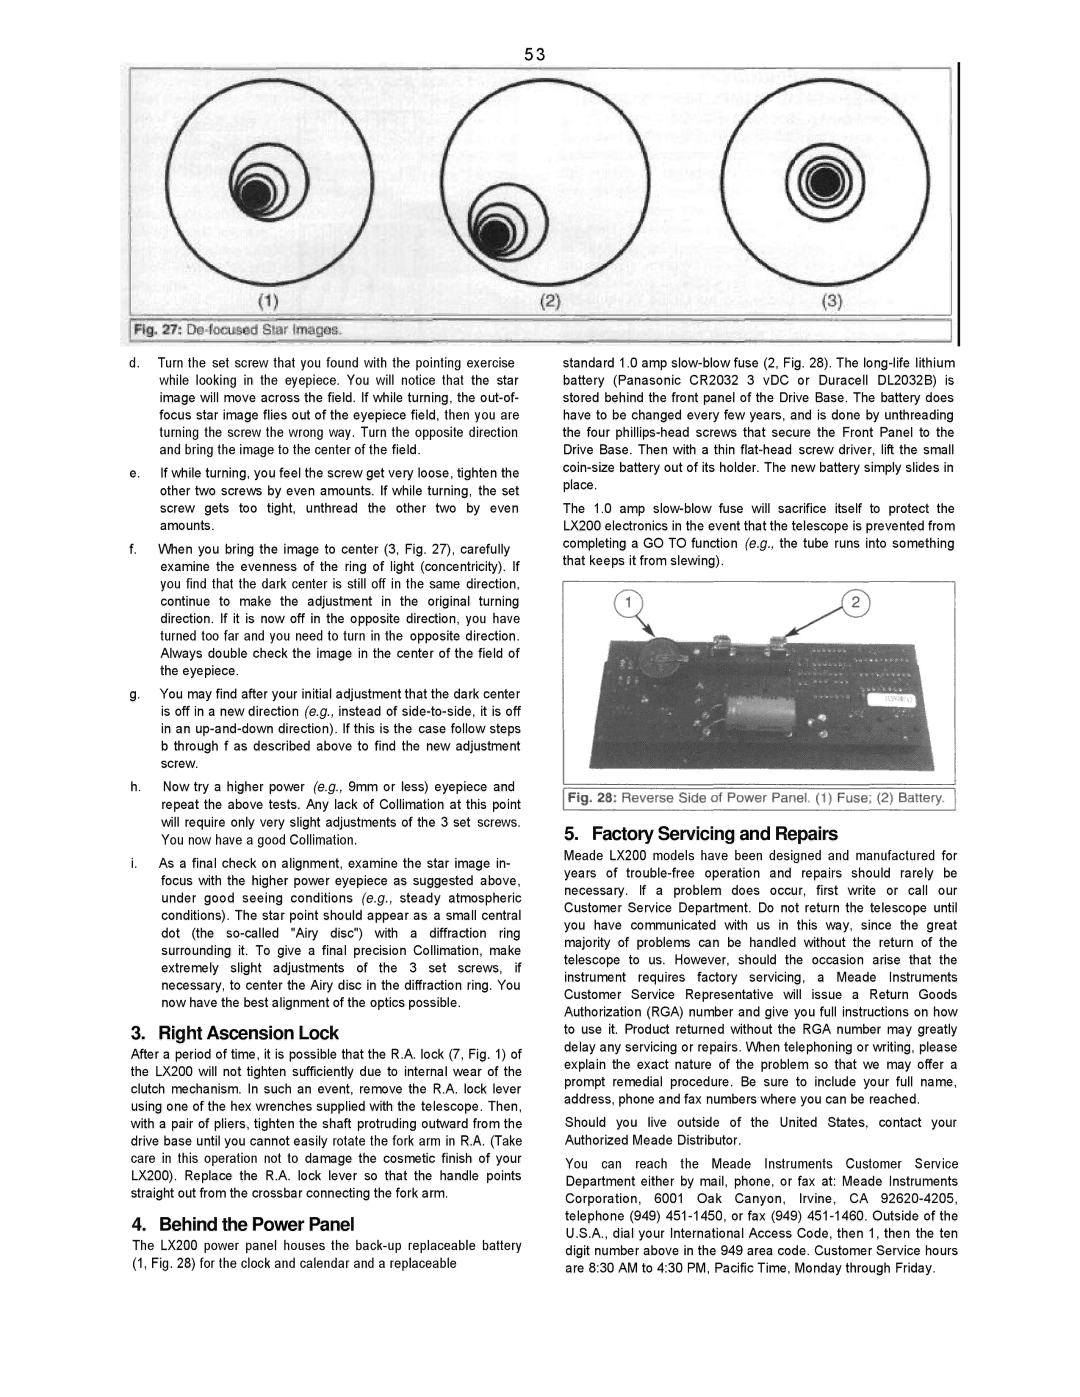
d.Turn the set screw that you found with the pointing exercise while looking in the eyepiece. You will notice that the star image will move across the field. If while turning, the out-of- focus star image flies out of the eyepiece field, then you are turning the screw the wrong way. Turn the opposite direction and bring the image to the center of the field.
e.If while turning, you feel the screw get very loose, tighten the other two screws by even amounts. If while turning, the set screw gets too tight, unthread the other two by even amounts.
f.When you bring the image to center (3, Fig. 27), carefully examine the evenness of the ring of light (concentricity). If you find that the dark center is still off in the same direction, continue to make the adjustment in the original turning direction. If it is now off in the opposite direction, you have turned too far and you need to turn in the opposite direction. Always double check the image in the center of the field of the eyepiece.
g.You may find after your initial adjustment that the dark center is off in a new direction (e.g., instead of side-to-side, it is off in an up-and-down direction). If this is the case follow steps b through f as described above to find the new adjustment screw.
h.Now try a higher power (e.g., 9mm or less) eyepiece and repeat the above tests. Any lack of Collimation at this point will require only very slight adjustments of the 3 set screws. You now have a good Collimation.
i.As a final check on alignment, examine the star image in- focus with the higher power eyepiece as suggested above, under good seeing conditions (e.g., steady atmospheric conditions). The star point should appear as a small central dot (the so-called "Airy disc") with a diffraction ring surrounding it. To give a final precision Collimation, make extremely slight adjustments of the 3 set screws, if necessary, to center the Airy disc in the diffraction ring. You now have the best alignment of the optics possible.
3. Right Ascension Lock
After a period of time, it is possible that the R.A. lock (7, Fig. 1) of the LX200 will not tighten sufficiently due to internal wear of the clutch mechanism. In such an event, remove the R.A. lock lever using one of the hex wrenches supplied with the telescope. Then, with a pair of pliers, tighten the shaft protruding outward from the drive base until you cannot easily rotate the fork arm in R.A. (Take care in this operation not to damage the cosmetic finish of your LX200). Replace the R.A. lock lever so that the handle points straight out from the crossbar connecting the fork arm.
4. Behind the Power Panel
The LX200 power panel houses the back-up replaceable battery (1, Fig. 28) for the clock and calendar and a replaceable
standard 1.0 amp slow-blow fuse (2, Fig. 28). The long-life lithium battery (Panasonic CR2032 3 vDC or Duracell DL2032B) is stored behind the front panel of the Drive Base. The battery does have to be changed every few years, and is done by unthreading the four phillips-head screws that secure the Front Panel to the Drive Base. Then with a thin flat-head screw driver, lift the small coin-size battery out of its holder. The new battery simply slides in place.
The 1.0 amp slow-blow fuse will sacrifice itself to protect the LX200 electronics in the event that the telescope is prevented from completing a GO TO function (e.g., the tube runs into something that keeps it from slewing).
5. Factory Servicing and Repairs
Meade LX200 models have been designed and manufactured for years of trouble-free operation and repairs should rarely be necessary. If a problem does occur, first write or call our Customer Service Department. Do not return the telescope until you have communicated with us in this way, since the great majority of problems can be handled without the return of the telescope to us. However, should the occasion arise that the instrument requires factory servicing, a Meade Instruments Customer Service Representative will issue a Return Goods Authorization (RGA) number and give you full instructions on how to use it. Product returned without the RGA number may greatly delay any servicing or repairs. When telephoning or writing, please explain the exact nature of the problem so that we may offer a prompt remedial procedure. Be sure to include your full name, address, phone and fax numbers where you can be reached.
Should you live outside of the United States, contact your Authorized Meade Distributor.
You can reach the Meade Instruments Customer Service Department either by mail, phone, or fax at: Meade Instruments Corporation, 6001 Oak Canyon, Irvine, CA 92620-4205, telephone (949) 451-1450, or fax (949) 451-1460. Outside of the U.S.A., dial your International Access Code, then 1, then the ten digit number above in the 949 area code. Customer Service hours are 8:30 AM to 4:30 PM, Pacific Time, Monday through Friday.