1 5
7. FOCUS Key
The FOCUS key (9, Fig. 6) allows 2 speed electric focus control of the optional Meade #1206 Electric Focuser (or equivalent corded electric focusers such as the Meade Model #1200A). To activate, press either the SLEW or FIND key (for fast focusing), or the CNTR or GUIDE key (for slow focusing), press and hold the FOCUS key, and then press and hold the PREV or NEXT keys for near and far focus.
8. MAP Key
The Map key (11, Fig. 6) turns on and off the red LED 'flashlight' that is located at the top of the keypad. The deep red LED light will protect your night vision while you search for a particular accessory or examine a star chart.
9. Object Keys (M, STAR, and CNGC)
These keys (10, Fig. 6) allow direct access to the LX200's Object Library any time that you are not editing a value or setting a parameter, or selecting a file menu. Use the Object keys when you are at a "top level" of a mode. After pressing one of these keys, the keypad's display will give a blinking cursor, allowing you to enter the catalog number for objects listed in the library (see APPENDIX C, page 31). After entry press the ENTER key. To see the entered object press the GO TO key. A brief description of the catalog key symbols are; M (Messier objects), STAR (stars and planets), and CNGC (Computerized New General Catalog).
The 16" LX200 has several object libraries which are accessed with the STAR and CNGC keys.
When you press the STAR or CNGC keys, the display will show which object library you are currently in and wait for a number entry, as described above.
To switch to a different library, press the ENTER key instead of entering a number.
The keypad display will show a menu of libraries available. Move the cursor to the desired library and press ENTER to select.
The 16" LX200 will "remember" the database you last accessed. Each time you press the STAR or CNGC keys, the same object database will be displayed on the first line of the keypad display.
10. PREV AND NEXT Keys
The PREV and NEXT (up and down arrow) keys (12, Fig. 6) move the display LCD arrow up and down the menu files and menu file options, so that you may choose an individual selection to enter. These keys are also used when adjusting the RET brightness range, or when activating the electric focuser. PREV and NEXT work as well to select the objects from the Object Library when using START FIND.
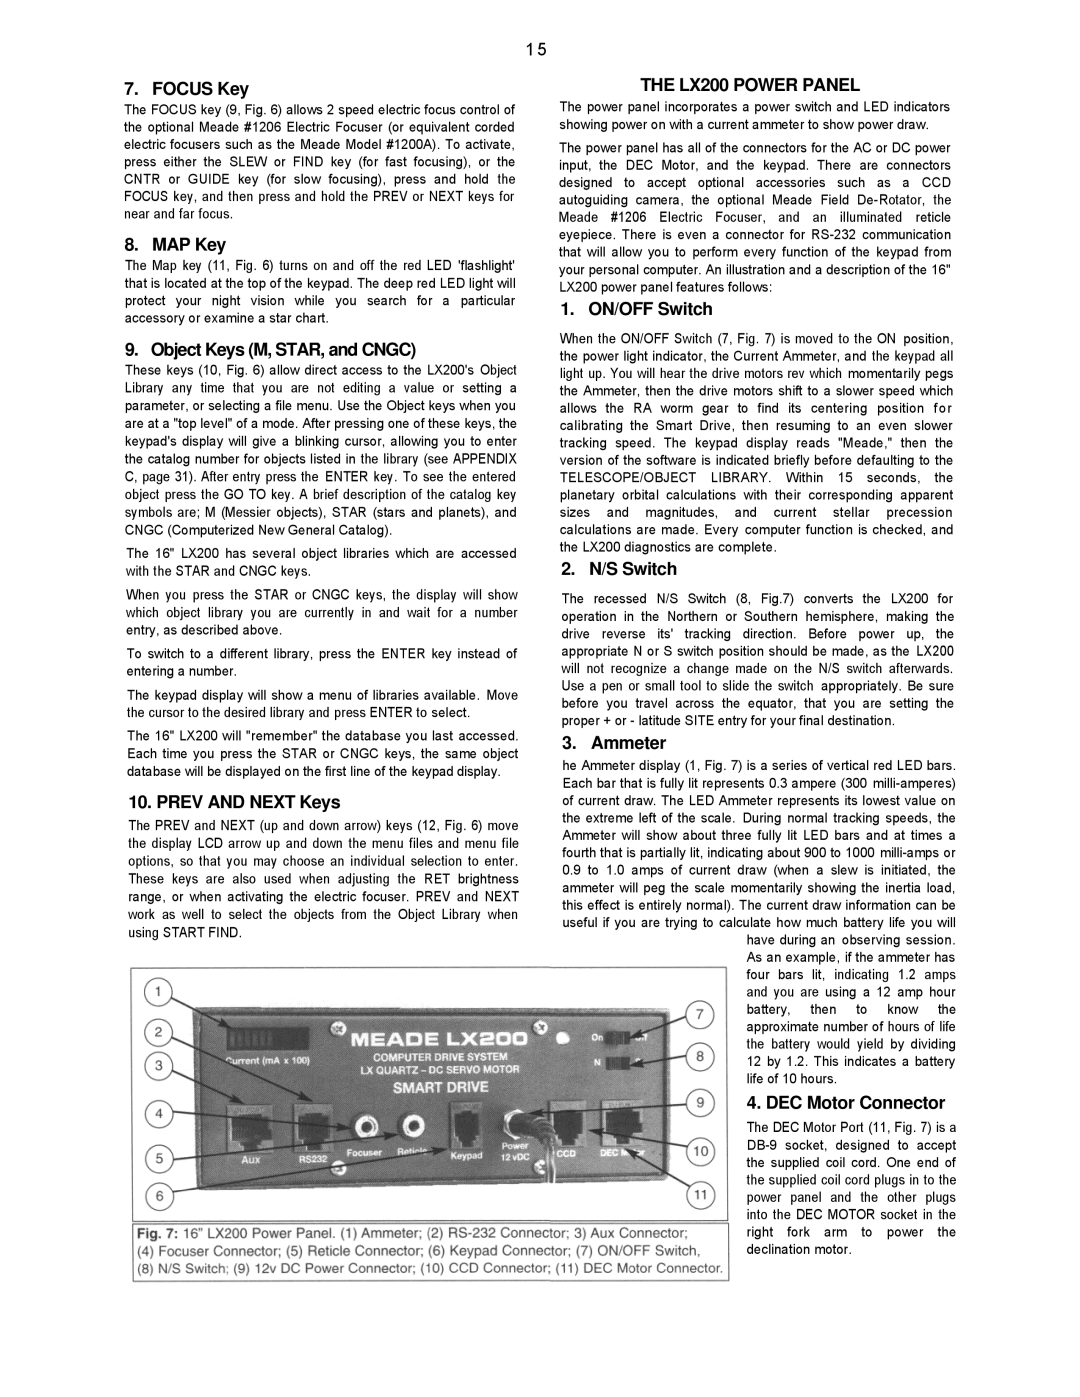
THE LX200 POWER PANEL
The power panel incorporates a power switch and LED indicators showing power on with a current ammeter to show power draw.
The power panel has all of the connectors for the AC or DC power input, the DEC Motor, and the keypad. There are connectors designed to accept optional accessories such as a CCD autoguiding camera, the optional Meade Field De- Rotator, the Meade #1206 Electric Focuser, and an illuminated reticle eyepiece. There is even a connector for RS-232 communication that will allow you to perform every function of the keypad from your personal computer. An illustration and a description of the 16" LX200 power panel features follows:
1. ON/OFF Switch
When the ON/OFF Switch (7, Fig. 7) is moved to the ON position, the power light indicator, the Current Ammeter, and the keypad all light up. You will hear the drive motors rev which momentarily pegs the Ammeter, then the drive motors shift to a slower speed which allows the RA worm gear to find its centering position for calibrating the Smart Drive, then resuming to an even slower tracking speed. The keypad display reads "Meade," then the version of the software is indicated briefly before defaulting to the TELESCOPE/OBJECT LIBRARY. Within 15 seconds, the planetary orbital calculations with their corresponding apparent sizes and magnitudes, and current stellar precession calculations are made. Every computer function is checked, and the LX200 diagnostics are complete.
2. N/S Switch
The recessed N/S Switch (8, Fig.7) converts the LX200 for operation in the Northern or Southern hemisphere, making the drive reverse its' tracking direction. Before power up, the appropriate N or S switch position should be made, as the LX200 will not recognize a change made on the N/S switch afterwards. Use a pen or small tool to slide the switch appropriately. Be sure before you travel across the equator, that you are setting the proper + or - latitude SITE entry for your final destination.
3. Ammeter
he Ammeter display (1, Fig. 7) is a series of vertical red LED bars. Each bar that is fully lit represents 0.3 ampere (300 milli-amperes) of current draw. The LED Ammeter represents its lowest value on the extreme left of the scale. During normal tracking speeds, the Ammeter will show about three fully lit LED bars and at times a fourth that is partially lit, indicating about 900 to 1000 milli-amps or
0.9to 1.0 amps of current draw (when a slew is initiated, the ammeter will peg the scale momentarily showing the inertia load, this effect is entirely normal). The current draw information can be useful if you are trying to calculate how much battery life you will
have during an observing session. As an example, if the ammeter has four bars lit, indicating 1.2 amps and you are using a 12 amp hour
battery, then to know the approximate number of hours of life the battery would yield by dividing 12 by 1.2. This indicates a battery life of 10 hours.
4. DEC Motor Connector
The DEC Motor Port (11, Fig. 7) is a DB-9 socket, designed to accept the supplied coil cord. One end of the supplied coil cord plugs in to the power panel and the other plugs into the DEC MOTOR socket in the right fork arm to power the declination motor.