Leisure Time LX20 instruction manual Operating Instructions, Meade Instruments Corporation

Models: LX20

1 65
Download 65 pages 13.16 Kb
Page 64
Image 64
Operating Instructions

Operating Instructions

Meade Standard Field Tripod

For use with the 7" LX200 Maksutov-Cassegrain, 8" LX200 and 10" LX200 Schmidt-Cassegrain, and 4" and 5" ED APO Telescopes

The Standard Field Tripod is supplied as a completely assembled unit, except for the spreader bar (4, Fig. 1) and the 2 lock knobs (6, Fig. 1) for each of the 3 tripod legs, used to adjust tripod height. These knobs are packed separately for safety in shipment.

For visual (i.e., non-photographic) observations, the drive base of the telescope's fork mount is attached directly to the field tripod. The telescope in this way is mounted in an "Altazimuth" (Altitude- Azimuth," or "Vertical-Horizontal") format.

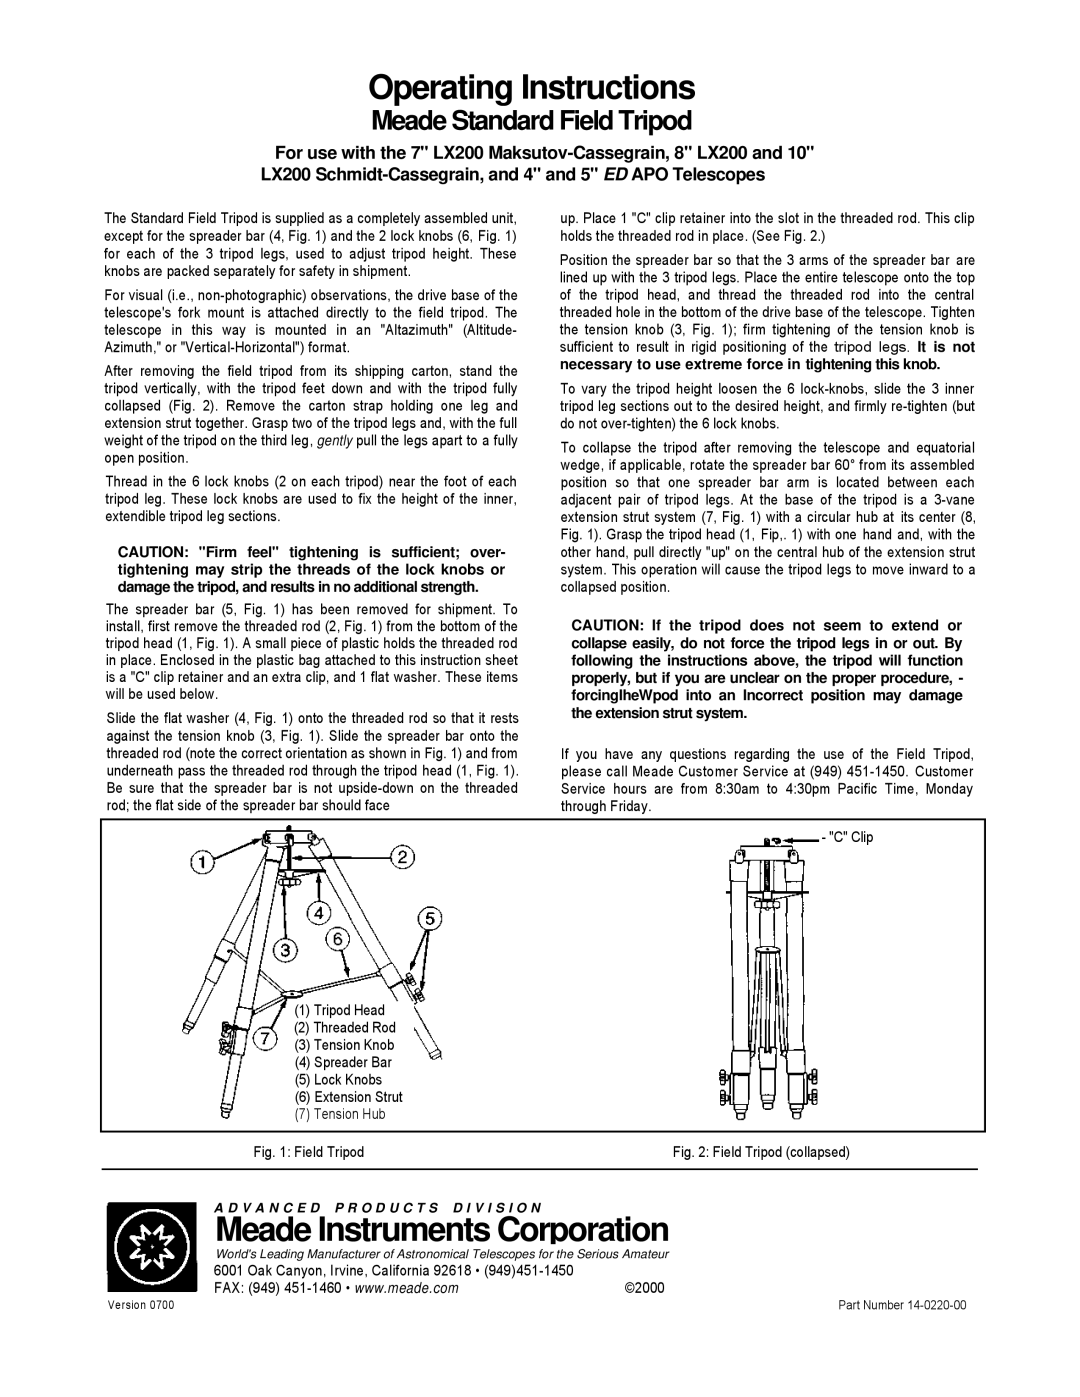
After removing the field tripod from its shipping carton, stand the tripod vertically, with the tripod feet down and with the tripod fully collapsed (Fig. 2). Remove the carton strap holding one leg and extension strut together. Grasp two of the tripod legs and, with the full weight of the tripod on the third leg, gently pull the legs apart to a fully open position.

Thread in the 6 lock knobs (2 on each tripod) near the foot of each tripod leg. These lock knobs are used to fix the height of the inner, extendible tripod leg sections.

CAUTION: "Firm feel" tightening is sufficient; over- tightening may strip the threads of the lock knobs or damage the tripod, and results in no additional strength.

The spreader bar (5, Fig. 1) has been removed for shipment. To install, first remove the threaded rod (2, Fig. 1) from the bottom of the tripod head (1, Fig. 1). A small piece of plastic holds the threaded rod in place. Enclosed in the plastic bag attached to this instruction sheet is a "C" clip retainer and an extra clip, and 1 flat washer. These items will be used below.

Slide the flat washer (4, Fig. 1) onto the threaded rod so that it rests against the tension knob (3, Fig. 1). Slide the spreader bar onto the threaded rod (note the correct orientation as shown in Fig. 1) and from underneath pass the threaded rod through the tripod head (1, Fig. 1). Be sure that the spreader bar is not upside-down on the threaded rod; the flat side of the spreader bar should face

(1)Tripod Head

(2)Threaded Rod

(3)Tension Knob

(4)Spreader Bar

(5)Lock Knobs

(6)Extension Strut

(7)Tension Hub

up. Place 1 "C" clip retainer into the slot in the threaded rod. This clip holds the threaded rod in place. (See Fig. 2.)

Position the spreader bar so that the 3 arms of the spreader bar are lined up with the 3 tripod legs. Place the entire telescope onto the top of the tripod head, and thread the threaded rod into the central threaded hole in the bottom of the drive base of the telescope. Tighten the tension knob (3, Fig. 1); firm tightening of the tension knob is sufficient to result in rigid positioning of the tripod legs. It is not necessary to use extreme force in tightening this knob.

To vary the tripod height loosen the 6 lock-knobs, slide the 3 inner tripod leg sections out to the desired height, and firmly re-tighten (but do not over-tighten) the 6 lock knobs.

To collapse the tripod after removing the telescope and equatorial wedge, if applicable, rotate the spreader bar 60° from its assembled position so that one spreader bar arm is located between each adjacent pair of tripod legs. At the base of the tripod is a 3-vane extension strut system (7, Fig. 1) with a circular hub at its center (8, Fig. 1). Grasp the tripod head (1, Fip,. 1) with one hand and, with the other hand, pull directly "up" on the central hub of the extension strut system. This operation will cause the tripod legs to move inward to a collapsed position.

CAUTION: If the tripod does not seem to extend or collapse easily, do not force the tripod legs in or out. By following the instructions above, the tripod will function properly, but if you are unclear on the proper procedure, - forcingIheWpod into an Incorrect position may damage the extension strut system.

If you have any questions regarding the use of the Field Tripod, please call Meade Customer Service at (949) 451-1450. Customer Service hours are from 8:30am to 4:30pm Pacific Time, Monday through Friday.

- "C" Clip

Fig. 1: Field TripodFig. 2: Field Tripod (collapsed)

A D V A N C E D P R O D U C T S D I V I S I O N

Meade Instruments Corporation

World's Leading Manufacturer of Astronomical Telescopes for the Serious Amateur

6001 Oak Canyon, Irvine, California 92618 • (949)451-1450


FAX: (949) 451-1460www.meade.com

©2000

Version 0700

Part Number 14-0220-00

Page 64
Image 64
Leisure Time LX20 instruction manual Operating Instructions, Meade Instruments Corporation, Meade Standard Field Tripod