ThinkCentre M83, M93/p User Guide
Second Edition January Copyright Lenovo 2013
Contents
Recovery information 101
Appendix A. Notices 143
Iv ThinkCentre M83, M93/p User Guide
Static electricity prevention
Important safety information
Service and upgrades
Extension cords and related devices
Power cords and power adapters
Heat and product ventilation
Plugs and outlets
External devices
Operating environment
Modem safety information
Laser compliance statement
Power supply statement
Cleaning and maintenance
ThinkCentre M83, M93/p User Guide
Product overview
Features
Connectivity
System management features
Power supply
Input/Output I/O features
Security features
Expansion
Preinstalled operating system
Preinstalled software programs
Lenovo programs
Specifications
Accessing Lenovo programs on the Windows 7 operating system
Program Icon name
Accessing Lenovo programs from Control Panel
An introduction to Lenovo programs
Lenovo Solution Center
Communications Utility
Fingerprint Software
Locations
Front connector, control, and indicator locations
Locating connectors on the rear of your computer
ThinkCentre M93/p rear connector locations
Connector Description
Component locations
Locating components
Locating parts on the system board
ThinkCentre M93/p system board part locations
ThinkCentre M83 system board part locations
Drive bay locations
Locating internal drives
Machine type and model label
Machine type and model label
ThinkCentre M83, M93/p User Guide
Where can I find help about the Windows operating system?
Using your computer
Frequently asked questions
Navigating on Windows
Using your computer
Click Settings Click Control Panel
Using a fingerprint reader
Using the keyboard
Using Windows shortcut keys
Adjusting audio
Using the wheel mouse
Setting the volume from the desktop
Adding the volume icon to the taskbar
Using CDs and DVDs
Setting the volume from Control Panel
Sound section, click Adjust system volume
Taskbar section, click Customize icons on the taskbar
Recording a CD or DVD
Handling and storing CD and DVD media
Playing a CD or DVD
Using your computer
ThinkCentre M83, M93/p User Guide
You and your computer
Accessibility and comfort
Arranging your workspace
Comfort
Electrical outlets and cable lengths
Glare and lighting
Air circulation
Moving your computer to another country or region
Replacement power cords
Registering your computer
ThinkCentre M83, M93/p User Guide
Security
Security features
Locking the computer cover
Locking the computer cover
Attaching a Kensington-style cable lock
Attaching a Kensington-style cable lock
Attaching a cable lock
Using passwords
Bios passwords
Configuring the fingerprint reader
Windows passwords
Using and understanding firewalls
Protecting data against viruses
ThinkCentre M83, M93/p User Guide
Installing or replacing hardware
Installing or replacing hardware
Installing external options
Handling static-sensitive devices
Removing the computer cover
Removing the computer cover
Removing and reinstalling the front bezel
What to do next
Installing or replacing a PCI card
Opening the PCI card latch
Removing a PCI card
Installing a PCI card
Installing or replacing a memory module
Udimm Dimm
Opening the retaining clips
Installing or replacing the optical drive
Removing the optical drive
Installing the optical drive
Installing or replacing the card reader
Removing the card reader retainer
Installing the card reader
Installing the card reader
Removing the card reader
Replacing the card reader
Installing or replacing the front USB assembly
Installing the front USB assembly
Installing the front USB assembly
Removing the front USB assembly
Replacing the front USB assembly
Replacing the battery
Install a new battery
Replacing the power supply assembly
Removing the screws for the power supply assembly
Replacing the heat sink and fan assembly
Removing the heat sink and fan assembly
Replacing the microprocessor
Accessing the microprocessor
Installing the mSATA solid-state drive
Installing or replacing the mSATA solid-state drive
Installing or replacing hardware
Replacing the mSATA solid-state drive
Installing the mSATA solid-state drive
Removing the mSATA solid-state drive storage converter
Removing the mSATA solid-state drive
What to do next
Removing the primary hard disk drive
Replacing the primary hard disk drive
Installing the hard disk drive into the bracket
Removing the secondary hard disk drive
Replacing the secondary hard disk drive
Installing the secondary hard disk drive
Installing the solid-state drive into the storage converter
Installing the solid-state drive
Replacing the front fan assembly
Removing the front fan assembly
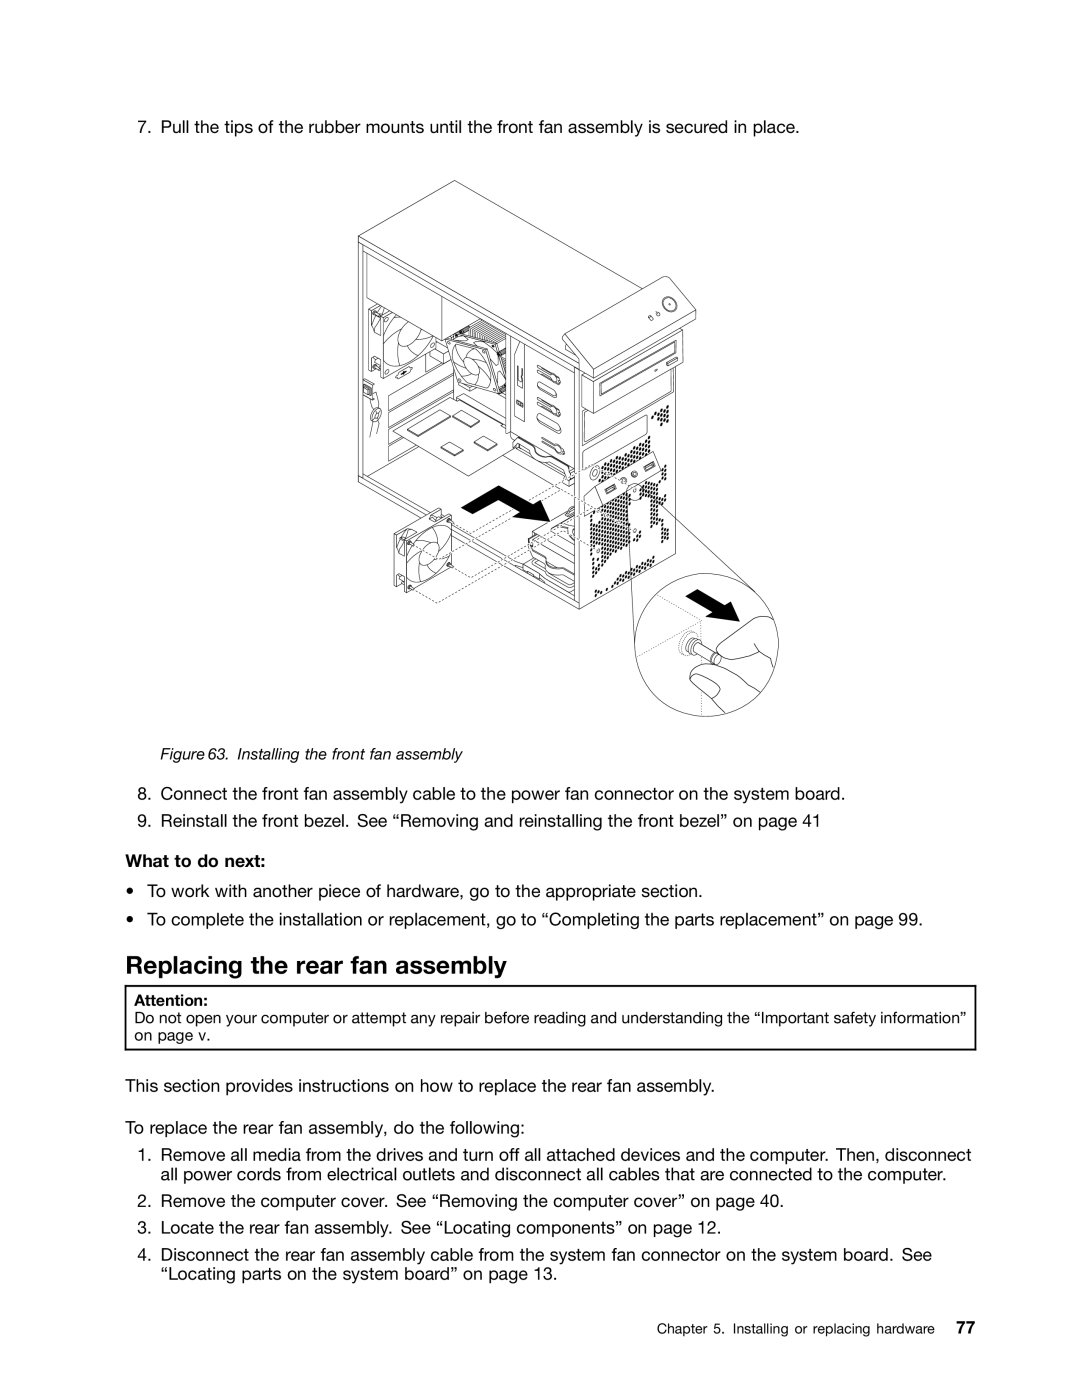
Installing the front fan assembly
Replacing the rear fan assembly
Removing the rear fan assembly
Installing the rear fan assembly
Replacing the front audio and USB assembly
Removing the front audio and USB assembly
Installing the front audio and USB assembly
Replacing the internal speaker
Removing the old internal speaker
Replacing the thermal sensor
Installing a new internal speaker
Pull the entire thermal sensor out of the chassis
Installing the new thermal sensor
Replacing the cover presence switch
Removing the cover presence switch
Installing the new cover presence switch
Replacing the Wi-Fi units
Disconnecting the Bluetooth cable
Removing the Wi-Fi adapter card
Opening the PCI card latch
Removing the Wi-Fi adapter card
Removing the Wi-Fi card module
Removing the screws that secure the Wi-Fi card module
Installing the Wi-Fi units
Installing the Wi-Fi card module
Installing the Wi-Fi antenna cables
Installing the rear Wi-Fi antenna
Installing or removing the rear Wi-Fi antenna
Installing the front Wi-Fi antenna
Installing or removing the front Wi-Fi antenna
Removing the rear Wi-Fi antenna
Peeling off the paper that protects the stickers
Replacing the keyboard or mouse
Removing the front Wi-Fi antenna
Connecting the USB keyboard or mouse
Completing the parts replacement
Obtaining device drivers
Reinstalling the computer cover
Recovery information for the Windows 7 operating system
Recovery information
Creating and using recovery media
101
Creating recovery media
Performing backup and recovery operations
Using recovery media
Performing a backup operation
Click the Restore your system from a backup icon
Using the Rescue and Recovery workspace
Performing a recovery operation
Creating a rescue medium
Creating and using a rescue medium
Using a rescue medium
Reinstalling preinstalled device drivers
Reinstalling preinstalled applications and device drivers
Reinstalling preinstalled applications
Solving recovery problems
Reinstalling software programs
Reinstalling device drivers
Refreshing your computer
Resetting your computer to the factory default settings
Using the advanced startup options
ThinkCentre M83, M93/p User Guide
Starting the Setup Utility program
Using the Setup Utility program
Viewing and changing settings
109
Power-On Password
Password considerations
Administrator Password
Hard Disk Password
Enabling or disabling a device
Erasing lost or forgotten passwords clearing Cmos
Selecting a startup device
Enabling ErP compliance mode
Selecting a temporary startup device
Selecting or changing the startup device sequence
ICE thermal alert
ICE performance mode
Disabled
Exiting the Setup Utility program
Updating flashing the Bios from a disc
Using system programs
Updating system programs
115
Click Download Drivers & Software Click Use Quick Path
Updating flashing the Bios from your operating system
Recovering from a POST/BIOS update failure
Keeping your computer current
Preventing problems
Getting the latest device drivers for your computer
Updating your operating system
Basics
Using System Update
Computer
Cleaning your computer
Keyboard
Optical mouse
Moving your computer
Good maintenance practices
Cleaning a glass-screen surface
121
Troubleshooting and diagnostics
Basic troubleshooting
System Protection System Restore
Troubleshooting procedure
Troubleshooting
No audio in Windows
Audio problems
No audio in DOS applications or games
CD problems
Sound comes from one external speaker only
Black screen instead of DVD video
DVD problems
CD or DVD does not work
No audio or intermittent audio while playing DVD movie
DVD movie will not play
Playback is very slow or choppy
Invalid disc or no disc found message
All or some keys on the keyboard do not work
Intermittent problems
Keyboard, mouse, or pointing device problems
Mouse or pointing device does not work
Wireless keyboard does not work
Pointer on the screen does not move smoothly with the mouse
Fingerprint reader does not work
Wrong characters appear on the screen
Monitor problems
Image is discolored
Networking problems
Image appears to be flickering
Click Start Control Panel Click Hardware and Sound
Ethernet problems
Your computer cannot connect to the network
Adapter stops working for no apparent reason
Wireless LAN problem
Wake on LAN feature is not working
Wireless WAN problem
Option problems
Bluetooth problem
An option that was just installed does not work
Click Disk Cleanup
Performance and lockup problems
Insufficient free hard disk drive space
Click Start Computer
Click Disk Cleanup Click Clean up system files
Click Programs Click Turn Windows features on or off
Programs and Features area, click the Clean up button
Excessive number of fragmented files
Insufficient memory
Printer problems
Serial port problems
Software does not work as expected
Software problems
Lenovo Solution Center
USB problems
Getting information, help, and service
Using the documentation and diagnostic program
Help and service
Calling for service
Lenovo Support Web site
Purchasing additional services
Using other services
ThinkCentre M83, M93/p User Guide
143
Appendix A. Notices
Trademarks
Export classification notice
Appendix B. Regulatory information
Electronic emissions notices
Federal Communications Commission Declaration of Conformity
ThinkCentre M83, M93/p User Guide
Eurasian compliance mark Additional regulatory information
ThinkCentre M83, M93/p User Guide
Important Weee information
Appendix C. Weee and recycling information
Recycling information for Japan
149
Recycling information for Brazil
Appendix C. Weee and recycling information
ThinkCentre M83, M93/p User Guide
153
European Union RoHS
China RoHS Turkish RoHS
Ukraine RoHS India RoHS
155
Appendix E. China Energy Label
ThinkCentre M83, M93/p User Guide
157
Appendix F. Energy Star model information
ThinkCentre M83, M93/p User Guide
159
Index
103
161
ThinkCentre M83, M93/p User Guide