Contents
Monitor Signage
Page
Contents
Specifications IR Codes Controlling the Multiple Product
Licenses
Accessories
Assembling and Preparing
Optional Accessories
ST-200T Stand Screws
SP-2000 Cable holder Speaker Cable Tie Screws
Parts and buttons
Connection panel
Screen Marks Description
Connecting the stand Connecting the speaker
To organize the cables
Using the Mounting Cable Tie
Using the IR Receiver
Using the Kensington security system
Portrait Layout
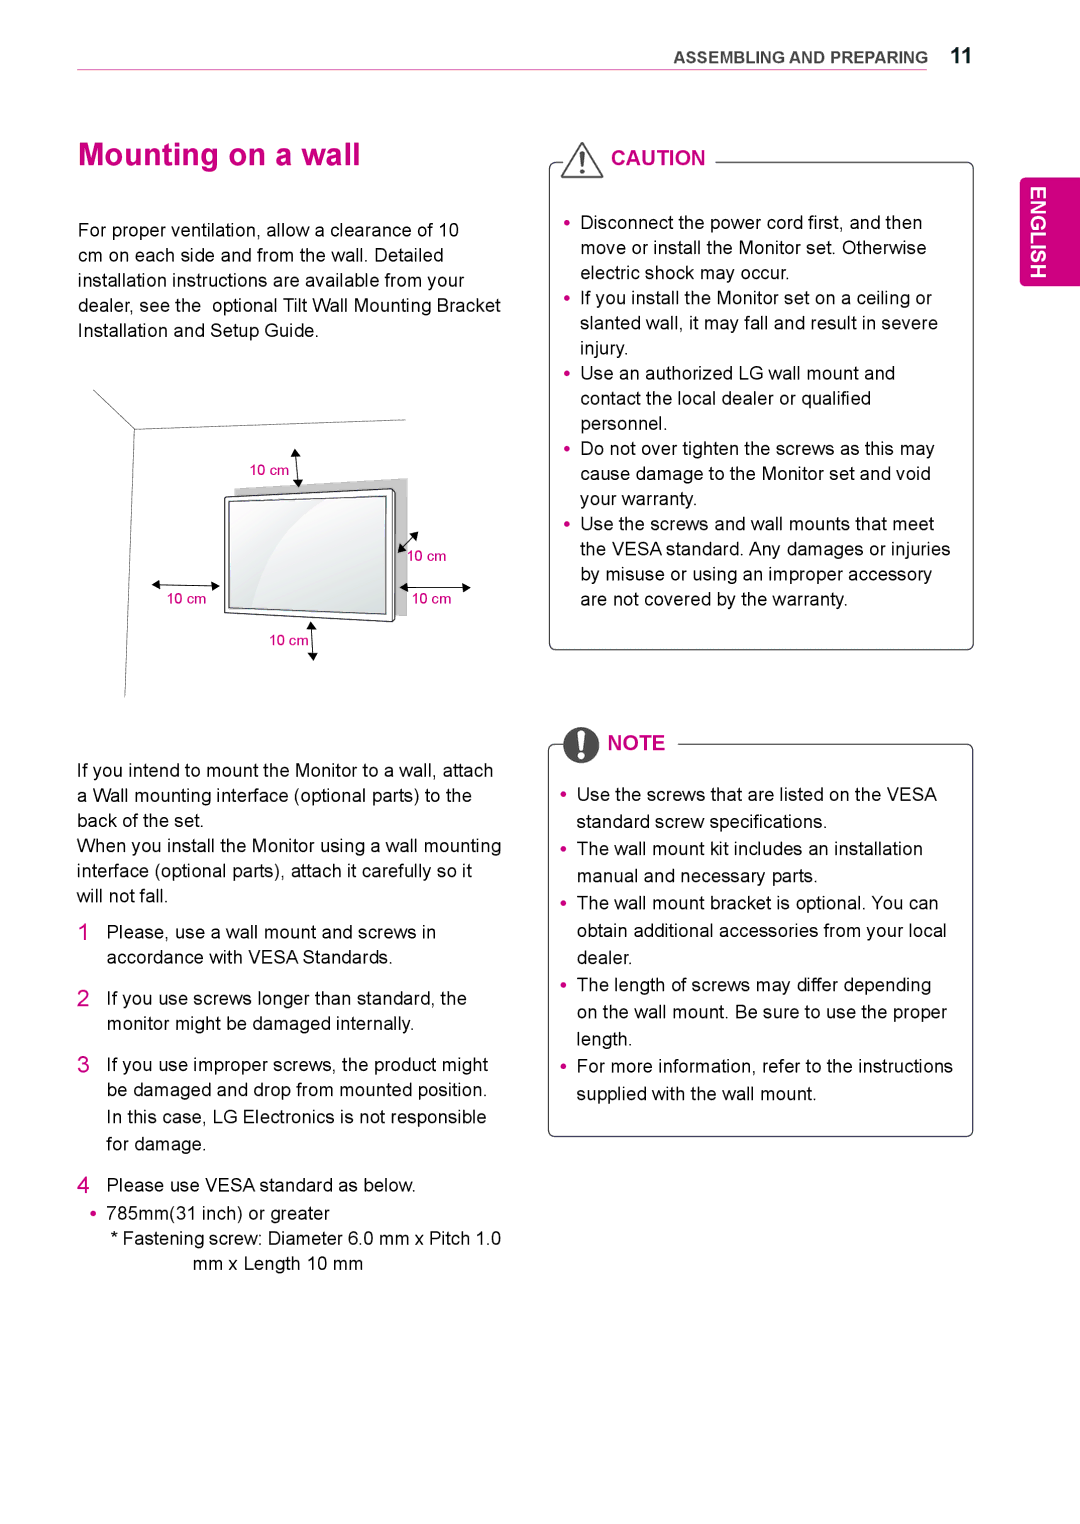
Mounting on a wall
Remote Control
Volume Up / Down
Power
A Button Toggles between numerical and alphabetical
Navigation buttons Scrolls through menus or
One step in user interaction
Returns to Monitor set
Function
Using the Monitor SET
Connecting to a PC
RGB connection
DVI connection Hdmi connection
IR Receiver connection
Adjusting the screen
Selecting an image mode
Customizing image options
Adjusting the sound
Selecting an sound mode
Customizing PC display options
Using additional options
Using the input list
Customizing sound options
Selecting an input source
Adjusting aspect ratio
Mode
RGB DVI Hdmi ARC DTV
169 Just Scan Zoom Cinema Zoom
Just Scan
PC, RGB PC
Connecting to a wired network
Select IP Auto Setting or IP Manual Setting
Entertainment
Depending on model
Tips for Network setting
Network Status
Ting the network
Close Return to the previous menu
Connecting USB storage devices
Tips for using USB storage devices
Browsing files
Photo List
Supported file format
RP,TP,ASF,WMV,FLV
Viewing movies
ButtonDescription
Exit Return to Movie List
Energy Saving but
Tips for using playing video files
Video options
Picture Size, Audio Language, Subtitle
Language or Repeat
Viewing photos
Photo List
Using photo options
Photo options
BGM
Saving
Transition Effect Option
Fades the slide out slowly before playing to the next slide
Listening to music
Sound Mode, Clear Voice II or Balance
Control playback by using the following buttons
Music List
Viewing the Contents List
DivX VOD Guide
DivX VOD Registration
DivX VOD Deregistration
Using PIP/PBP
Movie List
Photo List
PIP/PBP
Customizing Settings
Accessing main menus
Picture settings
Picture
Picture Mode options
Screen
Setting Description Dynamic
Off/High
Medium/Low Dynamic Color
Off/High/Low
Audio settings
Audio
Time settings
Time
Option settings
Option
Setting Description Tile Mode To use this function
270
Tile Mode
Tile Mode Natural mode
Position
Top left Bottom left Size Top right Bottom right
RGB HDMI/DVI
PIP
Picture ID
Audio cable
Network settings
Network
Making Connections
HD Receiver
Camcorder/Camera Gaming device
Connecting to a HD receiver
DVD, Camcorder, Camera
Gaming Device or VCR player
DVI connection
Connecting to the LAN
Connecting to a USB
Component connection
Daisy Chain Monitors
DVI Cable
Troubleshooting
Problem Resolution
No image is displayed
Screen image looks abnormal
After-image appears on the product
Audio function does not work
Screen color is abnormal
Operation does not work normally
Specifications
LAN, DVI, USB
Applicable only for models that support the speakers
47WL10MS
Mm x 699.9 mm x 297.7 mm / 16.8 kg
Dimensions
1074.3 78.6 15.3
RGB PC supported mode DTV Mode
HDMI/ DVI/ Display PortPC supported mode
Resolution Horizontal Vertical FrequencykHz FrequencyHz
Resolution Component
IR Codes
Code Hexa Function
Connecting the cable
RS-232C Configurations
Controlling the Multiple Product
Communication Parameter
Command reference list
Command Data
Hexadecimal
English
Transmission / Receiving protocol
Transmission
Acknowledgement
Power Command k a Energy Saving Command j q
Input Select Command x b
Aspect Ratio Command k c
Brightness Command k h To adjust the screen brightness
Color Command k i To adjust the screen color
Tint Command k j To adjust the screen tint
Position Command f q
Position Command f r Balance Command k t
Size Command f s
Auto Configuration Command j u Treble Command k r
Bass Command k s To adjust the Bass values
Volume Mute Command k e To control the Volume Mute on/off
Volume Control Command k f To set the playback volume
Off TimerRepeat Mode/ Time Command f e
On Timer Input Command f u
Sleep Time Command f f To set the Sleep Time
Power On Delay Command f h
Auto Off Command f g
Language Command f ISM mode Command j p
Fail Over Select Command m i To set the Fail Over function
Reset Command f k
Tile Mode Command d d
Tile Mode Check Command d z To check Tile Mode status
Tile ID Command d i To set Tile ID
Tile H Size Command d g
Tile V Size Command d h To adjust the Tile Vertical size
Natural Mode In Tile Mode Command d j
DPM Select Command f j
FAN Fault Check Command d w To check the fan errors
Remote Controller Lock/ Key Lock Command k m
Key Command m c
OSD Select Command k l
Serial No.Check Command f y
56. S/W Version Command f z
Backlight Command m g To adjust the screen backlight
PC Power Control Command d t
PC Power Command d s
Declaration of Conformity
No 3840TRL098E 0801-REV00