Canceling a timer recording
You can cancel a timer recording before the timer actually starts. Select a timer recording that you want to cancel on the [Timer Record List] menu and press
CLEAR.
Timer Recording Troubleshooting
Even though the timer is set, the unit will not record when:
–There is no disc loaded.
–A
–[Disc Protect] option is set to [ON] in the Setup menu.(see page 21).
–The DVD recorder operating a function (recording, deleting etc.).
–There are already 99 titles
You cannot enter a timer program when:
–A recording is already underway.
–The time you’re trying to set has already passed.
–There are 16 timer programs set.
If two or more timer programs overlap:
– | The earlier program takes priority. |
– | When the earlier program finishes, the later program starts. |
– | If two programs are set to start at exactly the same time, the program |
Editing a title
Using the Title list menu,you can edit video contents. | ON REMOTE | ||||
1 | Displays a [Title List] menu: | MENU/LIST | |||
|
|
|
|
|
|
2 | Selects a title you want to edit: | v V b B | |||
|
|
|
|
| |
3 | Displays an editing menu: | OK ( | ) | ||
| The options are differ depending on the media type. |
|
|
|
|
|
|
|
|
| |
4 | Selects a menu option: | v V b B, OK ( | ) | ||
|
|
|
|
|
|
5 | Exit the [Title List] menu: | BACK (O) | |||
|
|
|
|
|
|
Editing a title - more you can do
About title list menu
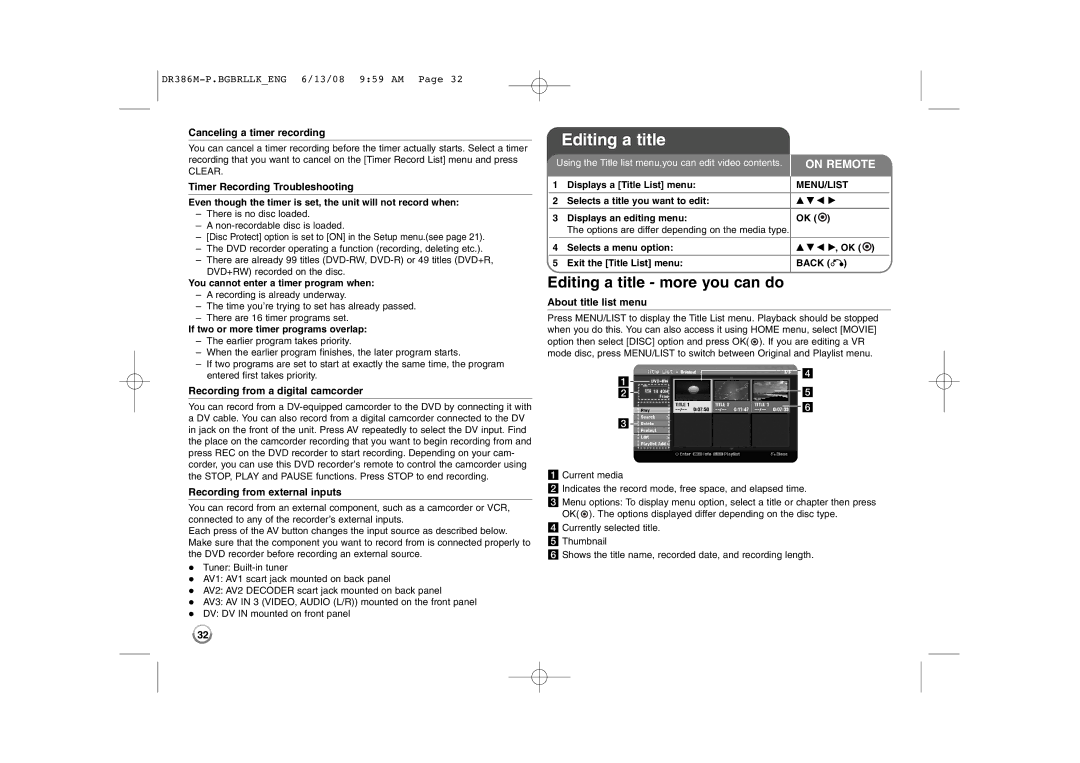
Press MENU/LIST to display the Title List menu. Playback should be stopped when you do this. You can also access it using HOME menu, select [MOVIE] option then select [DISC] option and press OK( ![]() ). If you are editing a VR mode disc, press MENU/LIST to switch between Original and Playlist menu.
). If you are editing a VR mode disc, press MENU/LIST to switch between Original and Playlist menu.
entered first takes priority. |
a![]()
![]()
![]()
d
Recording from a digital camcorder
You can record from a
Recording from external inputs
You can record from an external component, such as a camcorder or VCR, connected to any of the recorder’s external inputs.
Each press of the AV button changes the input source as described below. Make sure that the component you want to record from is connected properly to the DVD recorder before recording an external source.
Tuner:
AV1: AV1 scart jack mounted on back panel
AV2: AV2 DECODER scart jack mounted on back panel
AV3: AV IN 3 (VIDEO, AUDIO (L/R)) mounted on the front panel
DV: DV IN mounted on front panel
b | e |
| f |
c |
|
a Current media
b Indicates the record mode, free space, and elapsed time.
c Menu options: To display menu option, select a title or chapter then press OK( ![]() ). The options displayed differ depending on the disc type.
). The options displayed differ depending on the disc type.
d Currently selected title.
eThumbnail
fShows the title name, recorded date, and recording length.
32