S0-81504
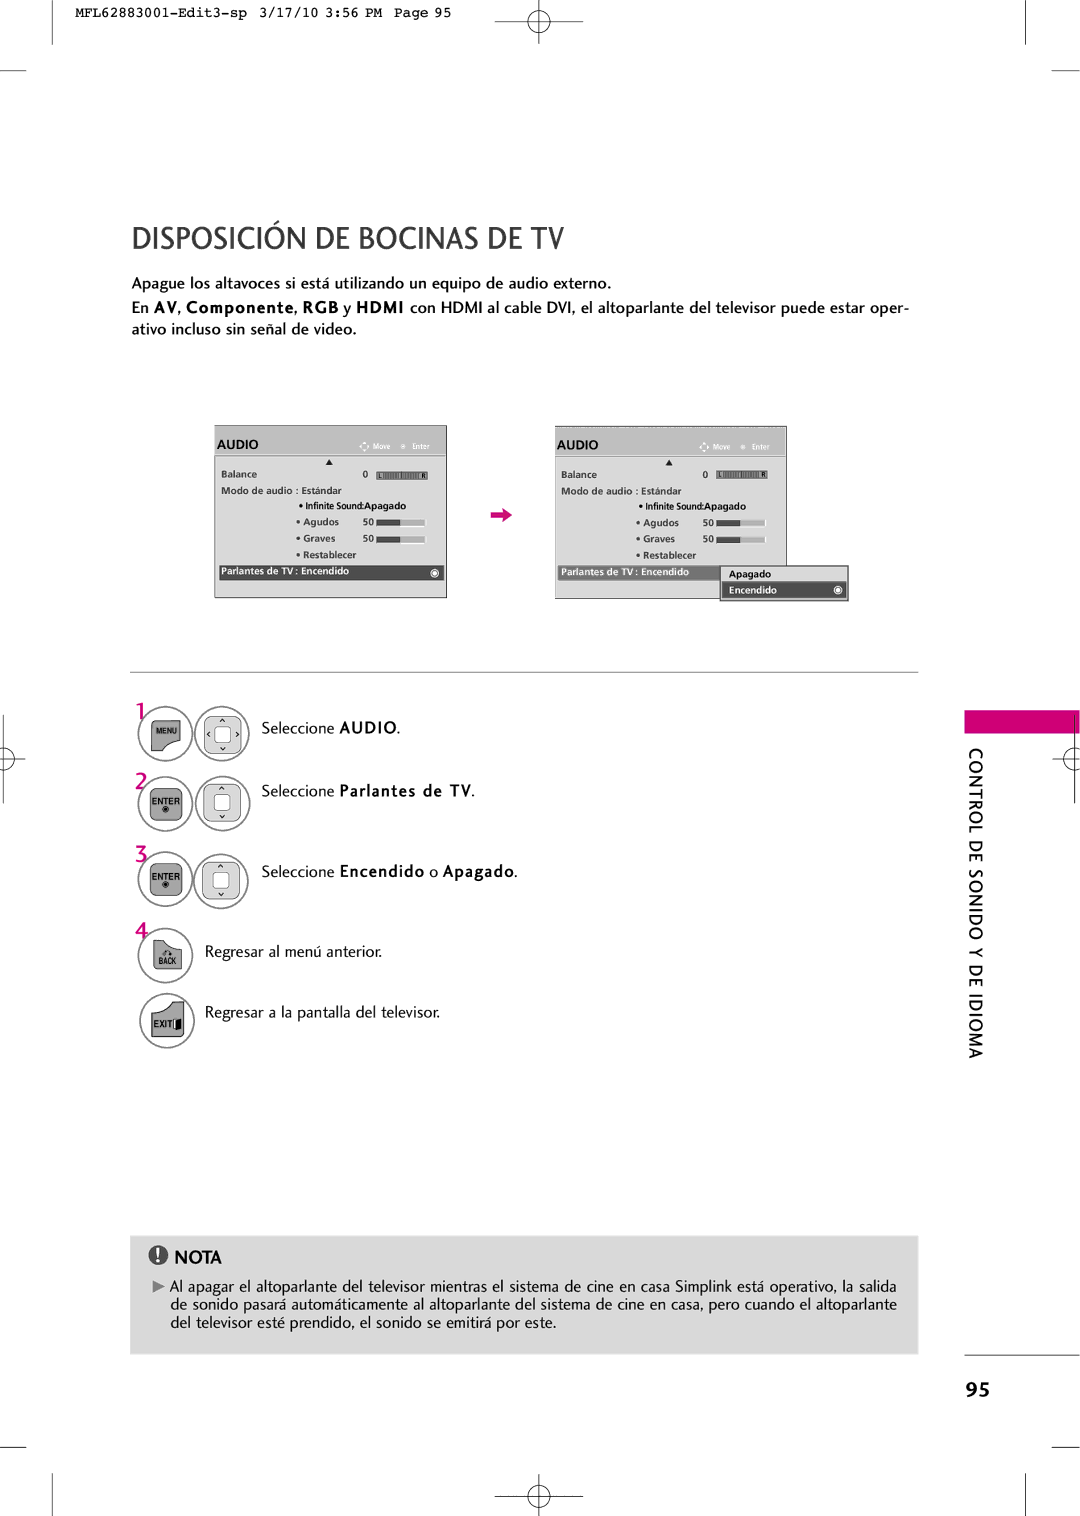
Mar./10/17
…. … 118
Plasma TV
MFL62883001-Edit1-en 3/17/10 346 PM
Important Safety Instructions
Safety Instructions
Signal cables on the back of the TV
Safety Instructions
Thunder or lighting storm
Screen with something
When cleaning, unplug the power cord
Cleaning
Cord contact an authorized service center
Scrub gently with a soft cloth to prevent
Contents
Time Setting
This feature is not available for all models
Feature of this TV
Preparation
Accessories
Preparation
M4x28
Preparation
Power Input Menu Enter Volume
Front Panel Information
Image shown may differ from your TV
42/50PJ350R
Power Input Menu Enter Volume Channel
For 42/50PJ250R
Back Panel Information
Variable Audio OUT
HDMI/DVI
Component
Antenna
Stand Instruction
Installation Except 60PK550R
Protection Cover
M4x28 Detach the stand from TV M4x30
Fix a Guide to the Outsides
AW-50PG60MS
Vesa Wall Mounting
400
AW-50PG60M
Cable Arrangement
Swivel Stand
Desktop Pedestal Installation
Preparation
Antenna Analog
Antenna or Cable Connection
HD Receiver Setup
External Equipment Setup
How to connect
How to use
HDMI-DTV
External Equipment Setup
DVI to Hdmi Connection Except 42/50PJ250R
External Equipment Setup
DVD Setup
Composite RCA Connection
VCR Setup
Camcorder
Other A/V Source Setup
USB Connection Except 42/50PJ250R
VGA D-Sub 15 pin Connection
640x480
640x350 31.468 70.09 720x400
800x600
60.004
Enter Select the desired resolution
Selecting Resolution
Screen
Enter Select Screen
Enter Select Screen Enter Select Auto config
Auto Configure
Adjustment for screen Position, Size, and Phase
Select Picture Enter Select Screen
Screen Reset Reset to original factory values
Enter Select Yes
Variable Audio OUT
Setup
Watching TV / Channel Control
Watching TV / Channel Control
Controls the Simplink compatible devices
Freeze Freezes the current frame
Watching TV / Channel
Installing Batteries
Control
Watching TV / Channel Control
It helps users listen to human voices better
Turning on TV
Turning on TV just after installation
Channel Selection
Volume Adjustment
Mode Setting
Initializing Setup Mode Setting
Welcome
Selecting Language
Enter Accept the current selection
ON-SCREEN Menus Selection and Adjustment
USB
Enter Select a menu item
USB Eject Select Eject in order to eject a USB device
Quick Menu
Watching
Display each menu
Auto Scan Auto Tuning
Channel Setup
Select Channel
Select Manual Tuning
Select T V or Catv
Or delete
Select Channel Edit TV, Cadtv and Catv
Select Channel Keep pressing
Input List
Select
Input Label
Display the Channel List
Channel List
PTurn the pages
Select Del/Add/Fav
Favorite Channel Setup
Select Favorite
Return to TV viewing
FAV Display the Favorite channel list
Favorite Channel List
AV Mode toggles through preset Video and Audio settings
AV Mode
OffCinema
GameSport
Select Option
KEY Lock
With the Key Lock On, the display
Botton
Select Simplink
Select Option
Select On or Off
VCR HDD
VCR
Device Select Photo LIST, Music List or
USB
Movie List
Select Eject
Only a USB storage device is recognizable
Precautions when using the USB device
USB
Corresponding buttons on the remote control
Photo List
Moves to upper level folder Current page/Total pages
Photo Selection and PopUp Menu
Set up the menu in Full-Sized Screen
Delete or Hide
Select the Slideshow , BGM, Rotate
Show the Slide Speed or Music Album
You cannot change Music Folder while BGM is playing
Show the Sound Mode, Auto Volume, Clear Voice II and Balance
Show the Picture Mode
Screen Components
Music List
As shown , up to 6 music titles are listed per
Music Selection and PopUp Menu
Using the Music List function, play
Movie List
Select USB
Movie List
As shown , up to 6 movie titles are listed per
Movie Selection and PopUp Menu
Show the Picture Size, Audio Language, or Subtitle Language
Using the Movie List function, play
Auto Power Save mode is not supported in Set Video function
Playg
Using the remote control
Display Divx Reg Code
Divx Registration Code
Press the Back button to move to the previous menu screen
USB
Deactivation
Picture Size Aspect Ratio Control
Picture Control
Picture Control
169
Picture Control
Preset Picture Settings Picture Mode
Manual Picture Adjustment User Mode
Picture Improvement Technology
Except 42/50PJ250R
Color Temperature
Energy Saving
Initialize the adjusted value
Picture Reset
Select Picture
Image Sticking Minimization ISM Method
Demo Mode
Enter Select Initial Setting
Initial Setting Factory Reset
Sound & Language Control
Auto Volume Leveler Auto Volume
Sound & Language Control
Clear Voice
Sound & Language Control
Sound
Preset Sound Settings Sound Mode
Select Sound Mode
Sound Setting Adjustment User Mode
Language Control
Select Infinite Sound
Select Audio
Select O n or Off
Balance
Audio
TV Speakers ON/OFF Setup
Select Reset
Audio Reset
Initialize the adjusted value
Select MONO, STEREO, or SAP
STEREO/SAP Broadcast Setup
Sound & Language
ON-SCREEN Menus Language Selection
Menus can be shown on the screen in the selected language
Closed Captions
Clock Setting
Time Setting
Time Setting
Select Time To cancel On/Off Time function, select Off
ON/OFF Time Setting
Select Off time or On time Select and set Hour
Sleep Timer Setting
Time Setting
Sleep Time turns the TV off at the preset time
Remote control Doesn’t work Power is suddenly Turned off
Troubleshooting
Appendix
Appendix
Picture OK & No sound No output from one Speakers
Appendix
Vertical bar or stripe on Background
Cleaning the Screen
Maintenance
Cleaning the Cabinet
Extended Absence
42PJ250R 50PJ250R 42PJ250R-MA 50PJ250R-MA
Product Specifications
107
IR Codes
Remote Control IR Codes
1st frame
Repeat frame
109
Type of Connector D-Sub 9-Pin Male
RS-232C Setup
External Control Through RS-232C
Communication Parameters
Either cable below can be used
RS-232C Configurations
RXD TXD GND DTR DSR RTS CTS
Transmission / Receiving Protocol
Command Reference List
113
114
115
116
117
MFL62883001-Edit3-en 3/17/10 347 PM
MFL62883001-Edit3-en 3/17/10 347 PM
Model Serial
Televisor Plasma
Advertencia Precaucion
Advertencia /PRECAUCIÓN
Tenimiento
Instrucciones Importantes DE LA Seguridad
Instrucciones Importantes DE LA Seguridad
Cuando monte el televisor en la pared
Tormenta eléctrica
Eléctricos y de señal de la parte trasera
Objetos encima ni en la pantalla
Transporte
Limpieza
Ventilación
Contenido
Control DE Sonido Y DE Idioma
Acerca DE LOS Contenidos Divx Video
Funciones DE Este TV
Accesorios
Preparación
Preparación
M4x28 M5x14
Preparación
Power Input Menu Enter
Controles DEL Panel Frontal
42/50PJ250R
Canal E, D
Información DEL Panel Posterior
HDMI/DVI
Una superficie acolchada que la proteja de posibles daños
Instrucciones
M4x28 Separar el soporte del televisor M4x30
Separación
60PK550R 600 AW-60PG60MS
Montaje Para LA Pared Vesa
Disposición DE Cables
Soporte DEL Eslabon Giratorio
Instalación DE UN Pedestal DE Escritorio
OTA
Enchufe de antena de la pared Antena de exterior VHF, UHF
Conexión DE LA Antena O Cable
Instalación DEL Hdstb
Conexiones DE Equipo Externo
Cómo conectar
Cómo usar
Externo
Conexión de DVI a Hdmi Excepto 42/50PJ250R
Instalación DEL DVD
Conexiones DE Equipo Externo
Conexiones DE Equipo Externo
Puertos de la salida del repro Ductor de DVD
Conecte las salidas de AUDIO/VIDEO entre la TV y
Conexiones DE Equipo Externo
Antena RF del VCR
Instalación DEL VCR
Ponga el interruptor de salida del VCR en 3 ó
Conecte las salidas de AUDIO/VIDEO entre la TV y el
Configuración DE Otra Fuente DE A/V
USB. G p
Entrada de USB en el televisor
Rgbp C en la unidad
Conexiones DE Equipo Externoa
Encienda la PC y la unidad
Resolución de Despliegue RGB- PC
Pantalla
Seleccionar la resolución
Enter Seleccione Pantalla
Enter Seleccione la resolución deseada
Enter Seleccione Pantalla Enter Seleccione Auto config
Auto configuración
Enter Iniciar la auto configuración
Menu Seleccione Imagen
Ajuste para la Posición, Tamaño y Fase de la pantalla
Fase
Para ajustar
Equipo Externoa
Conexiones DE
Funciones DE LOS Botones DEL Control Remoto
VER EL TV / Control DE Configuración
Controla los dispositivos compatibles con la función
Simplink
Colocando las Baterías
VER EL TV / Control DE Configuración
SUBIR/BAJAR
Volumen Ajusta el volumen
INPUT, CH E o D en el TV o
Encendido DEL TV
Ajuste DEL Canal
Ajuste DEL Volumen
Control DE Configuración
Paso3. Configuración de Modo
Paso1. Bienvenido
Paso2. Selección de idioma
Selección Y Ajuste DEL Menú Pantalla
VER EL TV / Control DE Configuración
Audio
VER EL TV / Control DE Configuracióna
Aspecto de pantalla Selecciona el formato de
Menú Rápido
Camente Ciones de observación
Modo de audio Selecciona modos de sonido
Búsqueda DE Canales
Configuracióna
VER EL TV / Control DE
Seleccione Sintonización automática
Regresar a la pantalla del televisor
Agregar/Eliminar los Canales Sintonización manual
Enter Seleccione Edición de Canales
Edición de canal
Lista DE Entradas
Configuración
Etiqueta DE Entrada
PPase las páginas
Lista DE Canales
Seleccione Bor/Agr/Fav
Configuración DE LOS Canales Favoritos
Seleccione Favorito
FAV Muestre la lista de canales favoritos
Lista DE Favoritos
El Modo AV cambia entre los ajustes de video y audio
Modo AV
ApagadoCine
JuegoDeporte
INPUT, CH o números del con- trol remoto
Bloqueo DE Teclas
Excepto botón de Encendido
Back Regresar al menú anterior
Seleccione Simplink
Seleccione el dispositivo deseado
Visualizar el menú Simplink
Dispositivo seleccionado
Este televisor es compatible con los formatos JPG, MP3
Modos DE Entrada
Seleccione FOTOS, Música o
Películas
Pueden reconocerse un máximo de 200 archivos y carpetas
Sólo se puede reconocer un dispositivo de almacenamiento USB
Enter Seleccione Lista de fotos
Lista DE Fotos
Deseado
Página de fotos
Menú de pantalla completa
Girar, Borrar o Esconder
Seleccione Presentación, BGM
Use el botón para seleccionar la foto anterior o siguiente
Uso de la opción Lista de fotos
Al seleccionar Establecer vídeo
Seleccione Lista De Música
Lista DE Música
Se desplaza a la carpeta del nivel superior
Aparecen hasta 6 títulos de música por página
Selección de música y menú emergente
Uso de la opción Lista de música
25progresivo
Lista DE Películas
30progresivo
Se lee una película
Las
Un mensaje sobre archivos no admitidos
Selección de película y menú emergente
Tamaño de imagen Escoja el tamaño original o a completo
Uso de la opción Lista de películas
Al seleccionar Configurar vídeo
Pulse el botón Playg para volver a la lectura normal
Uso del control remoto
Visualizar el Reg.DivX
Código DE Registro DEL Divx
Código
Nota
Desactivación
Tamaño DE LA Imagen Control DE Relacion DE Aspecto
Control DE Imagen
Control DE Imagen
Sólo búsqueda
Ajustes DE LA Imagen Prestablecida Modo Imagen
Control DE Imagen
Control Manual DE Imagen Modo Usuario
Seleccione Control Avanzado
Tecnología DE Mejora DE LA Imagen
Seleccione sus opciones deseadas
Temperatura de Color
Seleccione Ahorro de energía
Ahorro DE Energía
Seleccione Sensor inteligente, Apagado, Mínimo, Media
Máximo o Desconexión de pantalla
Restablecimiento DE LA Imagen
Minimización DE Imagen Fantasma
Seleccione Modo Demo
Modo DEMO. Modo DE Demostración
Seleccione Encendido
Si desea detener la demostración, pulse cualquier botón
Configuración Inicial Restablecer Ajustes DE Fábrica
Control DE Sonido Y DE Idioma
Nivelador Automático DE Volumen
Control DE Sonido Y DE Idioma
VOZ Clara
Control DE Sonido Y DE Idioma
Sonido Y
DE Idioma
Control DE Sonido Y
Ajustes DE Sonido Preestablecido Modo DE Audio
DE Sonido Y DE Idioma
Ajuste DE Sonido Modo Usuario
Menu Seleccione Audio
Seleccione Modo de audio
Ajuste el sonido que mejor se adapte a sus necesidades
Escoja esta opción para obtener un sonido realista
Seleccione Audio Seleccione Balance
Seleccione Audio Seleccione Parlantes de TV
Disposición DE Bocinas DE TV
Control DE
Reajuste DE Audio
Sonido Y DE Idioma
Seleccione MONO, Stereo o SAP
Disfrute DE LA Transmisión ESTÉREO/SAP
Control DE Sonido
Selección DEL Lenguaje EN LA Pantalla
Subtitulaje
Configuración Horaria
Configuración Horaria
Programacion DEL Reloj
Seleccione Hora de Apagado o Hora de
Configuración DE ENCENDIDO/APAGADO DE Tiempo
Encendido
Inuto
Configuración DEL Temporizador DE Apagado Automático
Configuración Horaria
Está configurado el tiempo para dormir?
Lista DE Verificación DE Problemas
Apéndice
Apéndice
Imagen OK pero No sonido No salida de una de las Bocinas
Apéndice
La señal está fuera del Rango Formato no válido
Limpiando la pantalla
Mantenimiento
Limpiando el gabinete
Ausencia Extendida
Modelos
Especificaciones DEL Producto
42PJ260R
Códigos de IR de Control Remoto
Códigos DE IR
Función Nota Hexa
Tipo del Conector Macho D-Sub 9-Pines
Instalación de RS-232C
Comunicación de los Parametros
Configuración de ID
Configuraciones de RS-232C
Seleccione Opción Seleccione ID del Televisor
Lista de Referencia de los Comandos
Transmisión ka ID del Televisor FFCr
Transmisión kk ID del Televisor DatoCr
Transmisión jp ID del Televisor DatoCr
NGDato0x
Número de entrada
MFL62883001-Edit3-sp 3/17/10 356 PM
MFL62883001-Edit3-sp 3/17/10 356 PM
Modelo Serie