When you require service
Features will increase power consumption that could exceed
Page
FCC Notice
Safety Instructions
Important Safety Instructions
Cables on the back of the TV
Install the TV by the hanging power and signal
Thunder or lighting storm
Grounding
Only Hg lamp used LCD TV
Antennas
Contents
Reference LT2002 Cloning Procedure
Cloning Connections/Teaching Setup
Reference Clonable Menu Features
Reference Detailed Instructions For Making a
Features of this TV
BURN-IN on Your TV Screen
Accessories
Preperation
Front Panel Information
Image shown may differ from your TV Intelligent Sensor
Preparation
Back Panel Information
Image shown may differ from your TV
Remote Control OUT
Update
Reset
HDMI/DVI
Damage
Stand Instruction
Cushioned surface to protect the screen from
Stand Body Cover Base
Do not hold the Cable Management Clip when moving the TV
External Equipment Setup section
Install the Cable Management Clip as shown
Cable Management
Desktop Pedestal Installation
Swivel Stand
Attaching the TV to a Desk
Vesa Wall Mounting
200
LCD TV
Same
Antenna or Cable Connection
Antenna Analog or Digital
RF Cable
MPI Card Slot / PPV Card Installation
MPI Card Removal / PPV Card Installation
RF cable needs to be disconnected to remove current card
How to connect
External Equipment Setup
HD Receiver Setup
How to use
HDMI-DTV
External Equipment Setup
Hdmi Connection
720x480p 1280x720p 1920x1080i
DVI to Hdmi Connection
Audio RGB/DVI jack on the TV
Connect the video outputs Y, P B, P R of the DVD to
DVD Setup
Component Input ports
Turn on the DVD player, insert a DVD
Connect the Hdmi output of the DVD to
Using the Input button on the remote control
No separate audio connection is necessary
Hdmi supports both audio and video
Tune TV to the same channel number
VCR Setup
Antenna Connection
If you have a mono VCR, connect the audio cable
Other A/V Source Setup
Camcorder
640x480
PC Setup
720x400
800x600
Equipment
DVI jack on the TV
Jack on the TV
Turn on the PC and the TV
Screen Setup for PC mode
Selecting Resolution
Screen
Start Auto Configuration
Auto Configure
Select Auto config
Can adjust the Position, S i z e or Phase
Adjustment for screen Position, Size, and Phase
Screen Reset Reset to original factory values
Select Reset
Audio OUT Connection
Digital
Watching TV / Channel
Remote Control Functions
Watching TV / Channel Control
Control
Installing Batteries
Watching TV / Channel Control
Volume Adjustment
Turning on TV
Channel Selection
ON-SCREEN Menus Selection
Audio
Channel Setup
Auto Scan Auto Tuning
Select channel you want to add or delete
Add/Delete Channel Manual Tuning
Select Manual Tuning
Select Add or Delete
Select a channel
Channel Editing
Select Channel Edit
Return to the previous menu
Channel Label
Select Channel
Input List
Select the desired input source
HDMI2 HDMI1 RGB-PC Component
Program Program listings arranged Time slots
Example Electronic Program Guide
Currently tuned channel
Current program on select
Picture Control
PIP PICTURE-IN-PICTURE
PIP Operation
Picture Size Aspect Ratio Control
Picture
Set by program
169
Zoom
Just Scan
Preset Picture Settings
Picture Mode Preset
Color Tone Preset
Advanced Control
Make appropriate adjustments
Manual Picture Adjustment
Picture Mode User Mode
Select Back Light, Contrast, Brightness
Picture Improvement Technology
Noise Reduction, or Gamma
Select your desired options
Advanced Control Black Darkness Level
Select Advanced Control
Select Black Level
Advanced Control EYE Care
Advanced Control Film Mode
Select Film Mode
Picture Reset
Sound & Language Control
Auto Volume Leveler Auto Volume
Select Auto Volume
Select Audio
Preset Sound Settings Sound Mode
Select Sound Mode
Select Standard, Music
Cinema, Sport, or Game
Sound Setting Adjustment User Mode
Adjust the sound to suit your taste and room situations
Select Treble or Bass
SRS Trusurround XT
Select SRS TruSurround XT
Clear Voice
Balance
Select Balance
TV Speakers ON/OFF Setup
Turn the TV speakers off if using external audio equipment
Select TV
Audio Reset
Mono, Stereo, or SAP appear in turn
STEREO/SAP Broadcast Setup
If other languages available on the digital signal
Select them with the SAP button
Language Control
Audio Language
Sound
Select Language Select Audio
Select Option
ON-SCREEN Menus Language Selection
Menus can be shown on the screen in the selected language
Select Language Select Menu Select your desired language
Analog, DTV, and Digital Option
Caption Mode
Analog Broadcasting System Captions
Caption
Select CC1-4, Text1-4, or Service1
Digital Broadcasting System Captions
Caption Option
Custom
Auto Clock Setup
Time Setting
Clock Setting
Time Setting
Manual Clock Setup
If the current time setting is wrong, set the clock manually
Auto ON/OFF Time Setting
Select Time Select Off Time or On
Select Repeat
Sleep Timer Setting
Sleep Time turns the TV off at the preset time
Auto SHUT-OFF Setting
Setting
Time
Parental Control / Ratings
SET Password & Lock System
Setting up Your Password
Chip rating and categories
Input the password
Select Lock System When you select O n, the Lock System
Is enable
Lock System
Input the password Select Set password
Set Password
Change the password by inputting a new password twice
Same 4 digits on the Confirm
Channel Blocking
Parental Control / Rating
Select Lock
Movie & TV Rating
Movie Rating Mpaa
Select Age or Fantasy Violence
TV Rating Children
Select TV Rating-Children Age applies to TV-Y, TV-Y7
Fantasy Violence applies to TV-Y7
TV Rating General
Downloadable Rating
Control / Rating
Enables you to block an input
External Input Blocking
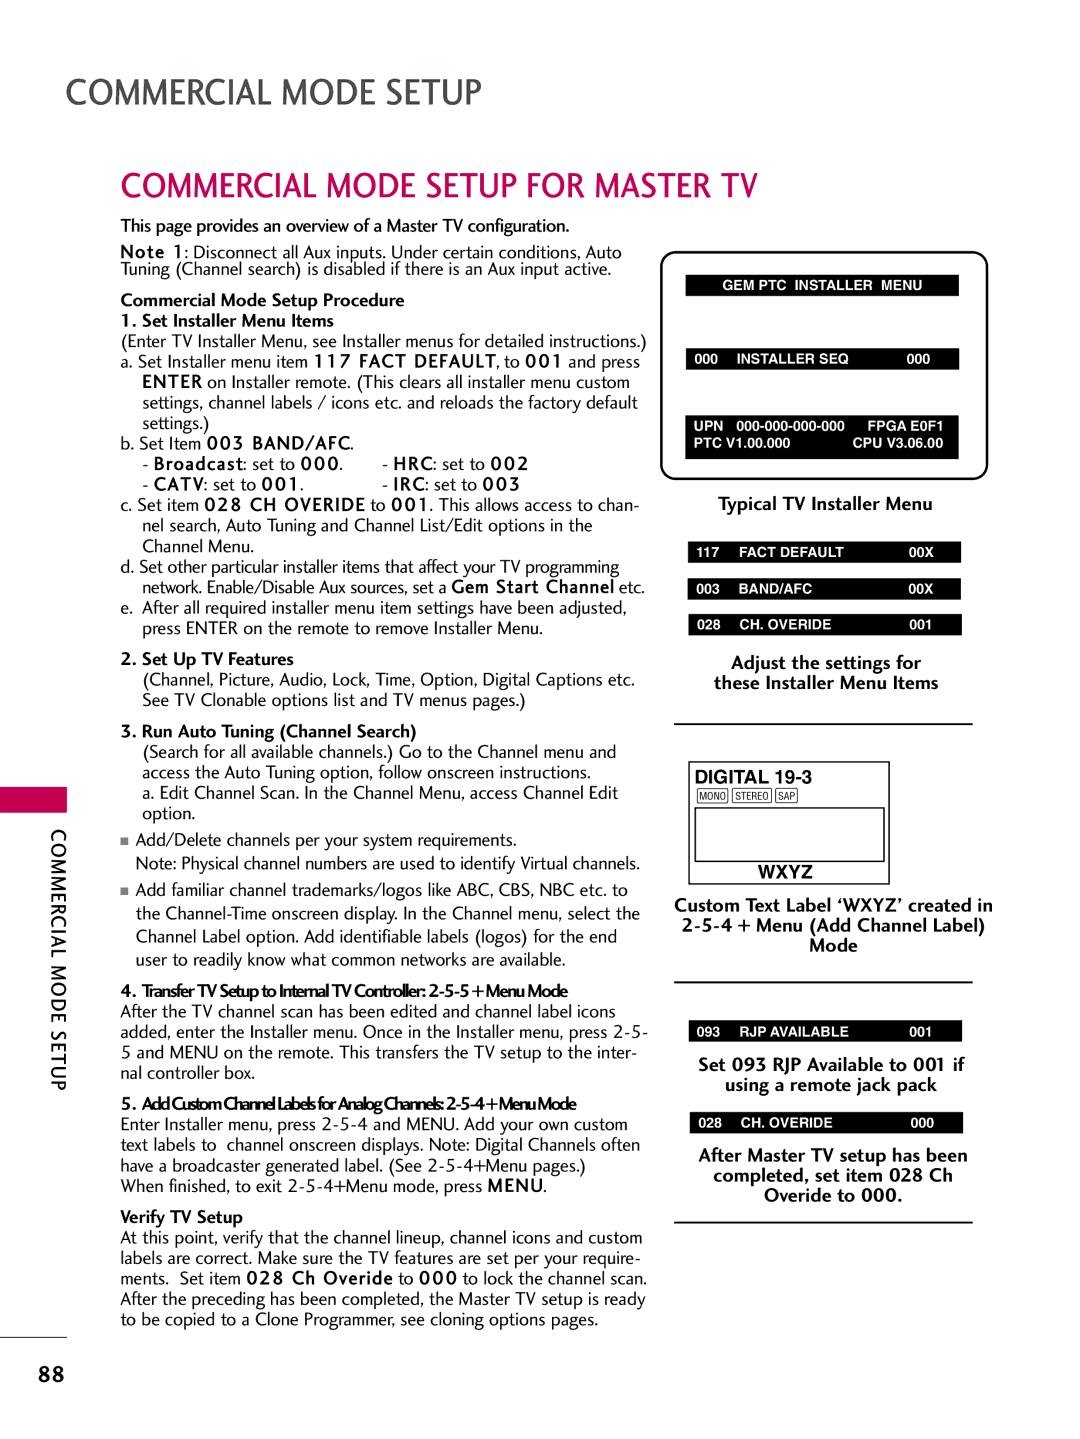
Commercial Mode Setup
Interactive TV Setup
LG Installer Remote
Installer Overview
Operating Installer Menu
TLL-1100A Clone Programmer
After TV setup, remove the AC power cord for 15 seconds
Interactive TV Overview
Interactive Amenities may include the following
Set Up TV Features
Commercial Mode Setup for Master TV
Commercial Mode Setup Procedure Set Installer Menu Items
Run Auto Tuning Channel Search
Optional Edit/Change File Name
See Installer Menu pages
On Master TV, Create Profile and Learn
Remove the USB memory card
On Target TV, Teach Master TV Profile
On TLL-1100A
TLL-1100A Cloning CONNECTIONS/LEARNING Setup
On Master TV
On Target TV
Before you begin cloning
LT2002 Cloning CONNECTIONS/LEARNING Setup
Mode Setup
Commercial
Learn Setup from Master TV
LT2002 Cloning Learning Setup
Learning the Master TV Setup
LT2002 Clone Programmer Communication Problems
Teach Master TV’s Setup to the target TV
Cloning CONNECTIONS/TEACHING Setup
Teaching the Master Setup to Another TV
Disconnect TV Power for 15 Seconds
Using the Installer’s Menu
Installer Menu
Accessing the Installer’s Menu
Installer Menu Items 000 through
Installer Menu Items 035 through
MIN Volume Minimum Volume
AC on AC Power Switchable
Strt Volume Start Volume
BAND/AFC Band/Automatic Frequency Control
Alarm
MAX Volume Maximum Volume
EN Timer Enable On/Off Timers
Camport EN. Camera Port Enable
Strt AUX Srce Start Aux Source
DIS. CH-TIME Disable Channel-Time
EN. CH-T COL. Enable Channel-Time Custom Color
FOR. CH-TIME Channel-Time Display Foreground Color
Fact Default Factory Default Set to 0 for normal
YPrPb2 HDMI2 Enable
Video Mute EN Video Mute Enable Set to 0 for normal
Pseudo PWR OFF Pseudo Power Off
Reference Detailed Instructions for Making a Master TV
Enter the TV installer menu
Finally, the TV’s clonable features need to be set up. This
Making a Master TV
To Do Channel Editing/Labeling, Proceed as Follows
Adding Channel Icons and Labels in the 2-5-4 + Menu Mode
Editing/Adding Channel ICONs and/or Labels
Changing a Channel’s Icon on Master TV
Reference Clonable Menu Features
Procedure for Checking Software Version
Clonable Menu Features
Reference Power Saving Setup
TV AUX Input Configuration
Power Savings Setup
Camport Operation PPV
TV Camport Auto Sense Operation
Camport Operation Stand-Alone
Camport Front Video Functionality Control
Appendix
Troubleshooting
Remote control Doesn’t work Power is suddenly Turned off
Appendix
See troubleshooting flow chart
Check the signal cable
Or single color Update video card drivers
No Power
Clone Programmer Troubleshooting
Reference LT2002 Cloning Procedure Troubleshooting
Reset Clone After Static Shock
Than 30 seconds
Troubleshooting Flow Chart
Controller Quick Check
Commercial Mode Check
Digital Video Interface
Glossary of Terms
Programming provided by a cable ser- vice
High-definition multi-media interface
Cleaning the Screen
Maintenance
Product Specifications
Cleaning the Cabinet
Programming the Remote Control
Testing your remote control
Remote Control Code
159
028 035 047 057
158 085
060 147
IR Codes
Remote Control IR Codes
Configuration of frame
Output waveform
Dash Remote control Button
Remote control Button
10-19 Number Key Remote control Button
Remote control Button Ratio
Open Source License
Version 2, June
Preamble
119
120
121
GNU Lesser General Public License
Version 2.1, February
123
124
125
How to apply these terms to your new libraries
Mozilla Public License
Description of modifications
Distribution Obligations Application of license
Availability of source code
Intellectual property matters Third party claims
Distribution of executable versions
Representations
Required notices
Larger works
130
Exhibit a -Mozilla Public License
Initial Developer of the Original Code is
All Rights Reserved Contributors