Getting Started - Housing Identification |
| Quick Start Guide |
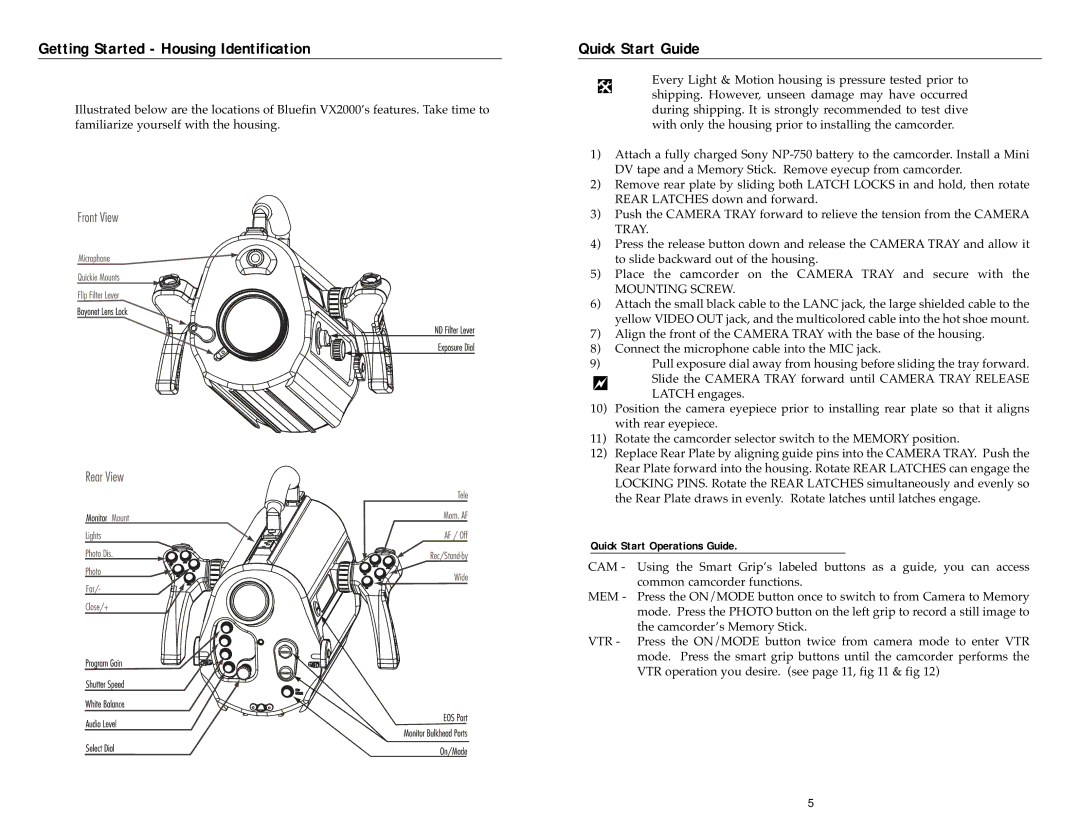
Illustrated below are the locations of Bluefin VX2000’s features. Take time to familiarize yourself with the housing.
Every Light & Motion housing is pressure tested prior to shipping. However, unseen damage may have occurred during shipping. It is strongly recommended to test dive with only the housing prior to installing the camcorder.
1)Attach a fully charged Sony
2)Remove rear plate by sliding both LATCH LOCKS in and hold, then rotate REAR LATCHES down and forward.
3)Push the CAMERA TRAY forward to relieve the tension from the CAMERA TRAY.
4)Press the release button down and release the CAMERA TRAY and allow it to slide backward out of the housing.
5)Place the camcorder on the CAMERA TRAY and secure with the
MOUNTING SCREW.
6)Attach the small black cable to the LANC jack, the large shielded cable to the yellow VIDEO OUT jack, and the multicolored cable into the hot shoe mount.
7)Align the front of the CAMERA TRAY with the base of the housing.
8)Connect the microphone cable into the MIC jack.
9)Pull exposure dial away from housing before sliding the tray forward. Slide the CAMERA TRAY forward until CAMERA TRAY RELEASE LATCH engages.
10)Position the camera eyepiece prior to installing rear plate so that it aligns with rear eyepiece.
11)Rotate the camcorder selector switch to the MEMORY position.
12)Replace Rear Plate by aligning guide pins into the CAMERA TRAY. Push the Rear Plate forward into the housing. Rotate REAR LATCHES can engage the LOCKING PINS. Rotate the REAR LATCHES simultaneously and evenly so the Rear Plate draws in evenly. Rotate latches until latches engage.
Quick Start Operations Guide.
CAM - Using the Smart Grip’s labeled buttons as a guide, you can access common camcorder functions.
MEM - Press the ON/MODE button once to switch to from Camera to Memory mode. Press the PHOTO button on the left grip to record a still image to the camcorder’s Memory Stick.
VTR - Press the ON/MODE button twice from camera mode to enter VTR mode. Press the smart grip buttons until the camcorder performs the VTR operation you desire. (see page 11, fig 11 & fig 12)
5