Return to Section TOC

Return to Section TOC

Return to Master TOC

Return to Master TOC

F-34

TROUBLESHOOTING & REPAIR

F-34


IDLER SOLENOID TEST (CONTINUED)

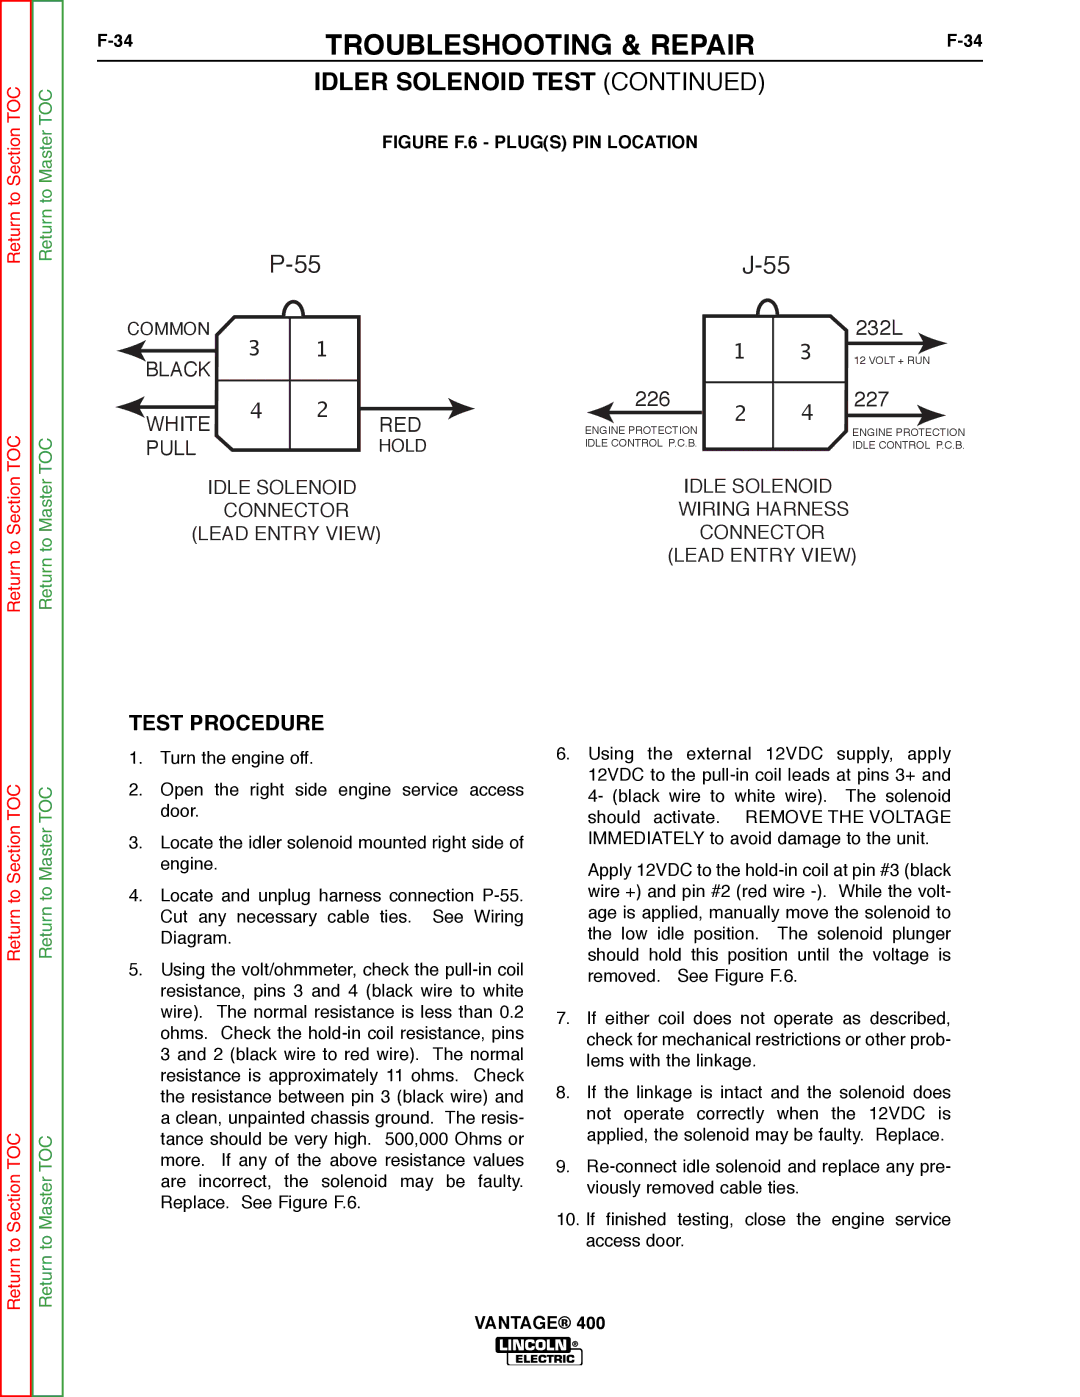
FIGURE F.6 - PLUG(S) PIN LOCATION


P-55


J-55


COMMON


3


1


1


3


232L


12 VOLT + RUN


BLACK


4


2


226


2


4


227


WHITE


RED


ENGINE PROTECTION


ENGINE PROTECTION


PULL


HOLD

IDLE CONTROL P.C.B.


IDLE CONTROL P.C.B.


IDLE SOLENOID


IDLE SOLENOID


CONNECTOR


WIRING HARNESS


(LEAD ENTRY VIEW)


CONNECTOR


(LEAD ENTRY VIEW)

TEST PROCEDURE

Return to Section TOC

Return to Section TOC

Return to Master TOC

Return to Master TOC

1.Turn the engine off.

2.Open the right side engine service access door.

3.Locate the idler solenoid mounted right side of engine.

4.Locate and unplug harness connection P-55. Cut any necessary cable ties. See Wiring Diagram.

5.Using the volt/ohmmeter, check the pull-in coil resistance, pins 3 and 4 (black wire to white wire). The normal resistance is less than 0.2 ohms. Check the hold-in coil resistance, pins 3 and 2 (black wire to red wire). The normal resistance is approximately 11 ohms. Check the resistance between pin 3 (black wire) and a clean, unpainted chassis ground. The resis- tance should be very high. 500,000 Ohms or more. If any of the above resistance values are incorrect, the solenoid may be faulty. Replace. See Figure F.6.

6.Using the external 12VDC supply, apply 12VDC to the pull-in coil leads at pins 3+ and 4- (black wire to white wire). The solenoid should activate. REMOVE THE VOLTAGE IMMEDIATELY to avoid damage to the unit.

Apply 12VDC to the hold-in coil at pin #3 (black wire +) and pin #2 (red wire -). While the volt- age is applied, manually move the solenoid to the low idle position. The solenoid plunger should hold this position until the voltage is removed. See Figure F.6.

7.If either coil does not operate as described, check for mechanical restrictions or other prob- lems with the linkage.

8.If the linkage is intact and the solenoid does not operate correctly when the 12VDC is applied, the solenoid may be faulty. Replace.

9.Re-connect idle solenoid and replace any pre- viously removed cable ties.

10.If finished testing, close the engine service access door.

VANTAGE® 400

Page 82
Image 82
Lincoln Electric 400 service manual 232L

400 specifications

The Lincoln Electric 400 is a state-of-the-art multi-process welding machine designed to meet the demands of today’s industrial welding applications. Renowned for its reliability and versatility, this welder is a preferred choice among professionals in fabrication, construction, and maintenance industries.

One of the main features of the Lincoln Electric 400 is its multi-process capability. It seamlessly integrates MIG, TIG, and stick welding processes into a single unit, allowing users to switch between methods depending on the job at hand. This flexibility makes it incredibly suitable for a wide range of materials, including steel, stainless steel, and aluminum.

The welding machine boasts a robust power output, with a maximum range of 400 amps. This impressive capacity enables it to handle thick materials effectively, making it ideal for heavy-duty tasks. The machine operates on both single-phase and three-phase power, giving users the advantage of versatility depending on the power source available at the job site.

Another significant characteristic of the Lincoln Electric 400 is its advanced digital display and control interface. This user-friendly panel allows for easy adjustments to voltage and wire feed speed, ensuring precision and high-quality welds. Additionally, the machine includes built-in features to improve the consistency of welding, such as the Smart MIG technology which optimizes the welding parameters automatically based on the wire diameter and material thickness.

In terms of durability, the Lincoln Electric 400 is designed for rugged environments. Its heavy-duty construction, including a robust metal casing and protective features, ensures it can withstand the rigors of daily use in harsh conditions. Furthermore, the welder is often praised for its efficient cooling system, which prolongs the machine's lifespan and maintains optimal performance even during extended usage.

Portability is another key aspect of this welding machine. Weighing under 200 pounds, it is designed with mobility in mind. The integrated wheels allow for easy transportation between job sites, making it a practical choice for mobile welders and contractors.

In conclusion, the Lincoln Electric 400 stands out in the welding equipment market due to its multi-process capabilities, impressive power output, user-friendly interface, durability, and portability. It is engineered to exceed the expectations of professional welders, providing them with the tools needed for high-quality results across a variety of applications.