ES
U E
ROF
EB SETUP
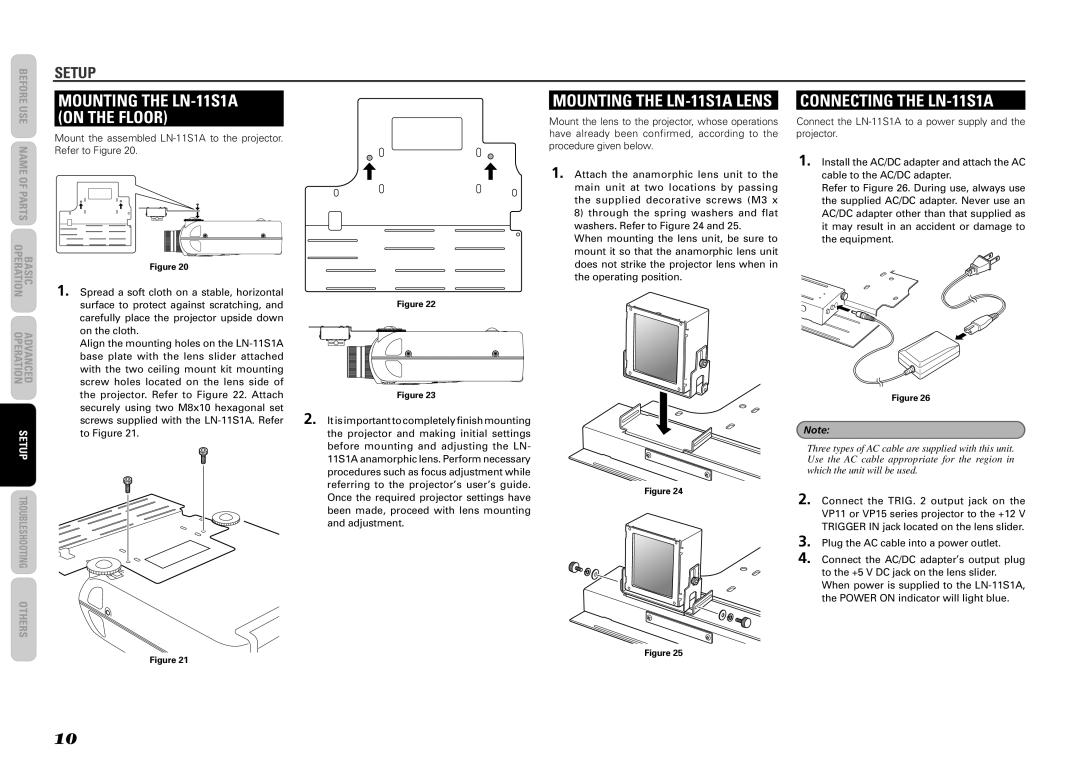
P | MOUNTING THE | |
F O | (ON THE FLOOR) | |
E |
| |
MAN | Mount the assembled | |
Refer to Figure 20. | ||
STRA |
| |
ARE |
| |
IC |
| |
P |
| |
S |
| |
O |
| |
AB |
| |
N IO | Figure 20 | |
T |
| |
| 1. Spread a soft cloth on a stable, horizontal | |
V ARE | surface to protect against scratching, and | |
carefully place the projector upside down | ||
DE | on the cloth. | |
P |
| |
O |
| |
RACELNL | Align the mounting holes on the | |
N | ||
base plate with the lens slider attached | ||
IO | ||
AO |
| |
RT |
| |
T | with the two ceiling mount kit mounting | |
NOCE | ||
screw holes located on the lens side of | ||
TO | the projector. Refer to Figure 22. Attach | |
MER PA | ||
securely using two M8x10 hexagonal set | ||
REUTP | screws supplied with the | |
EO | to Figure 21. | |
GS IN | ||
| ||
TNIO |
| |
OT |
| |
OHSEL |
| |
BUORT |
|
SRE HT O
Figure 22
Figure 23
2. It is important to completely finish mounting the projector and making initial settings before mounting and adjusting the LN- 11S1A anamorphic lens. Perform necessary procedures such as focus adjustment while referring to the projector’s user’s guide. Once the required projector settings have been made, proceed with lens mounting and adjustment.
MOUNTING THE LN-11S1A LENS
Mount the lens to the projector, whose operations have already been confirmed, according to the procedure given below.
1. Attach the anamorphic lens unit to the main unit at two locations by passing the supplied decorative screws (M3 x
8)through the spring washers and flat washers. Refer to Figure 24 and 25.
When mounting the lens unit, be sure to mount it so that the anamorphic lens unit does not strike the projector lens when in the operating position.
Figure 24
CONNECTING THE LN-11S1A
Connect the
1. Install the AC/DC adapter and attach the AC cable to the AC/DC adapter.
Refer to Figure 26. During use, always use the supplied AC/DC adapter. Never use an AC/DC adapter other than that supplied as it may result in an accident or damage to the equipment.
Figure 26
Note:
Three types of AC cable are supplied with this unit. Use the AC cable appropriate for the region in which the unit will be used.
2. Connect the TRIG. 2 output jack on the VP11 or VP15 series projector to the +12 V TRIGGER IN jack located on the lens slider.
3. Plug the AC cable into a power outlet.
4.
Figure 21
Figure 25
10