Refrigerator Models
Installation Operation and Maintenance Instructions
Recognize Safety Sym- bols, Words, and Labels
CONTENTS
Important Safety Instructions
UNPACKING YOUR REFRIGERATOR
Warranty Registration
Remove Interior Packaging
Note to Customer
Outdoor Installation
INSTALLING YOUR REFRIGERATOR
Select Location
Cabinet Clearance
Electrical Connection
ELECTRICAL CONNECTION
Alarms
USING YOUR MICROSENTRY REFRIGERATOR CONTROL
Alarm Mute
Starting your refrigerator
RECOMMENDED ROUGH IN OPENING DIMENSIONS, MODEL 30ARM
DIMENSIONS FOR MODEL 30ARM
RECOMMENDED ROUGH IN OPENING DIMENSIONS MODEL 30ARM OVERLAY DOOR
DIMENSIONS FOR MODEL 30ARM WITH OVERLAY DOOR
123⁄8 31.4cm
137⁄8 35.3cm
RECOMMENDED ROUGH IN OPENING DIMENSIONS, 3OARM
DIMENSIONS FOR MODEL 3OARM
RECOMMENDED ROUGH IN OPENING DIMENSIONS, 61ARM
DIMENSIONS FOR MODEL 61ARM
RECOMMENDED ROUGH IN OPENING DIMENSIONS MODEL 61ARM OVERLAY DOOR
DIMENSIONS FOR MODEL 61ARM WITH OVERLAY DOOR
RECOMMENDED ROUGH IN OPENING DIMENSIONS, 6ARM
DIMENSIONS FOR MODEL 6ARM
RECOMMENDED ROUGH IN OPENING DIMENSIONS MODEL 6ARCM OVERLAY DOOR
DIMENSIONS FOR MODEL 6ARCM WITH OVERLAY DOOR
RECOMMENDED ROUGH IN OPENING DIMENSIONS 6AROM & MPRO6ARM
DIMENSIONS FOR MODELS 6AROM & MPRO6ARM
RECOMMENDED ROUGH IN OPENING DIMENSIONS, MODEL 6ADAM
DIMENSIONS FOR MODEL 6ADAM
3 to
DIMENSIONS FOR MODEL 6ADAM WITH OVERLAY DOOR
RECOMMENDED ROUGH IN OPENING DIMENSIONS MODEL 6ADAM OVERLAY DOOR
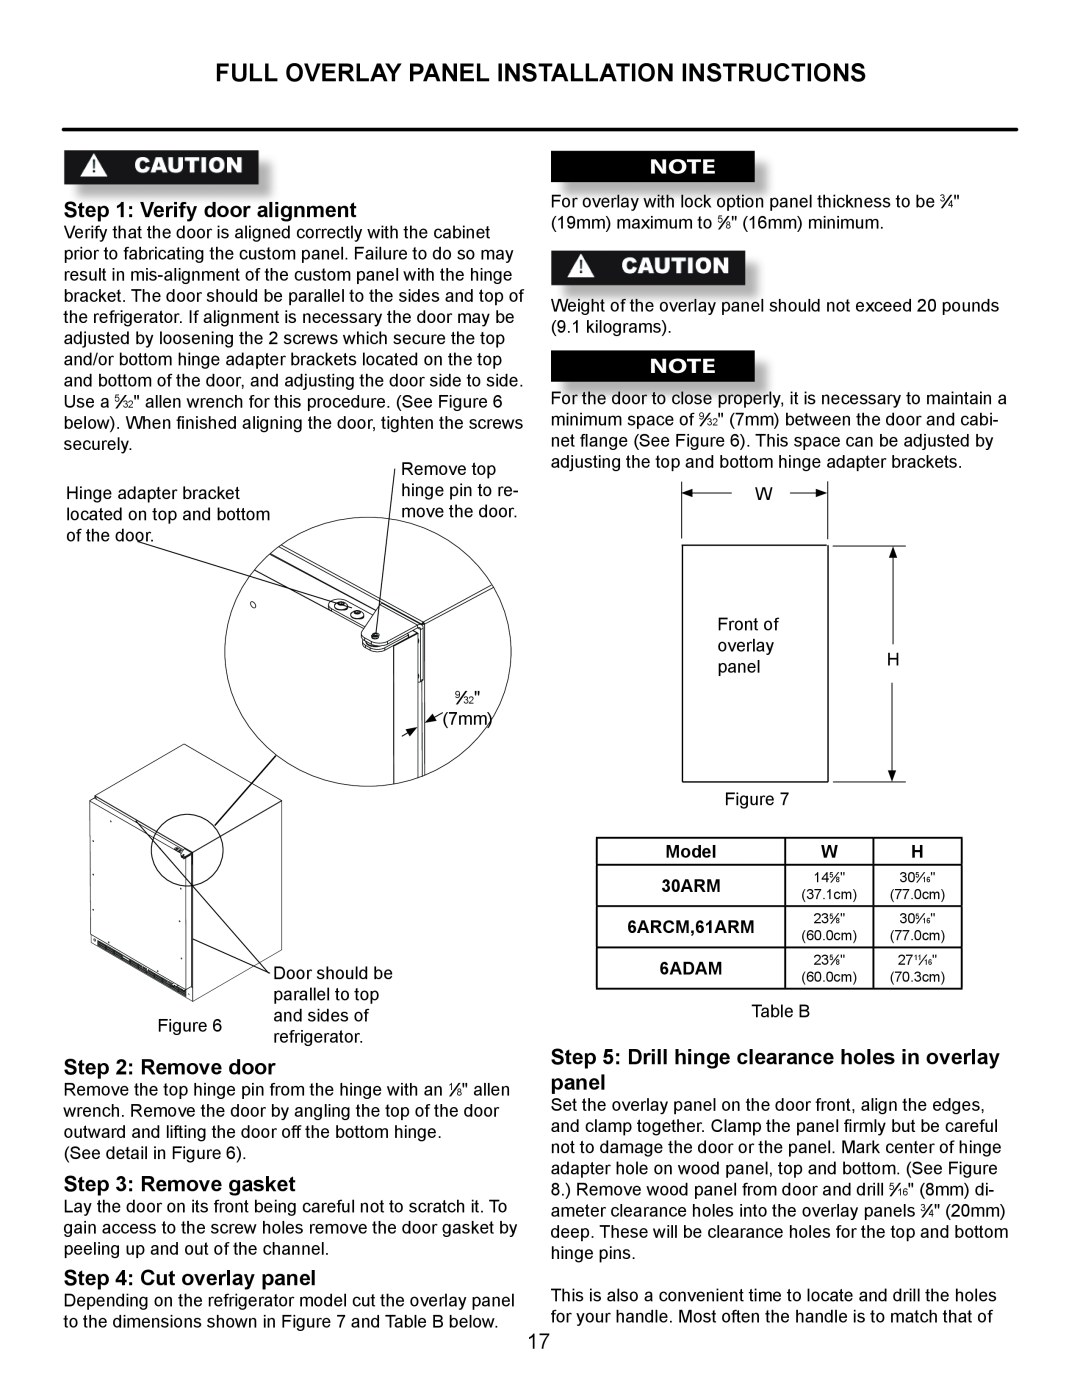
Step 1 Verify door alignment
FULL OVERLAY PANEL INSTALLATION INSTRUCTIONS
Step 2 Remove door
Step 3 Remove gasket
Step 7 Mark and drill lock hole
Step 6 Drill panel mounting holes
Material Type
#8 Wood Screw
Step 11 Install door gasket
Step 10 Install lock cam Models with locks only
Step 12 Install the door
Step 8 Assemble the lock parts
ENERGY SAVING TIPS
Light Bulb Replacement
CARE AND CLEANING
Cabinet
Interior
If Service is Required
TROUBLESHOOTING YOUR REFRIGERATOR
Before You Call for Service
Entire Product Limited One Year Parts and Labor Warranty
HOUSEHOLD PRODUCT WARRANTY
Additional Second Through Fifth Year Limited Parts Only Warranty
Parts or Service Not Supplied or Designated by AGA MARVEL
41012685-EN revG 7/10/13
1260 E. VanDeinse St. Greenville MI
Réfrigérateurs
Instructions d’installation, d’utilisation et d’entretien
CONTENU
REMARQUENOTE
Importantes instructions de sécurité
AVERTISSEMENT
Enlèvement de l’emballage intérieur
DÉBALLAGE DE VOTRE RÉFRIGÉRATEUR
Note pour le client
Enregistrement de la garantie
Choix de l’emplacement
INSTALLATION DE VOTRE RÉFRIGÉRATEUR
Installation à l’extérieur
Écartements par rapport à l’armoire
Raccordement électrique
RACCORDEMENT ÉLECTRIQUE
Démarrage de votre réfrigérateur
UTILISATION DE VOTRE CONTRÔLE DE REFROIDISSEMENT MICROSENTRY
Mise en marche et à l’arrêt de votre réfrigéra- teur
Fixation de consigne de température
DIMENSIONS BRUTES D’OUVERTURE RECOMMANDÉES POUR MODÈLE 30ARM
DIMENSIONS DES MODÈLE 30ARM
DIMENSIONS POUR MODÈLE 30ARM AVEC PORTE À REVÊTEMENT
12 30.5cm
DIMENSIONS DES MODÈLE 3OARM
DIMENSIONS BRUTES D’OUVERTURE RECOMMANDÉES POUR MODÈLE 3OARM
DIMENSIONS BRUTES D’OUVERTURE RECOMMANDÉES POUR MODÈLE 61ARM
DIMENSIONS DES MODÈLE 61ARM
DIMENSIONS POUR MODÈLE 61ARM AVEC PORTE À REVÊTEMENT
86.7 cm à
DIMENSIONS DES MODÈLE 6ARM
DIMENSIONS BRUTES D’OUVERTURE RECOMMANDÉES POUR MODÈLE 6ARM
DIMENSIONS POUR MODÈLE 6ARCM AVEC PORTE À REVÊTEMENT
DIMENSIONS BRUTES D’OUVERTURE RECOMMANDÉES
DIMENSIONS DES MODÈLES MPRO6ARM ET 6AROM
POUR MODÈLES MPRO6ARM ET 6AROM
54,6 cm
20 50,8cm
DIMENSIONS POUR MODÈLE 6ADAM
DIMENSIONS BRUTES D’OUVERTURE RECOMMANDÉES POUR MODÈLE 6ADAM
DIMENSIONS POUR MODÈLE 6ADAM AVEC PORTE À REVÊTEMENT
Étape 1 Vérification de l’alignement de porte
INSTRUCTIONS D’INSTALLATION DE PANNEAU DE REVÊTEMENT COMPLET
Étape 2 Démontage de la porte
Étape 3 Enlèvement de joint
Étape 7 Marquez et percez le trou pour ver- rouillage
Étape 6 Percez les trous de montage du panneau
Type de matériau
Vis à bois #8
Étape 12 Installez la porte
Étape 11 Installez le joint de porte
Étape 8 Assemblez les pièces de verrouillage
Étape 9 Fixez le panneau de revêtement sur la porte
CONSEILS POUR LES ÉCONOMIES D’ÉNERGIE
ENTRETIEN ET NETTOYAGE
Remplacement de l’ampoule d’éclairage
Armoire
Intérieur
Si du service est nécessaire
Avant d’appeler pour du service
DÉPANNAGE DE VOTRE RÉFRIGÉRATEUR
Tableau D
GARANTIE DE PRODUIT À USAGE DOMESTIQUE
Pièces ou service non fournis ou conçus par AGA MARVEL
Appareil complet Garantie limitée d’un an sur pièces et main- d’œuvre
Période additionnelle de la deuxième à la cinquième année
41012685-FR revE 6/25/12
1260 E. VanDeinse St Greenville MI