Manuals
/
Maytag
/
Kitchen Appliance
/
Refrigerator
Maytag
W10558104A
manual
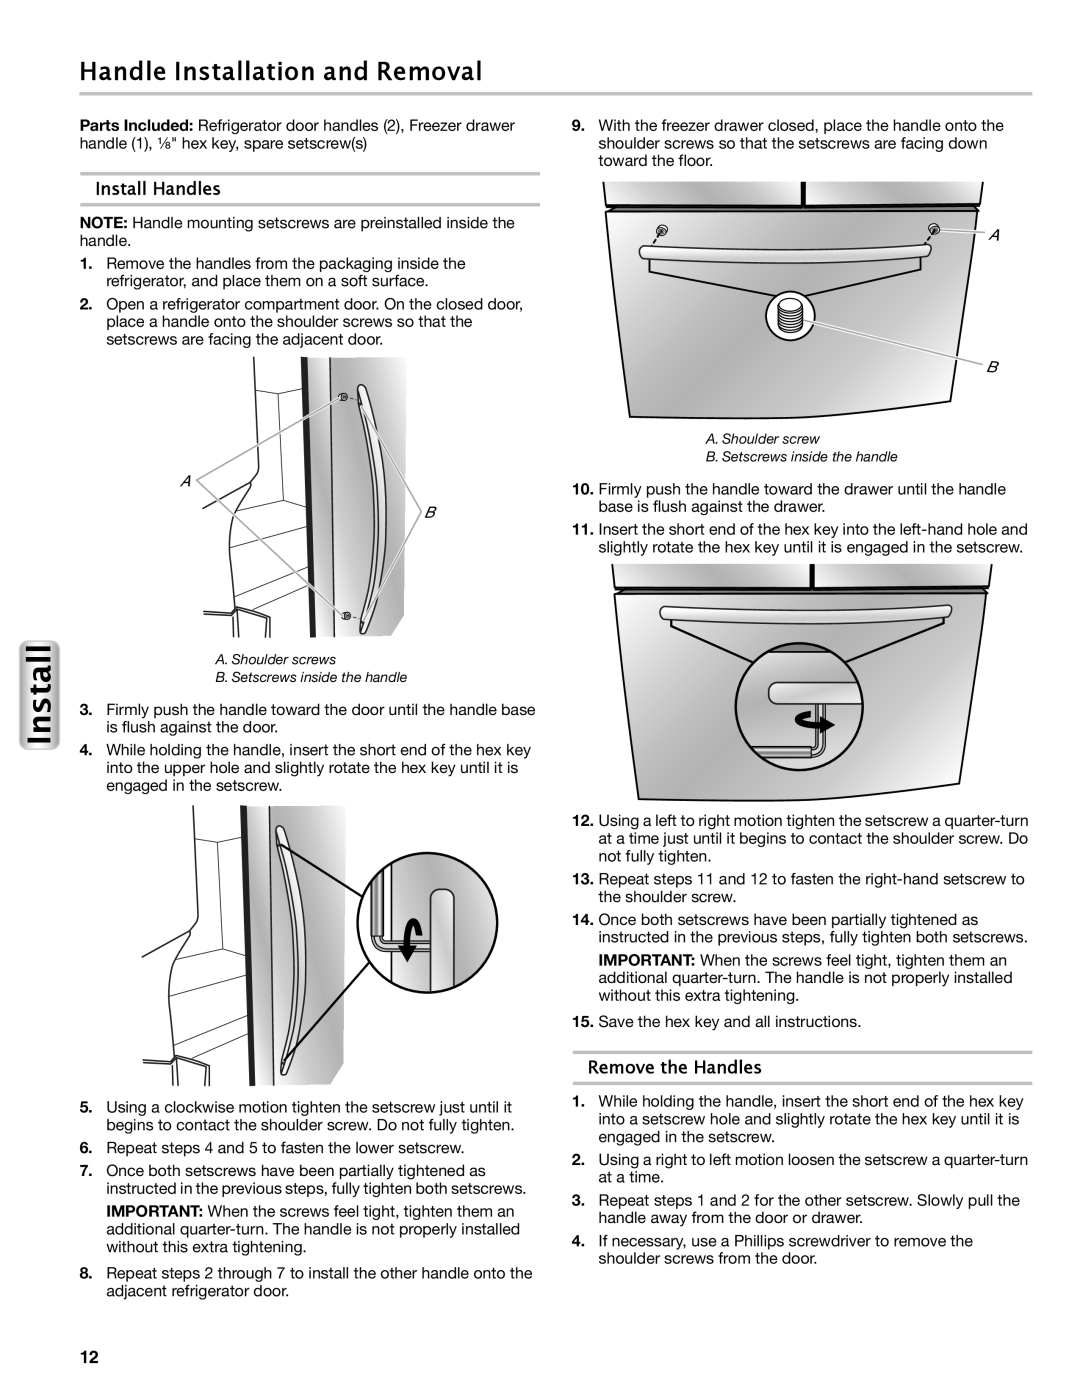
Handle Installation and Removal, Install Handles, Remove the Handles
Models:
W10558104A
1
12
116
116
Download
116 pages
13.86 Kb
9
10
11
12
13
14
15
16
Troubleshooting
Install
FAQ
Performance Data Sheet
Door Alarm
Wiring Plug
Warranty
Solución De Problemas
Filters And Accessories
Utilisation des commandes
Page 12
Image 12
Page 11
Page 13
Page 12
Image 12
Page 11
Page 13
Contents
French Door Bottom Mount Refrigerator Use & Care Guide
Canada
W10558104A
TABLE OF CONTENTS
Contents
REFRIGERATOR SAFETY
PARTS AND FEATURES
REFRIGERATOR SAFETY
Safety
Your safety and the safety of others are very important
IMPORTANT SAFETY INSTRUCTIONS
PARTS AND FEATURES
Parts & Features
Door Alarm
Power Outage Indicator on some models
INSTALLATION INSTRUCTIONS
Install
Clean Before Using
Excessive Weight Hazard
Door Removal and Replacement
Wiring Plug
Electrical Shock Hazard Disconnect power before removing doors
Remove and Replace Refrigerator Doors
Remove Right-Hand Refrigerator Door
Remove Left-Hand Refrigerator Door
A B C D
Remove and Replace Freezer Drawer Front
Replace Right-Hand Refrigerator Door
Replace Left-Hand Refrigerator Door
Final Steps
Electrical Requirements
Recommended Grounding Method
Replace Drawer Front
Electrical Shock Hazard Plug into a grounded 3 prong outlet
Water Supply Requirements
Connect the Water Supply
Reverse Osmosis Water Supply
Connect to Water Line
Complete the Installation
Style
Connect to Refrigerator
Handle Installation and Removal
Install Handles
Remove the Handles
To Adjust the Cabinet Tilt
Refrigerator Leveling, Door Closing and Alignment
Tools Needed ¹⁄₄ hex driver Tools Provided ¹⁄₈ hex key wrench
Style
FILTERS AND ACCESSORIES
Accessories
Install the Water Filter
Water Filtration System
Install Air Filter on some models
Installing the Air Filter
Installing the Filter Status Indicator
Replace the Water Filter
Accessories
Install Produce Preserver on some models
Installing the Produce Preserver
Replacing the Air Filter
Accessories
Installing the Status Indicator
affresh Kitchen & Appliance Cleaner
Replacing the Produce Preserver
Using the Controls
Viewing and Adjusting Temperature Set Points
REFRIGERATOR USE
Opening and Closing Doors
Adjust Temperature Set Points
When adjusting temperature set points
use the following chart as a guide
ADJUSTMENT
Door Ajar Alarm
Additional Features
Turn all OFF default - All options are off
Water Filter Status
To Clean the Ice Dispenser Chute
Cut Hazard Use a sturdy glass when dispensing ice
Water and Ice Dispensers
To Dispense Water
To turn on the light when you are not dispensing
Ice Maker and Ice Storage Bin on some models
To Dispense Ice and Water
The Dispenser Light
REFRIGERATOR FEATURES
Features
Refrigerator Shelves
Turn the Ice Maker On/Off
Features
Crisper and Crisper Cover
Crisper Humidity Control
Temperature-Controlled Drawer
DOOR FEATURES
FREEZER FEATURES
Drawer Removal and Replacement
Door Bins
Cleaning
Exterior Cleaning
Interior Cleaning
Explosion Hazard Use nonflammable cleaner
Condenser Cleaning
If you need to clean the condenser
Lights
Vacation and Moving Care
TROUBLESHOOTING
Troubleshooting
Questions to possibly avoid the cost of a service call
PROBLEM
Noise
The motor seems to
run too much
The lights do not
Temperature and Moisture
Temperature is too warm
Temperature is too cold in
the refrigerator/crisper
Ice and Water
The ice maker is not
producing ice or is not
producing enough ice
Off-taste, odor or gray
color in the ice or water
The water and ice
dispenser will not
Doors
Water is leaking or dripping
from the dispenser system
Water continues to drip
WATER FILTER CERTIFICATIONS
Certificate
PERFORMANCE DATA SHEET
Data Sheet
Water Filtration System
Model P6WB2L/P6RFWB2 Capacity 200 Gallons 757 Liters
MAYTAG REFRIGERATION LIMITED WARRANTY
Warranty
FIRST YEAR LIMITED WARRANTY PARTS AND LABOR
ITEMS EXCLUDED FROM WARRANTY This limited warranty does not cover
Refrigerador de dos puertas con congelador en la parte inferior
Manual de uso y cuidado
En EE.UU
En Canadá
SOLUCIÓN DE PROBLEMAS
ÍNDICE
SEGURIDAD DEL REFRIGERADOR
PIEZAS Y CARACTERÍSTICAS
CONSERVAR ESTAS INSTRUCCIONES
Si no sigue las instrucciones de inmediato, usted puede
morir o sufrir una lesión grave
Si no sigue las instrucciones, usted puede morir o sufrir
PIEZAS Y CARACTERÍSTICAS
ADVERTENCIA
Piezas y caracterÌsticas
Cómo deshacerse adecuadamente de su refrigerador viejo
Alarma de la puerta
INSTRUCCIONES DE INSTALACIÓN
¿Qué hay de nuevo detrás de las puertas?
Desempaque el refrigerador
Requisitos de ubicación
Limpieza antes del uso
Cómo mover su refrigerador
Peligro de Explosión
Cómo quitar y volver a colocar las puertas del refrigerador
Cómo quitar y volver a colocar las puertas
Estilo 1 - Conexión de la
Estilo 2 - Conexión de la
Quite la puerta del refrigerador del lado derecho
Quite la puerta del refrigerador del lado izquierdo
Use dos o más personas para levantar la puerta del refrigerador
Vuelva a colocar la puerta del refrigerador del lado derecho
Vuelva a colocar la puerta del refrigerador del lado izquierdo
Pasos finales
NOTAS
Cómo quitar y volver a colocar el frente del cajón del congelador
Para quitar el frente del cajón
Para volver a colocar el frente del cajón
IMPORTANTE
Requisitos eléctricos
Requisitos del suministro de agua
Conexión del suministro de agua
Método de conexión a tierra recomendado
Estilo
Conexión a la línea de agua
Conexión al refrigerador
Complete la instalación
Cómo instalar las manijas
Instalación y remoción de las manijas
Nivelación del refrigerador, cierre y alineamiento de las puertas
Cómo sacar las manijas
Herramientas necesarias Llave hexagonal de ¹⁄₄
Cómo regular la inclinación de la carcasa
Estilo
Para alinear las puertas
Para estabilizar el refrigerador
FILTROS Y ACCESORIOS
Accesorios
Sistema de filtración de agua
Instalación del filtro de agua
Instalación del filtro de aire en algunos modelos
Reemplazo del filtro de agua
Cómo instalar el indicador de estado del filtro
Cómo instalar el filtro de aire
Instalación del preservador de alimentos frescos en algunos modelos
Cómo reemplazar el filtro de aire
Cómo instalar el preservador de alimentos frescos
Modelos sin muescas
Accesorios
Cómo volver a colocar el preservador de alimentos frescos
Limpiador de acero inoxidable affresh
Limpiador para cocina y electrodomésticos affresh
USO DE SU REFRIGERADOR
Cómo abrir y cerrar las puertas
Uso de los controles
Cómo ver y regular los puntos de ajuste de temperatura
Cómo ver los puntos de ajuste de temperatura
Regule los puntos de ajuste de temperatura
Encendido/Apagado del enfriamiento
Temperatura recomendada del refrigerador
Alarma de puerta entreabierta
Estado del filtro de agua
Opciones
Características adicionales
Despachadores de agua y hielo
Desactivación de sonidos en algunos modelos
Modo de sala de exposición
Para limpiar el conducto de distribución de hielo
Fábrica de hielo y depósito de hielo en algunos modelos
Para despachar agua
Para despachar hielo
Cómo despachar hielo y agua
Para encender y apagar la fábrica de hielo
Ritmo de producción de hielo
Estilo 1 - Fábrica de hielo en el refrigerador en algunos modelos
Para encender y apagar la fábrica de hielo
CARACTERÍSTICAS DEL REFRIGERADOR
CaracterÌsticas
Estantes del refrigerador
Cajón para verduras y tapa
Control de humedad del cajón para verduras
Cajón con temperatura controlada
Estilo 1 - Control electrónico
Estilo 2 - Control manual
CARACTERÍSTICAS DE LA PUERTA
CARACTERÍSTICAS DEL CONGELADOR
Recipientes de la puerta
Espacio para pizzas y divisor del cajón
CUIDADO DE SU REFRIGERADOR
Cuidado
Limpieza
Estilo 1 - Puerta lisa
Luces
Cuidado durante las vacaciones y mudanzas
Si Ud. decide dejar el refrigerador funcionando mientras está ausente
Limpieza del interior
SOLUCIÓN DE PROBLEMAS
Funcionamiento
de una visita de servicio técnico
Ruido
El motor parece
funcionar
excesivamente
Temperatura y humedad
La temperatura está
demasiado elevada
demasiado baja en el
Hielo y agua
Hay acumulación de
humedad en el interior
escarcha/hielo en el
El hielo o el agua tiene mal sabor, mal olor o un color grisáceo
Deseche ese hielo. Lave el depósito de hielo. Deje transcurrir
enjuagarse más. Enjuague el sistema de agua después de la
El despachador de agua y
hielo no funciona
un suministro de agua o no se ha
completamente la válvula de cierre de agua
Puertas
El agua del despachador
está tibia
Las puertas no cierran
HOJA DE DATOS DEL RENDIMIENTO
Hoja de datos
Sistema de filtración de agua
Modelo P6WB2L/P6RFWB2 Capacidad de 200 galones 757 litros
GARANTÍA LIMITADA DE LOS PRODUCTOS DE REFRIGERACIÓN MAYTAG
GarantÌa
GARANTÍA LIMITADA DURANTE EL PRIMER AÑO PIEZAS Y MANO DE OBRA
EXCLUSIONES DE LA GARANTÍA Esta garantía limitada no cubre
Réfrigérateur avec porte à double battant et congélateur en bas
Guide d’utilisation et d’entretien
TABLE DES MATIÈRES
Sommaire
Entretien avant les vacances ou
SÉCURITÉ DU RÉFRIGÉRATEUR
DANGER AVERTISSEMENT
Votre sécurité et celle des autres est très importante
IMPORTANTES INSTRUCTIONS DE SÉCURITÉ
PIÈCES ET CARACTÉRISTIQUES
AVERTISSEMENT
Avant de jeter votre vieux réfrigérateur ou congélateur
Risque de suffoquer Enlever les portes de votre vieux réfrigérateur
INSTRUCTIONS D’INSTALLATION
Installation
Quoi de neuf en coulisse?
Déballage du réfrigérateur
Exigences demplacement
Déplacement de votre réfrigérateur
Nettoyage avant l’utilisation
Risque dexplosion
Retrait et réinstallation des portes du réfrigérateur
Retrait et réinstallation des portes
Style 1 - Distributeur deau
Raccordement du tuyau
Retrait de la porte de droite du réfrigérateur
de ³⁄₁₆
Réinstallation de la porte de droite du réfrigérateur
Réinstallation de la porte de gauche du réfrigérateur
Étapes finales
REMARQUES
Retrait et réinstallation de lavant du tiroir de congélation
Réinstallation de lavant du tiroir
Retrait de lavant du tiroir
Ne pas utiliser un adaptateur Ne pas utiliser un câble de rallonge
Méthode recommandée de mise à la terre
Spécifications électriques
Spécifications de l’alimentation en eau
Raccordement à la canalisation deau
Raccordement à la canalisation deau
Raccordement au réfrigérateur
Installation
Installation et démontage des poignées
Installation
Achever linstallation
Installation des poignées
Mise à niveau du réfrigérateur, fermeture et alignement des portes
Démontage des poignées
Pour régler l’inclinaison du réfrigérateur
Alignement des portes
Stabilisation du réfrigérateur
FILTRES ET ACCESSOIRES
Installation du filtre à eau
Système de filtration de leau
Témoin lumineux du filtre à eau
Installation du filtre à air sur certains modèles
Remplacement du filtre à eau
Installation du filtre à air
Modèles avec encoches
Installation du conservateur pour produits frais sur certains modèles
Remplacement du filtre à air
Installation du conservateur pour produits frais
Modèles sans encoches
Accessoires
Installation du témoin
Remplacement du sachet de conservation pour produits frais
Nettoyant pour acier inoxydable affresh
Utilisation des commandes
UTILISATION DU RÉFRIGÉRATEUR
Utilisation
Ouverture et fermeture des portes
Température recommandée du réfrigérateur
Température recommandée du congélateur
Voir les points de réglage de température
Ajustement des points de réglage de température
Alarme de porte entrouverte
Statut du filtre à eau
Témoin de coupure de courant sur certains modèles
Caractéristiques supplémentaires
Distributeurs deau et de glaçons
Utilisation
Désactivation des signaux sonores sur certains modèles
Mode Showroom exposition
Distribution deau
Distribution de glace
Distribution deau et de glaçons
Lumière du distributeur
Retrait et réinstallation du bac dentreposage à glaçons
Machine à glaçons et bac d’entreposage à glaçons sur certains modèles
Taux de production des glaçons
Mise en marche/arrêt de la machine à glaçons
Dépose et réinstallation dune tablette/dun cadre de tablette
CARACTÉRISTIQUES DU RÉFRIGÉRATEUR
Tablettes du réfrigérateur
Mise en marche/arrêt de la machine à glaçons
Commande dhumidité dans le bac à légumes
Style 1 - Commande électronique
Dépose et réinstallation du/des bacs à légumes
Bac à légumes et couvercle du bac à légumes
Style 2 - Commande manuelle
Dépose et réinstallation du tiroir
Réinstallation de la cloison
Réinstallation du tiroir
CARACTÉRISTIQUES DU CONGÉLATEUR
ENTRETIEN DU RÉFRIGÉRATEUR
Entretien
Espace à pizza et cloison de tiroir
Lampes
Style 2 - Acier inoxydable
Nettoyage de l’intérieur
Nettoyage du condensateur
Entretien avant les vacances ou lors d’un déménagement
Vacances
Déménagement
Entretien
et la FAQ foire aux questions
DÉPANNAGE
Fonctionnement
pour éviter le coût dune intervention de dépannage
La commande de
Bruits
Le moteur semble
fonctionner
Température et humidité
La température est trop
élevée
basse dans le réfrigérateur
Glaçons et eau
basse dans les garde
manger
Il y a accumulation
Les glaçons sont creux ou
petits
Mauvais goût, mauvaise
odeur ou couleur grise des
Le distributeur deau et de glaçons ne fonctionne pas correctement
Le distributeur de glaçons
se bloque lorsquil distribue
de la glace “concassée”
Portes
Leau du distributeur est
tiède
Les portes ne ferment pas
FEUILLE DE DONNÉES SUR LA PERFORMANCE
Système de filtration d’eau
Modèle P6WB2L/P6RFWB2 Capacité 200 gallons 757 litres
Modèle P6WB2NL/P6RFWB2 Capacité 200 gallons 757 litres
GARANTIE LIMITÉE DES APPAREILS DE RÉFRIGÉRATION MAYTAG
Garantie
GARANTIE LIMITÉE DURANT LA PREMIÈRE ANNÉE PIÈCES ET MAIN-DŒUVRE
GARANTIE LIMITÉE DE LA DEUXIÈME À LA DIXIÈME ANNÉE
Serial Number
Model Number
Country
Call
Top
Page
Image
Contents