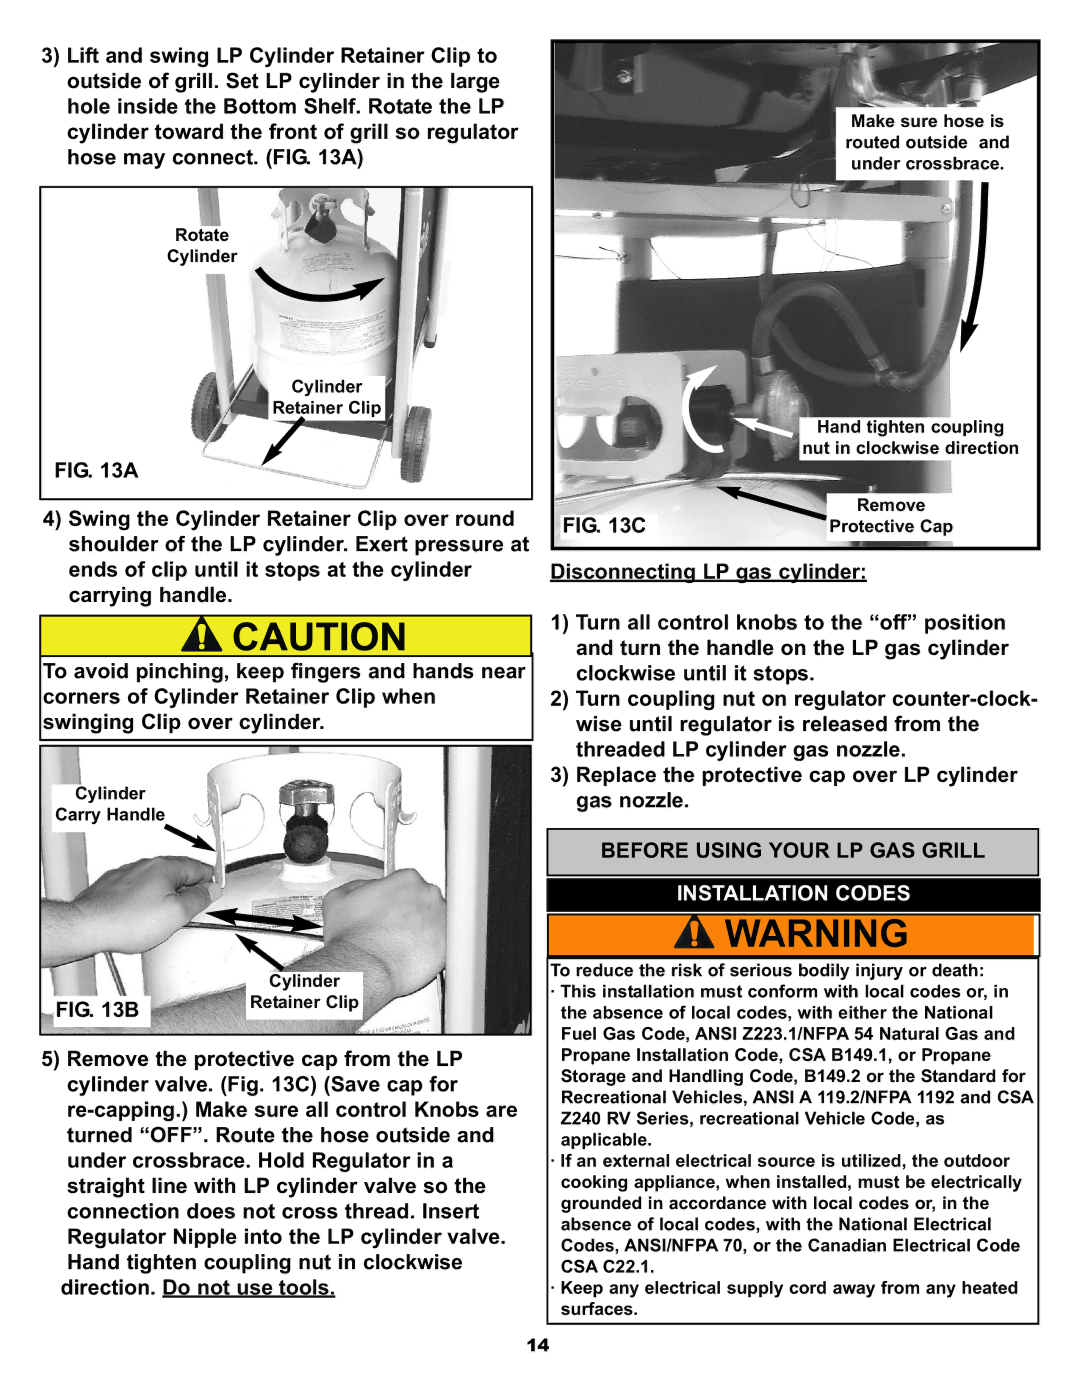
3) Lift and swing LP Cylinder Retainer Clip to |
|
|
|
| |
outside of grill. Set LP cylinder in the large |
|
|
hole inside the Bottom Shelf. Rotate the LP |
| Make sure hose is |
cylinder toward the front of grill so regulator |
| routed outside and |
hose may connect. (FIG. 13A) |
| under crossbrace. |
|
|
|
Rotate |
|
|
Cylinder |
|
|
|
|
|
|
| Cylinder |
|
|
|
|
|
| ||
|
|
|
|
| Retainer Clip |
|
|
|
| Hand tighten coupling | |||
| FIG. 13A |
|
|
|
|
|
|
|
|
| nut in clockwise direction | ||
|
|
|
|
|
|
|
|
| Remove | ||||
4) Swing the Cylinder Retainer Clip over round |
|
| FIG. 13C | ||||||||||
| shoulder of the LP cylinder. Exert pressure at |
| Protective Cap | ||||||||||
| ends of clip until it stops at the cylinder | Disconnecting LP gas cylinder: | |||||||||||
| carrying handle. |
|
|
|
|
| 1) Turn all control knobs to the “off” position | ||||||
|
|
|
|
|
|
|
|
| |||||
To avoid pinching, keep fingers and hands near |
|
|
| and turn the handle on the LP gas cylinder | |||||||||
|
| ||||||||||||
|
|
| clockwise until it stops. | ||||||||||
corners of Cylinder Retainer Clip when |
| 2) Turn coupling nut on regulator | |||||||||||
swinging Clip over cylinder. |
|
| wise until regulator is released from the | ||||||||||
|
|
|
|
|
|
|
|
|
| threaded LP cylinder gas nozzle. | |||
|
|
|
|
|
|
|
|
| |||||
|
|
|
|
|
|
|
|
| |||||
| Cylinder |
|
|
|
|
|
| 3) Replace the protective cap over LP cylinder | |||||
|
|
|
|
|
|
|
| gas nozzle. | |||||
| Carry Handle |
|
|
|
|
|
|
| |||||
|
|
|
|
|
|
|
|
|
| BEFORE USING YOUR LP GAS GRILL |
| ||
|
|
|
|
|
|
|
|
|
|
| INSTALLATION CODES |
| |
|
|
|
|
|
|
|
|
|
|
|
| ||
|
|
|
|
|
|
|
|
|
|
|
| ||
|
|
|
|
|
|
|
|
|
|
| |||
|
|
|
|
|
|
|
|
| To reduce the risk of serious bodily injury or death: | ||||
|
|
|
|
|
|
|
|
| |||||
|
|
|
|
| Cylinder |
|
|
| |||||
|
|
|
|
|
|
|
| · This installation must conform with local codes or, in | |||||
| FIG. 13B |
| Retainer Clip |
|
|
|
| the absence of local codes, with either the National | |||||
|
|
|
|
|
|
|
|
|
| Fuel Gas Code, ANSI Z223.1/NFPA 54 Natural Gas and | |||
|
|
|
|
|
|
|
|
| |||||
|
|
|
|
|
|
|
|
| |||||
5) Remove the protective cap from the LP | |||||||||||||
| Propane Installation Code, CSA B149.1, or Propane | ||||||||||||
| cylinder valve. (Fig. 13C) (Save cap for |
| Storage and Handling Code, B149.2 or the Standard for | ||||||||||
|
| Recreational Vehicles, ANSI A 119.2/NFPA 1192 and CSA | |||||||||||
|
| Z240 RV Series, recreational Vehicle Code, as | |||||||||||
| turned “OFF”. Route the hose outside and |
| applicable. |
|
| ||||||||
| under crossbrace. Hold Regulator in a | · If an external electrical source is utilized, the outdoor | |||||||||||
| straight line with LP cylinder valve so the |
| cooking appliance, when installed, must be electrically | ||||||||||
| connection does not cross thread. Insert |
| grounded in accordance with local codes or, in the | ||||||||||
|
| absence of local codes, with the National Electrical | |||||||||||
| Regulator Nipple into the LP cylinder valve. |
| Codes, ANSI/NFPA 70, or the Canadian Electrical Code | ||||||||||
| Hand tighten coupling nut in clockwise |
| CSA C22.1. |
|
| ||||||||
| direction. Do not use tools. | · Keep any electrical supply cord away from any heated | |||||||||||
|
|
|
| 14 |
| surfaces. |
|
| |||||
|
|
|
|
|
|
|
| ||||||
