SETTING THE CHANNELS
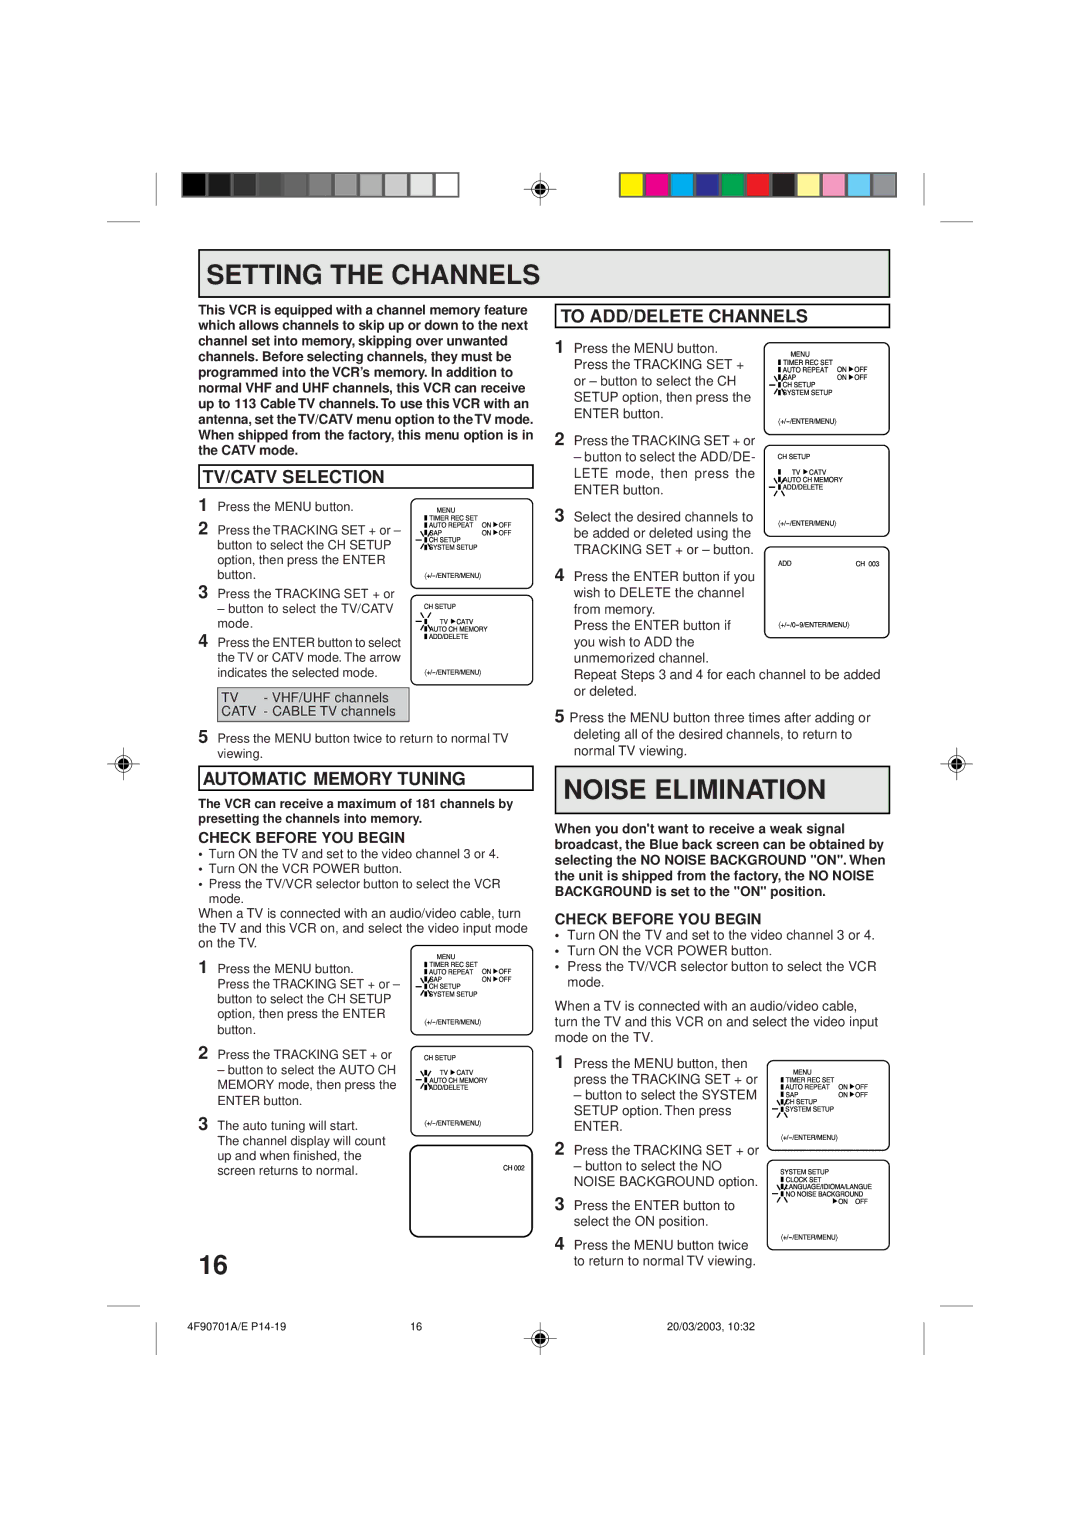
This VCR is equipped with a channel memory feature which allows channels to skip up or down to the next channel set into memory, skipping over unwanted channels. Before selecting channels, they must be programmed into the VCR’s memory. In addition to normal VHF and UHF channels, this VCR can receive up to 113 Cable TV channels. To use this VCR with an antenna, set the TV/CATV menu option to the TV mode. When shipped from the factory, this menu option is in the CATV mode.
TV/CATV SELECTION
TO ADD/DELETE CHANNELS
1 Press the MENU button. | MENU |
|
|
Press the TRACKING SET + | TIMER REC SET | ON | OFF |
AUTO REPEAT | |||
or – button to select the CH | SAP | ON | OFF |
CH SETUP |
|
| |
SETUP option, then press the | SYSTEM SETUP |
|
|
|
|
| |
ENTER button. |
|
| |
|
|
|
2Press the TRACKING SET + or
– button to select the ADD/DE- LETE mode, then press the ENTER button.
1Press the MENU button.
2Press the TRACKING SET + or – button to select the CH SETUP option, then press the ENTER button.
3Press the TRACKING SET + or
– button to select the TV/CATV mode.
4Press the ENTER button to select the TV or CATV mode. The arrow indicates the selected mode.
TV | - VHF/UHF channels |
CATV | - CABLE TV channels |
|
|
MENU |
|
|
TIMER REC SET | ON | OFF |
AUTO REPEAT | ||
SAP | ON | OFF |
CH SETUP |
|
|
SYSTEM SETUP |
|
|
|
|
CH SETUP
TV ![]() CATV
CATV
![]() AUTO CH MEMORY
AUTO CH MEMORY
![]() ADD/DELETE
ADD/DELETE
3 Select the desired channels to be added or deleted using the TRACKING SET + or – button.
CH 003
4Press the ENTER button if you wish to DELETE the channel
from memory.
Press the ENTER button if you wish to ADD the unmemorized channel.
Repeat Steps 3 and 4 for each channel to be added or deleted.
5 Press the MENU button three times after adding or |
5Press the MENU button twice to return to normal TV viewing.
deleting all of the desired channels, to return to |
normal TV viewing. |
AUTOMATIC MEMORY TUNING
The VCR can receive a maximum of 181 channels by presetting the channels into memory.
CHECK BEFORE YOU BEGIN
•Turn ON the TV and set to the video channel 3 or 4.
•Turn ON the VCR POWER button.
•Press the TV/VCR selector button to select the VCR
mode.
When a TV is connected with an audio/video cable, turn the TV and this VCR on, and select the video input mode on the TV.
NOISE ELIMINATION
When you don't want to receive a weak signal broadcast, the Blue back screen can be obtained by selecting the NO NOISE BACKGROUND "ON". When the unit is shipped from the factory, the NO NOISE BACKGROUND is set to the "ON" position.
CHECK BEFORE YOU BEGIN
• Turn ON the TV and set to the video channel 3 or 4. |
• Turn ON the VCR POWER button. |
1 | Press the MENU button. |
| Press the TRACKING SET + or – |
| button to select the CH SETUP |
| option, then press the ENTER |
| button. |
2 | Press the TRACKING SET + or |
| – button to select the AUTO CH |
| MEMORY mode, then press the |
| ENTER button. |
3 | The auto tuning will start. |
| The channel display will count |
MENU |
|
|
TIMER REC SET | ON | OFF |
AUTO REPEAT | ||
SAP | ON | OFF |
CH SETUP |
|
|
SYSTEM SETUP |
|
|
|
|
CH SETUP
TV ![]() CATV
CATV
![]() AUTO CH MEMORY
AUTO CH MEMORY
![]() ADD/DELETE
ADD/DELETE
• Press the TV/VCR selector button to select the VCR |
mode. |
When a TV is connected with an audio/video cable, turn the TV and this VCR on and select the video input mode on the TV.
1 Press the MENU button, then | MENU |
|
|
press the TRACKING SET + or |
|
| |
TIMER REC SET | ON | OFF | |
– button to select the SYSTEM | AUTO REPEAT | ||
CH SETUP | ON | OFF | |
| SAP | ||
SETUP option. Then press | SYSTEM SETUP |
|
|
|
|
| |
ENTER. |
|
| |
|
|
|
up and when finished, the |
screen returns to normal. |
CH 002
2 | Press the TRACKING SET + or |
| – button to select the NO |
| NOISE BACKGROUND option. |
3 | Press the ENTER button to |
| select the ON position. |
4 | Press the MENU button twice |
SYSTEM SETUP
![]() CLOCK SET
CLOCK SET
![]() LANGUAGE/IDIOMA/LANGUE
LANGUAGE/IDIOMA/LANGUE
![]() NO NOISE BACKGROUND
NO NOISE BACKGROUND ![]() ON OFF
ON OFF
16
to return to normal TV viewing. |
4F90701A/E | 16 | 20/03/2003, 10:32 |
