manuale dell'utente

eigenaar handleiding

COLLOCAZIONE DEL SUBWOOFER

Pannello Posteriore


Perché il nuovo subfwooer MIRAGE funzioni bene, è essenziale che si

6.

Modo Power


(Alimentazione) - Questo


trovi in una collocazione corretta. Le tre collocazioni più comuni sono:


interruttore può essere


in un angolo della stanza (ma può derivarne un suono rimbombante o


impostato su On (acceso),


una presenza eccessiva di basse frequenze), lungo una parete ma


Off (spento) od Auto


lontano dall’angolo (risposta dei bassi soddisfacente, con maggior


(automatico). Se l’interuttore


fedeltà rispetto alla posizione ad angolo), oppure accanto ad un


è nella posizione Off, il


altoparlante anteriore (ne risulta migliorata la mescolanza con


subwoofer è spento, ma in

6

l’altoparlante anteriore, a spese del volume complessivo). S’incoraggia


posizione On è sempre

l’ascoltatore a collocare il subwoofer in posizioni diverse, dato che


acceso. In posizione Auto, e


anche leggeri cambiamenti possono incidere favorevolmente


alla presenza di un segnale,


sull’effetto audio. Per un’ulteriore verifica, installare il subwoofer in


il subwoofer si accende e,


modo provvisorio nella posizione d’ascolto principale e, facendo


automaticamente, si spegne

7

suonare un brano musicale già conosciuto, camminare nella stanza fino


dopo vari minuti dalla

ad individuare il punto d’ascolto più indicato. Potrebbe essere questo


scomparsa del segnale.


un modo per scegliere la collocazione giusta del subwoofer.


7. Sub In – Questo ingresso è


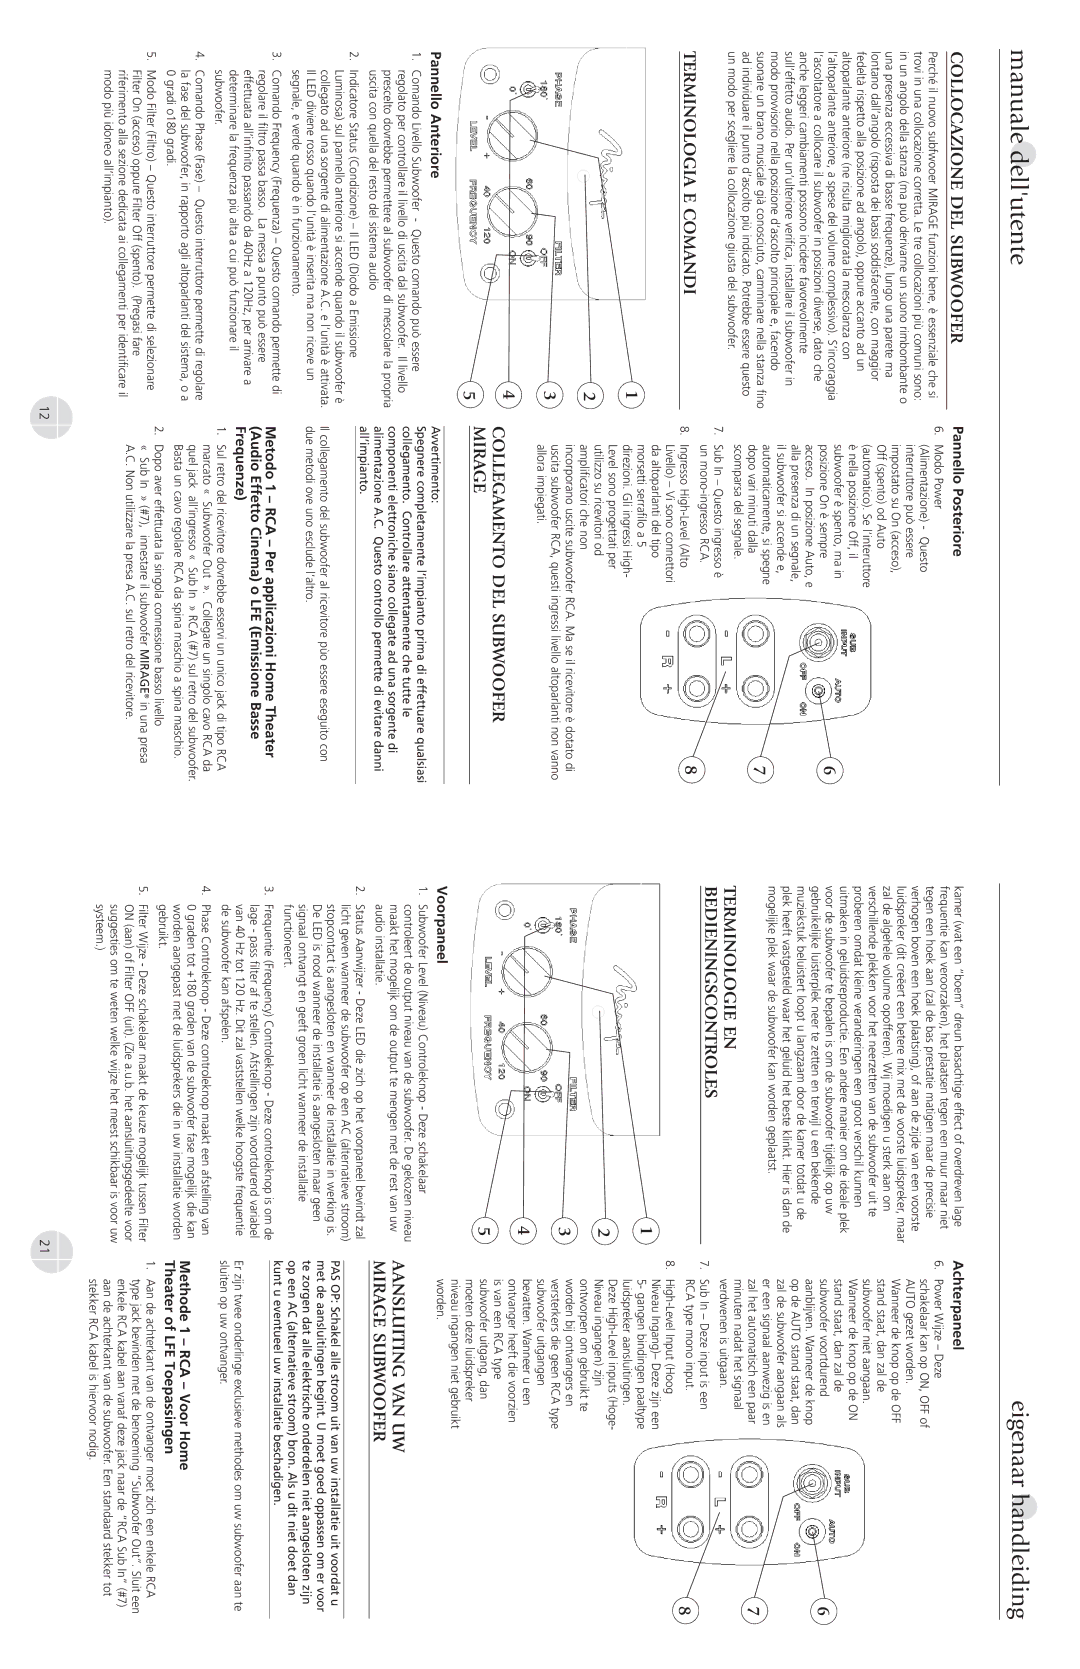
TERMINOLOGIA E COMANDI


un mono-ingresso RCA.

8

8.

Ingresso High-Level (Alto

kamer (wat een “boem” dreun basachtige effect of overdreven lage frequentie kan veroorzaken), het plaatsen tegen een muur maar niet tegen een hoek aan (zal de bas prestatie matigen maar de precisie verhogen boven een hoek plaatsing), of aan de zijde van een voorste luidspreker (dit creëert een betere mix met de voorste luidspreker, maar zal de algehele volume opofferen). Wij moedigen u sterk aan om verschillende plekken voor het neerzetten van de subwoofer uit te proberen omdat kleine veranderingen een groot verschil kunnen uitmaken in geluidsreproductie. Een andere manier om de ideale plek voor de subwoofer te bepalen is om de subwoofer tijdelijk op uw gebruikelijke luisterplek neer te zetten en terwijl u een bekende muziekstuk beluistert loopt u langzaam door de kamer totdat u de plek heeft vastgesteld waar het geluid het beste klinkt. Hier is dan de mogelijke plek waar de subwoofer kan worden geplaatst.

TERMINOLOGIE EN

BEDIENINGSCONTROLES

Achterpaneel

6.Power Wijze – Deze schakelaar kan op ON, OFF of AUTO gezet worden. Wanneer de knop op de OFF stand staat, dan zal de subwoofer niet aangaan. Wanneer de knop op de ON stand staat, dan zal de subwoofer voortdurend aanblijven. Wanneer de knop op de AUTO stand staat, dan zal de subwoofer aangaan als er een signaal aanwezig is en zal het automatisch een paar minuten nadat het signaal verdwenen is uitgaan.

7.Sub In – Deze input is een RCA type mono input.

6

7

8


Livello) – Vi sono connettori


da altoparlanti del tipo

1

morsetti serrafilo a 5

direzioni. Gli ingressi High-


Level sono progettati per

2

utilizzo su ricevitori od

amplificatori che non


incorporano uscite subwoofer RCA. Ma se il ricevitore è dotato di

3

uscita subwoofer RCA, questi ingressi livello altoparlanti non vanno

allora impiegati.


4

COLLEGAMENTO DEL SUBWOOFER


5

MIRAGE


8. High-Level Input (Hoog

1

Niveau Ingang)– Deze zijn een

5- gangen bindingen paaltype


luidspreker aansluitingen.

2

Deze High-Level inputs (Hoge-

Niveau ingangen) zijn


ontworpen om gebruikt te

3

worden bij ontvangers en

versterkers die geen RCA type


subwoofer uitgangen

4

bevatten. Wanneer u een


ontvanger heeft die voorzien

5

is van een RCA type

subwoofer uitgang, dan


moeten deze luidspreker

Voorpaneel

niveau ingangen niet gebruikt


Pannello Anteriore

Avvertimento:

worden.

1.Comando Livello Subwoofer - Questo comando può essere regolato per controllare il livello di uscita dal subwoofer. Il livello prescelto dovrebbe permettere al subwoofer di mescolare la propria uscita con quella del resto del sistema audio

2.Indicatore Status (Condizione) – Il LED (Diodo a Emissione Luminosa) sul pannello anteriore si accende quando il subwoofer è collegato ad una sorgente di alimentazione A.C. e l’unità è attivata. Il LED diviene rosso quando l’unità è inserita ma non riceve un segnale, e verde quando è in funzionamento.

Spegnere completamente l’impianto prima di effettuare qualsiasi collegamento. Controllare attentamente che tutte le componenti elettroniche siano collegate ad una sorgente di alimentazione A.C. Questo controllo permette di evitare danni all’impianto.

Il collegamento del subwoofer al ricevitore pùo essere eseguito con due metodi ove uno esclude l’altro.

1. Subwoofer Level (Niveau) Controleknop - Deze schakelaar

controleert de output niveau van de subwoofer. De gekozen niveau

maakt het mogelijk om de output te mengen met de rest van uw

audio installatie.

2. Status Aanwijzer - Deze LED die zich op het voorpaneel bevindt zal

licht geven wanneer de subwoofer op een AC (alternatieve stroom)

stopcontact is aangesloten en wanneer de installatie in werking is.

De LED is rood wanneer de installatie is aangesloten maar geen

signaal ontvangt en geeft groen licht wanneer de installatie

functioneert.

AANSLUITING VAN UW

MIRAGE SUBWOOFER

PAS OP: Schakel alle stroom uit van uw installatie uit voordat u met de aansluitingen begint. U moet goed oppassen om er voor te zorgen dat alle elektrische onderdelen niet aangesloten zijn op een AC (alternatieve stroom) bron. Als u dit niet doet dan

3.Comando Frequency (Frequenza) – Questo comando permette di regolare il filtro passa basso. La messa a punto può essere effettuata all’infinito passando da 40Hz a 120Hz, per arrivare a determinare la frequenza più alta a cui può funzionare il subwoofer.

4.Comando Phase (Fase) – Questo interruttore permette di regolare la fase del subwoofer, in rapporto agli altoparlanti del sistema, o a 0 gradi o180 gradi.

5.Modo Filter (Filtro) – Questo interruttore permette di selezionare Filter On (acceso) oppure Filter Off (spento). (Pregasi fare riferimento alla sezione dedicata ai collegamenti per identificare il modo più idoneo all’impianto).

Metodo 1 – RCA – Per applicazioni Home Theater (Audio Effetto Cinema) o LFE (Emissione Basse Frequenze)

1.Sul retro del ricevitore dovrebbe esservi un unico jack di tipo RCA marcato « Subwoofer Out ». Collegare un singolo cavo RCA da quel jack all’ingresso « Sub In » RCA (#7) sul retro del subwoofer. Basta un cavo regolare RCA da spina maschio a spina maschio.

2.Dopo aver effettuata la singola connessione basso livello

« Sub In » (#7), innestare il subwoofer MIRAGE® in una presa A.C. Non utilizzare la presa A.C. sul retro del ricevitore.

3.

Frequentie (Frequency) Controleknop - Deze controleknop is om de


lage - pass filter af te stellen. Afstellingen zijn voortdurend variabel


van 40 Hz tot 120 Hz. Dit zal vaststellen welke hoogste frequentie


de subwoofer kan afspelen.

4.

Phase Controleknop - Deze controleknop maakt een afstelling van


0 graden tot +180 graden van de subwoofer fase mogelijk die kan


worden aangepast met de luidsprekers die in uw installatie worden


gebruikt.

5.

Filter Wijze - Deze schakelaar maakt de keuze mogelijk tussen Filter


ON (aan) of Filter OFF (uit). (Zie a.u.b. het aansluitingsgedeelte voor


suggesties om te weten welke wijze het meest schikbaar is voor uw


systeem.)

kunt u eventueel uw installatie beschadigen.

Er zijn twee onderlinge exclusieve methodes om uw subwoofer aan te sluiten op uw ontvanger.

Methode 1 – RCA – Voor Home

Theater of LFE Toepassingen

1.Aan de achterkant van de ontvanger moet zich een enkele RCA type jack bevinden met de benoeming “Subwoofer Out”. Sluit een enkele RCA kabel aan vanaf deze jack naar de “RCA Sub In” (#7) aan de achterkant van de subwoofer. Een standaard stekker tot stekker RCA kabel is hiervoor nodig.

12

21

Page 12
Image 12
Mirage Loudspeakers OMNI-S8, S10 Collocazione DEL Subwoofer, Terminologia E Comandi, Terminologie EN Bedieningscontroles

S12, S10, OMNI-S8 specifications

Mirage Loudspeakers has carved a niche in the audio industry with its innovative approach to sound engineering. Among its esteemed lineup are the OMNI-S8, OMNI-S10, and OMNI-S12 models, each designed to elevate your listening experience through sophisticated technology and thoughtful design.

The OMNI-S8 is a compact yet powerful satellite speaker that embodies the brand's commitment to stunning acoustics. It features a 3-inch aluminum cone driver, ensuring clear and crisp audio reproduction across a range of frequencies. The speaker utilizes an advanced Waveguide technology, allowing for a wider dispersion of sound. This means you can enjoy consistent audio quality, whether you're seated directly in front of the speaker or off to the side. The OMNI-S8 is designed to blend seamlessly into any room, making it a versatile addition to home theater setups or multi-room audio systems.

Next in line is the OMNI-S10, a floor-standing speaker that takes sound to the next level. It incorporates a 10-inch woofer, engineered for deep bass response and dynamic range. The speaker features a tri-polar design, optimizing sound dispersion and creating a more immersive listening environment. The OMNI-S10's construction reduces cabinet resonance, minimizing distortion and ensuring that whether you're watching movies or enjoying music, every sound is clear and impactful. The sleek aesthetic and high-quality finishes also make it a visually pleasing addition to your décor.

Finally, we have the OMNI-S12, the flagship model that combines power and precision. This model is equipped with a dual 12-inch woofer system, designed for those who crave the ultimate bass experience. The OMNI-S12 employs proprietary technologies such as the Omni-directional sound field, allowing for 360-degree audio delivery. This feature transforms any room into a live performance space, enveloping listeners in a rich sound experience that feels real and captivating. The high-efficiency design ensures minimal power loss, making it not just powerful but also energy-efficient.

Each of these models is engineered with premium materials and cutting-edge technology, ensuring durability and long-lasting performance. With their distinct characteristics and features, the Mirage OMNI series serves audiophiles and casual listeners alike, providing an unparalleled listening experience that is nothing short of spectacular. Whether you're watching a film or enjoying your favorite album, the OMNI-S8, S10, and S12 deliver exceptional sound quality that transforms ordinary moments into extraordinary experiences.