Mitsubishi Electronics 164 Series manual IR Emitters, Placement, Highlight IR-NetCommand Output

Models: 154 Series 164 Series 265 Series

1 104
Download 104 pages 28.69 Kb
Page 61
Image 61

5. NetCommand IR Control (265 Series)

61

IR Emitters

Placement

6. Place any unused ends behind the devices to

The NetCommand system uses emitters connected

prevent stray signals from reaching the IR sensors.


to the IRNetCommand Output jack to control other


devices such as DVD players, cable boxes, satellite


receivers, and VCRs.


IR emitter cables are available for purchase from


Mitsubishi. Request either part number 242D483020


(two-ended cable) or part number 299P254020 (four-


ended cable).


1. Connect the plug end of the IR emitter cable to the


IR—NetCommand Output jack on the TV back panel.


2. When the New Device Found screen displays,


highlight IR—NetCommand Output.

Other A/V Device


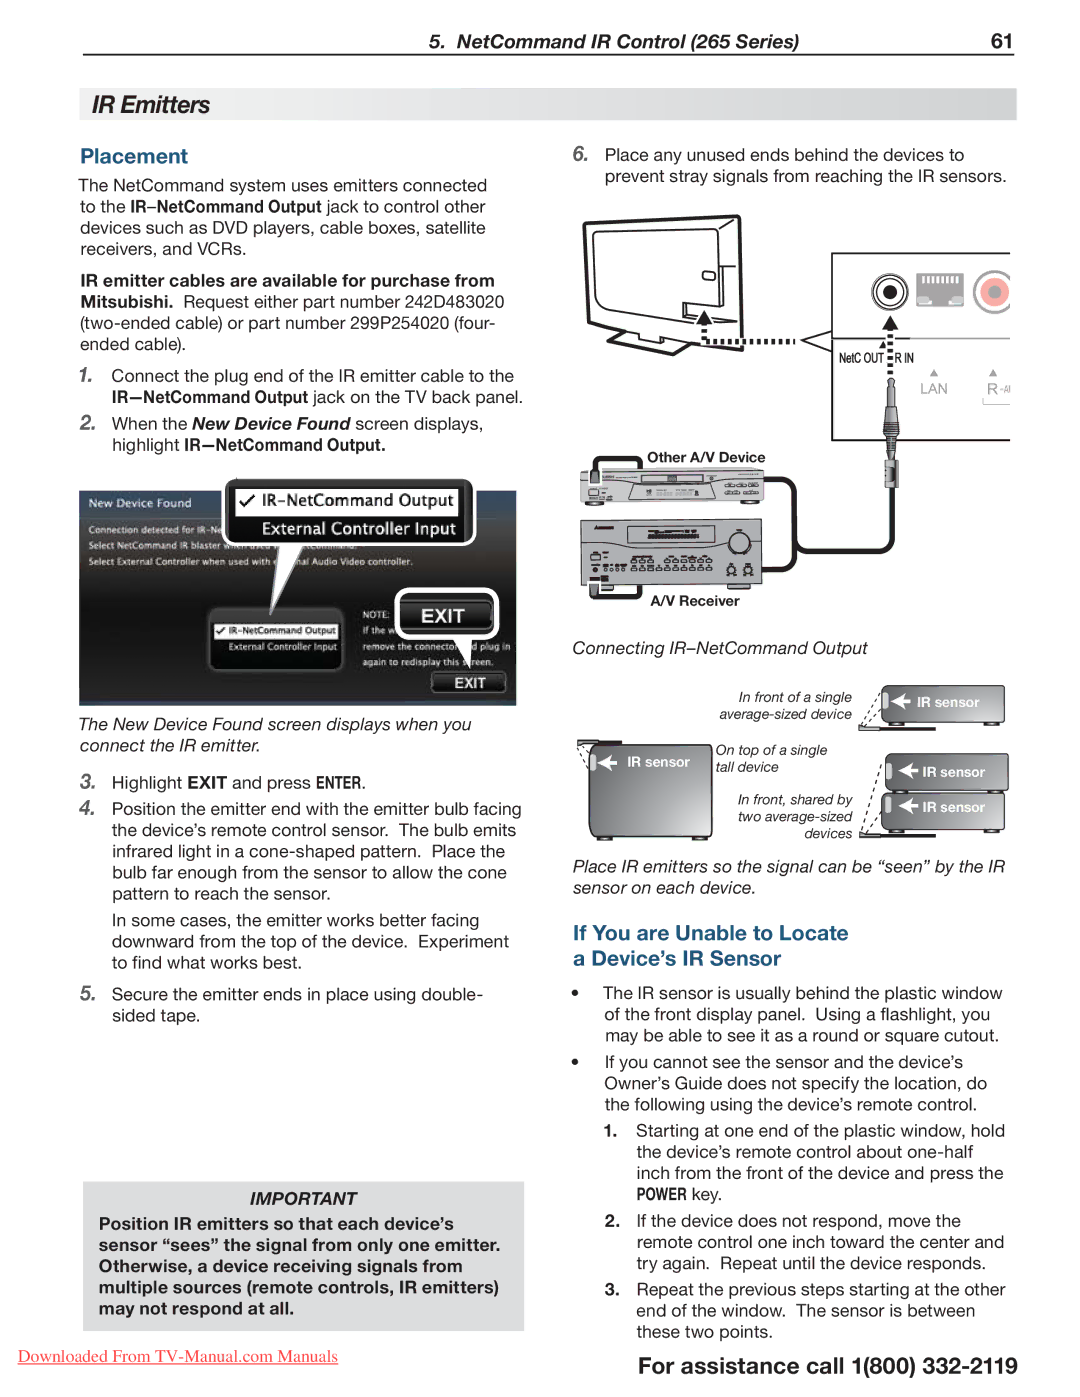
The New Device Found screen displays when you connect the IR emitter.

3.Highlight EXIT and press ENTER.

4.Position the emitter end with the emitter bulb facing the device’s remote control sensor. The bulb emits infrared light in a cone-shaped pattern. Place the bulb far enough from the sensor to allow the cone pattern to reach the sensor.

In some cases, the emitter works better facing downward from the top of the device. Experiment to find what works best.

5.Secure the emitter ends in place using double- sided tape.

IMPORTANT

Position IR emitters so that each device’s sensor “sees” the signal from only one emitter. Otherwise, a device receiving signals from multiple sources (remote controls, IR emitters) may not respond at all.

Downloaded From TV-Manual.com Manuals

A/V Receiver

Connecting IR–NetCommand Output


*OGSPOUPGBTJOHMF


*3TFOTPS


BWFSBHFTJ[FEEFWJDF


0OUPQPGBTJOHMF


*3TFOTPS


UBMMEFWJDF


*3TFOTPS


*OGSPOUTIBSFECZ


*3TFOTPS


UXPBWFSBHFTJ[FE


EFWJDFT


Place IR emitters so the signal can be “seen” by the IR sensor on each device.

If You are Unable to Locate a Device’s IR Sensor

The IR sensor is usually behind the plastic window of the front display panel. Using a flashlight, you may be able to see it as a round or square cutout.

If you cannot see the sensor and the device’s Owner’s Guide does not specify the location, do the following using the device’s remote control.

1.Starting at one end of the plastic window, hold the device’s remote control about one-half inch from the front of the device and press the POWER key.

2.If the device does not respond, move the remote control one inch toward the center and try again. Repeat until the device responds.

3.Repeat the previous steps starting at the other end of the window. The sensor is between these two points.

For assistance call 1(800) 332-2119

Page 61
Image 61
Mitsubishi Electronics 164 Series, 265 Series IR Emitters, Placement, If You are Unable to Locate a Device’s IR Sensor

154 Series, 164 Series, 265 Series specifications

Mitsubishi Electronics has established itself as a leader in the HVAC industry, offering a diverse range of products that cater to various needs. Among its notable offerings are the 265 Series, 164 Series, and 154 Series air conditioning units, each embodying advanced technology and user-friendly features.

The Mitsubishi 265 Series stands out for its energy efficiency and environmentally friendly operation. This series employs advanced inverter technology, which adjusts the compressor speed according to the cooling or heating demand, resulting in substantial energy savings. Additionally, the 265 Series is designed with quiet operation in mind, minimizing noise levels for residential and commercial settings. Its compact design allows for easy installation, and it is compatible with a range of indoor units, making it versatile for different applications.

In contrast, the 164 Series focuses on providing effective climate control in larger spaces. This series is equipped with multi-zone capability, allowing a single outdoor unit to connect with multiple indoor units. This flexibility makes it ideal for commercial buildings or residences with varying temperature needs in different areas. The 164 Series also features advanced filtration systems that improve indoor air quality by capturing dust, allergens, and other particles, ensuring a healthier environment.

The 154 Series, on the other hand, is engineered for simplicity and reliability. It is a more basic model designed for users who seek dependable performance without overwhelming features. The 154 Series offers straightforward controls and is easy to operate, making it suitable for both residential and light commercial applications. Despite its simplicity, it still boasts a commendable SEER rating, ensuring energy efficiency while providing comfortable temperature settings.

Across all three series, Mitsubishi Electronics incorporates a range of smart technologies. With compatibility for Wi-Fi control, users can manage their HVAC systems remotely, adjusting temperatures and settings from their smartphones or tablets. This feature enhances convenience and energy management, particularly in modern smart homes.

In summary, the Mitsubishi 265, 164, and 154 Series air conditioning units each offer unique advantages tailored to different consumer needs. From extreme energy efficiency and advanced filtration in the 265 Series to the multi-zone capabilities of the 164 Series, and the reliability of the 154 Series, Mitsubishi Electronics continues to push the boundaries of HVAC technology, ensuring superior comfort and performance in any environment.