Menu operation (continued)
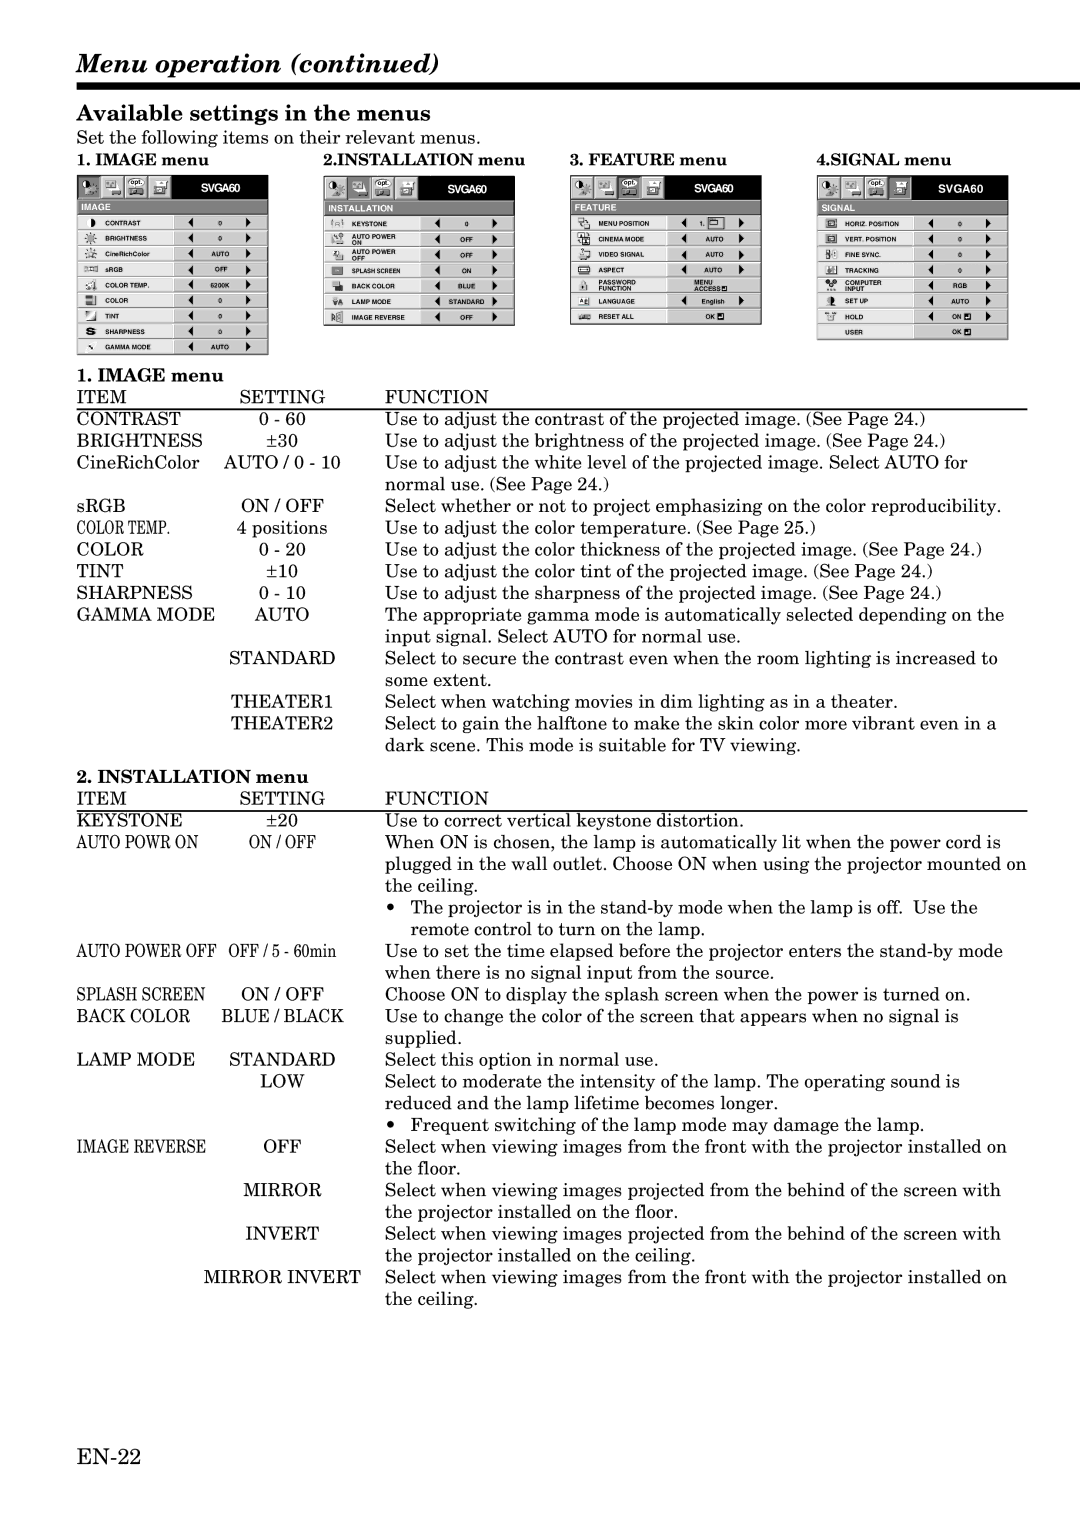
Available settings in the menus
Set the following items on their relevant menus.
1. IMAGE menu | 2.INSTALLATION menu | 3. FEATURE menu | 4.SIGNAL menu |
opt. | opt. | opt. | SVGA60 | opt. |
SVGA60 |
| SVGA60 | SVGA60 |
IMAGE | INSTALLATION |
| FEATURE |
| SIGNAL |
CONTRAST | 0 |
| KEYSTONE | 0 |
| MENU POSITION | 1. | HORIZ. POSITION | 0 |
BRIGHTNESS | 0 |
| AUTO POWER | OFF |
| CINEMA MODE | AUTO | VERT. POSITION | 0 |
| ON |
| |||||||
|
|
|
|
|
|
|
|
| |
CineRichColor | AUTO |
| AUTO POWER | OFF | ? | VIDEO SIGNAL | AUTO | FINE SYNC. | 0 |
| OFF |
| |||||||
|
|
|
|
|
|
|
|
| |
sRGB | OFF | ON | SPLASH SCREEN | ON |
| ASPECT | AUTO | TRACKING | 0 |
COLOR TEMP. | 6200K |
| BACK COLOR | BLUE |
| PASSWORD | MENU | COMPUTER | RGB |
|
| FUNCTION | ACCESS | RRGGBB INPUT | |||||
|
|
|
|
|
|
| |||
COLOR | 0 |
| LAMP MODE | STANDARD | A Ë | LANGUAGE | English | SET UP | AUTO |
TINT | 0 |
| IMAGE REVERSE | OFF |
| RESET ALL | OK | HOLD | ON |
SHARPNESS |
| 0 |
|
|
|
| USER |
| OK |
|
|
| |
GAMMA MODE |
| AUTO |
|
|
|
|
|
|
|
|
| ||
1. IMAGE menu |
|
|
|
|
|
|
|
|
|
|
| ||
ITEM |
| SETTING | FUNCTION |
|
|
|
|
| |||||
CONTRAST |
| 0 - 60 | Use to adjust the contrast of the projected image. (See Page 24.) |
|
|
|
|
| |||||
BRIGHTNESS |
| ±30 | Use to adjust the brightness of the projected image. (See Page 24.) |
|
|
|
|
| |||||
CineRichColor |
| AUTO / 0 - 10 | Use to adjust the white level of the projected image. Select AUTO for | ||||||||||
|
|
|
|
|
| normal use. (See Page 24.) |
|
|
|
|
| ||
sRGB |
| ON / OFF | Select whether or not to project emphasizing on the color reproducibility. | ||||||||||
COLOR TEMP. |
| 4 positions | Use to adjust the color temperature. (See Page 25.) |
|
|
|
|
| |||||
COLOR |
| 0 - 20 | Use to adjust the color thickness of the projected image. (See Page 24.) | ||||||||||
TINT |
| ±10 | Use to adjust the color tint of the projected image. (See Page 24.) |
|
|
|
|
| |||||
SHARPNESS |
| 0 - 10 | Use to adjust the sharpness of the projected image. (See Page 24.) |
|
|
|
|
| |||||
GAMMA MODE | AUTO | The appropriate gamma mode is automatically selected depending on the | |||||||||||
|
|
|
|
|
| input signal. Select AUTO for normal use. |
|
|
|
|
| ||
|
|
| STANDARD | Select to secure the contrast even when the room lighting is increased to | |||||||||
|
|
|
|
|
| some extent. |
|
|
|
|
| ||
|
|
| THEATER1 | Select when watching movies in dim lighting as in a theater. |
|
|
|
|
| ||||
|
|
| THEATER2 | Select to gain the halftone to make the skin color more vibrant even in a | |||||||||
|
|
|
|
|
| dark scene. This mode is suitable for TV viewing. |
|
|
|
|
| ||
2. INSTALLATION menu |
|
|
|
|
|
|
|
| |||||
ITEM |
| SETTING | FUNCTION |
|
|
|
|
| |||||
KEYSTONE |
| ±20 | Use to correct vertical keystone distortion. |
|
|
|
|
| |||||
AUTO POWR ON |
| ON / OFF | When ON is chosen, the lamp is automatically lit when the power cord is | ||||||||||
|
|
|
|
|
| plugged in the wall outlet. Choose ON when using the projector mounted on | |||||||
|
|
|
|
|
| the ceiling. |
|
|
|
|
| ||
•The projector is in the
AUTO POWER OFF | OFF / 5 - 60min | Use to set the time elapsed before the projector enters the |
|
| when there is no signal input from the source. |
SPLASH SCREEN | ON / OFF | Choose ON to display the splash screen when the power is turned on. |
BACK COLOR | BLUE / BLACK | Use to change the color of the screen that appears when no signal is |
|
| supplied. |
LAMP MODE | STANDARD | Select this option in normal use. |
| LOW | Select to moderate the intensity of the lamp. The operating sound is |
|
| reduced and the lamp lifetime becomes longer. |
•Frequent switching of the lamp mode may damage the lamp.
IMAGE REVERSE | OFF | Select when viewing images from the front with the projector installed on |
|
| the floor. |
| MIRROR | Select when viewing images projected from the behind of the screen with |
|
| the projector installed on the floor. |
| INVERT | Select when viewing images projected from the behind of the screen with |
|
| the projector installed on the ceiling. |
MIRROR INVERT | Select when viewing images from the front with the projector installed on | |
|
| the ceiling. |
